
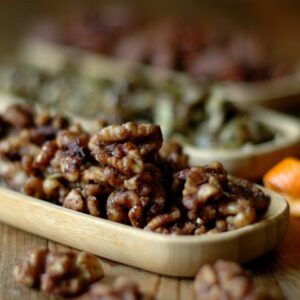
Learn how to make candied nuts and seeds for the holidays the real food way! Sprouted for better digestion and using better sweeteners without the junk!
 Product links in this post are affiliate links. It does not cost you anything and helps maintain the free information on this site, as well as answer the questions of “what brand do you use?” Please know I never personally recommend any product I wouldn’t use on my own family.
Harvest parties, Thanksgiving, & Holidays….oh my!
The next few months are sure to bring on party after party and gatherings almost weekly! I wanted to share with you a staple party snack I keep in my back pocket (technically just stashed away in my cupboard!) all holiday season, to make the holidays a bit less stressful, and still yummy real food. Keeping a stash of candied crispy nuts in my pantry ensures that I always have something to pass around when invited to last minute events that don’t leave me with enough time to cook, or where I’m not expected to bring a large dish to pass.
 An “evergreen” holiday treat for everyone!
 An “evergreen” holiday treat for everyone!
Whether its a snack bowl out on trick-or-treat night, the appetizer table at Thanksgiving, or the big holiday party at home or the office, candied pecans, walnuts, almonds, or any type of mixed nuts or seeds are always a hit. And there are always those present at these events that will be thankful to have a healthier, more protein rich treat to snack on versus the starchy cookies and candies hanging around.
 My special real food ingredients, and some notes on sprouting!
 My special real food ingredients, and some notes on sprouting!
Because you really can make a few little swaps and techniques to make these holiday nuts easier on digestion, more nutritious, less processed – and still taste amazing!
- Soaking/Sprouting :: I leave directions for both in the instructions. Soaking takes the phytic acid levels down so the nuts and seeds are easier on digestion. It takes just 7 hours of hands free time to soak (think over-night while you are sleeping!), so it really isn’t an inconvenience. If you have the time to take an extra day or 2, I recommend sprouting your nuts and seeds! It sounds intimidating, but it is really so simple. After soaking, you simply drain the water and let the nuts and seeds sit in the bowl until they start to sprout a little “tail” over the next 24-36 hours. It is a little extra time, yes, but super hands free, and so special! If you make big double and triple batches of these candied sprouted nuts, you can keep them stashed away for quick grab and go party snacks.
- Dehydrating under 150 degrees :: Dehydrating versus baking or roasting maintains the integrity of the nut and seed oils. It is just a healthier way to consume them!
- Coconut Sugar :: Instead of corn syrup or even “regular” white sugar, I always swap for coconut sugar. The glycemic index is lower which keeps blood sugars happier. It is an easy swap, and since coconut sugar has become more mainstream, you can find it even in regular grocery stores.
- Molasses :: I once tried a candied almond recipe at a party that just really “wow-ed” me. I remembered thinking there was just something different about this recipe and ended up tracking down the guest that made them to ask what their secret was. It was brown sugar! Technically, brown sugar is just sugar mixed with a bit of molasses, so I’ve got the ratios down in my recipe to make a sort of “coconut sugar brown sugar,” and the warmth of the flavor will blow you away!
Special hints of flavor options
 Special hints of flavor options
Don’t be afraid to mix things up a bit! Most people are pretty used to the typical sweet, candied nuts, but adding special aromas or spicy hits will make your recipe really special.
- Pumpkin Pie Spice :: Not just for that latte or pie! This makes Halloween trick-or-treating parties so fun for snacking with your pumpkin spice lattes for the adults and warm apple cider for the kids!
- Cayenne :: This is certainly optional when serving to little kids, but if you are attending an adult party, go for this one! Just a small pinch gives a flavorful heat that goes so well with the sweet and salty flecked candy shell.
- Orange Zest :: My personal favorite! I think it just brings a happy, bright aroma to the bowl, and it leaves people asking “what is that in there?” – in a really good way! Serve with warm mugs of Winter Wassail – it compliments it so well!
- Vanilla :: I have mixed vanilla bean to the coconut sugar mixture once before to serve with chilled mugs of real food eggnog, and it was SO good! Very special!
- Cacao :: Dust in a few teaspoons of raw cacao for a chocolate flavor! So good! Serve with warm mugs of hot buttered raw cacao hot cocoa (recipe is in my cookbook, Nourished Beginnings!) – it compliments it so well!
- Honey or Maple flavor :: You can swap out the coconut sugar for raw honey or pure maple syrup for a different sweet flavor too!
- Cinnamon :: Swap the pumpkin pie spice for cinnamon if that is more your flavor preference!
Notes for nut free friends or party guests
 Notes for nut free friends or party guests
My kiddos actually prefer candied seeds to nuts, so don’t be afraid to try out a seed mix even if you aren’t nut free! If you have party guests that have true nut allergies, just be sure you don’t dehydrate the seeds and nuts together in the same batch – do everything separate, and make sure the tools are all washed up real good in between. In fact some can’t even be in the same room as the nuts, so if you know this ahead of time, just stick to a seed mix and leave any nuts out. The seeds are just as festive and taste amazing.
I prefer a mix of sunflower and pumpkin seeds but there are so many things you can do. Adding chia seeds will make more “clusters” – almost like a candied seed “bark” and those just feel so special!
Notes for egg free friends or party guests
 Notes for egg free friends or party guests
I would love to hear from my egg free readers how this works out, but I would imagine that a flax egg – or really just half of a flax egg – would work out just fine here. The egg white combines with the coconut sugar to create the candied coating. I have seen recipes where you combine water and the sugar and bring to a boil until a thick candy coating is made. Let us know in the comments if you have tried this – I would love to make this post a great resource for friends that need to make these allergy swaps.
A quick note about dehydrating/cook methods
 A quick note about dehydrating/cook methods
Do not. I repeat do NOT, not make these just because you don’t have a dehydrator 🙂 YES dehydrating nuts and seeds below 150 degrees maintains the integrity of the nut oils and nutrients, but I would rather you make these in your oven than not make them at all, and buy crummy ingredient holiday nuts at the store. If you make them in the oven, just be sure to stir them around so they dry out evenly – it is more hands on than using a dehydrator, but it works.
If it happens to fit on your birthday or holiday wishlist, I get SO much use out of my dehydrator, and have had it for years. It is a great investment. If you want to make homemade granola for breakfast and snacks much easier with less hands on time, homemade jerky, and other dehydrated goods, you will not regret it. I have this “middle of the road” dehydrator, though I will definitely be spending the money when mine finally gives out to get a more quality dehydrator. Mine is 6 years old now and does not maintain the heated temperature as evenly (it’s tuckering out!), so I’ll be investing in a more quality dehydrator soon.

How To Make Sprouted Candied Nuts and Seeds
Ingredients
- 2 cups raw nuts and/or seeds of choice
- 2 tsp sea salt for soaking
- 1 egg white
- 1/4 – 1/3 cup coconut sugar

- 1 tsp blackstrap molasses
- 2 tsp pumpkin pie spice See above section for different flavoring options to swap here from vanilla and cacao to cinnamon!
- Zest of 1 orange Optional if you enjoy the citrus aroma and a hint of citrus to the nuts/seeds
- Up to ¼ tsp cayenne pepper Optional only if you want some heat to your mixture – I’d leave this out if serving to kids – I make a separate batch with some heat just for the adults because it’s so yummy!
- Sea salt to sprinkle over top to your preference
Instructions
- Put the raw nuts/seeds into a medium mixing bowl with 2 tsp sea salt and fill the bowl with water to cover the nuts/seeds. Stir the mixture around to dissolve the sea salt, and then cover with a towel. Let the soaking nuts/seeds sit on the counter 7-12 hours to soak. This soaking process breaks down the phytic acid in the nuts/seeds making them easier on digestion. You could also sprout your nuts/seeds if you have the time to take that process further for more nutrient availability. After 12 hours of soaking, drain the water, cover with a towel, and let the nuts/seeds sit on the counter for 24-36 hours until you see a little sprout of a tail. Rinse and drain the nuts/seeds a couple times a day during this sprouting time.
- After soaking (or sprouting) your nuts/seeds, drain the water. Whisk the egg white, coconut sugar, and pumpkin pie spice (and cayenne if using it) in a small mixing bowl, and then put the drained nuts/seeds in. Stir the nuts/seeds with the coconut sugar mixture to coat evenly.
- Spread your coconut sugar coated nuts/seeds over a dehydrator tray (or baking sheet if using an oven). If you are dehydrating the nuts/seeds, you can dehydrate under 150 degrees to keep the nutrients and oils stable in the nuts/seeds. This will take around 12-24 hours depending how high you set your temp – I do about 135 degrees and it takes about 12 or so hours (this is the dehydrator I use.). If you are using an oven, you can bake at 250 degrees for about 30 minutes to an hour. Stir them around once or twice while baking to make sure they dry out all the way.
- Store your crispy candied nuts and seeds in an airtight container in the pantry.
 More real food recipes you might like ::
 More real food recipes you might like ::
- Real Food Gluten Free Gingerbread Cookies
- Cranberry Baked Pears
- Cranberry Orange Granola
- Winter Wassail
- Real Food Simple & Quick Eggnog
- How To Make Gluten Free Christmas Cookie Cut-Outs & Natural Decorating Ideas!
- Healthier Halloween Tips and Ideas!


Oooohh I love that orange zest and molasses in there. I bet the flavor is so good combined with the coconut sugar and pumpkin spices. SO yummy! Thank you for sharing a healthier way for making these.
What a great list of ideas! I am very familiar with the benefits of soaking and sprouting as I ate lots of sprouts growing up and we always soaked our beans overnights as we ate beans often too. But I love your suggestions on candied seeds, on using molasses and on using dehydrator as an alternative to roasting! I think there are many good options you presented here for real food snacks in the upcoming holiday season, and nuggets of knowledge to take away.
I did not know it was possible to sprout pecans! I also love that you give people permission to use their ovens if they don’t have dehydrators! I’m sure some perfectionists will find relief in that!
These look sooo delicious! I love the idea of soaking and sprouting for better digestion. I should do it more but I get so lazy. You are inspiring me to start again!
Great info and recipes! Beautiful photos too!
What a great recipe! If you have a party and serve these, can I get an invite, ha ha! Thanks for sharing this, Renee!
Yeeesss!! I’m so glad you always share this truth in your recipes and posts; yay!!! 🙂 Lovely recipe!
These look so yummy, I just want to grab a handful right now. And love how many options you’ve given for adding different spice mixes in there 🙂
This is such a great idea for making healthy holiday gifts. Love the variety of spice blends here, and I can’t wait to experiment with my own!
Candied nuts are my weakness! These all look so good and I love all the variations of them! Pinning this for Christmas time 🙂
Wow, I love anything made more healthy. These are lovely too!
I love making these for my family, way way better than the crappy junk food ones in the supermarket. These nuts were my daughters go-to snack during her big exams last year.
I’ve heard of sprouting nuts and seeds, but I haven’t tried it yet, and the flavor combo sounds so good I can’t wait to give them a try!
This looks like such a tasty Fall treat. I so appreciate your creativity, Renee!
Sprouted nuts are most delicious! Thanks for sharing your lovely recipe !
This information is SO helpful!! I definitely notice a difference in how I digest sprouted nuts/seeds and it’s nice to know how to do it myself to save money….they get pricey to buy pre-sprouted!
What a delicious snack! Yes I definitely notice a difference when my nuts are sprouted.
PERFECT! Just in time for the holidays. YUM!
What a great idea for a healthier holiday treat!!
Mmmm – such a great idea for gifts AND for snacking on yourself! Love that you have seeds in here in addition to nuts.
I love candied nuts! What a great idea to make them yourself. So much healthier. 🙂
I love that you done a healthier version on candied nuts, all of those different spice variations sound delicious!
Oooo, I want to try this recipe! Is there a way to make these vegan?
Hi Sherri! I’m not sure how to get that candy coating without the egg. I’m sorry!