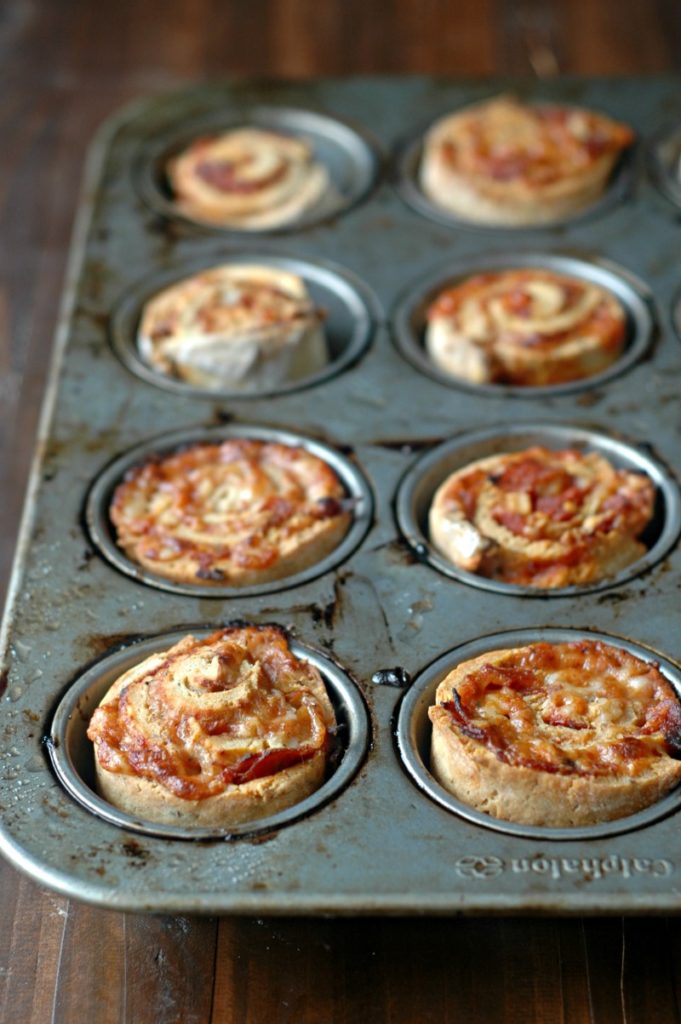
These easy prep, freezer friendly, gluten free pizza pinwheels can be used for everything from lunchboxes to game day!

Reunited and it feels so good!
I feel like I spent my late summer and entire fall buried under a rock! Buried under a rock writing a cookbook, that is! We did come out and enjoy all that our Michigan fall has to offer, with hiking, beach play, and leaf piles, but I have missed communicating with you in this space, and I’m so excited to be back. My new lunchbox cookbook, “The Little Lunchbox Cookbook,” is in the editing process for the winter, and will release later this summer! I couldn’t think of a better way to jump back into the blog than with a fun lunchbox idea, since I’ve spent the greater part of the last 6 months in lunchbox mode writing the new cookbook.

Pizza day with a twist…literally!
One thing that having 3 kids spanning grade levels from kindergarten to 5th grade has taught me is that everyone could use a mid-week “fun lunch.” If you follow my #RGNSchoolLunch hashtag on Instagram, you’ll notice a pattern to Wednesdays. They are typically more on the “fun” side of things. Not that the other lunches that are packed are “boring” per say, but something like a yogurt parfait, spaghetti thermoses, and pizza lunchable copycats (the recipe for the soft, grain free flatbreads for these will be in my new lunchbox cookbook!) just make the mid-week fly by. Instead of Wednesday being just another day, the kids will have something small to look forward to in their lunch, and before you know it you are half way to the weekend!

These look…fancy – it must be fussy?!
Fast, freezer friendly, and something that moms are *actually* going to do (read, not complicated!)…those were all thoughts in the forefront of my mind when I was creating my new lunchbox cookbook. So when I had the idea for using the pinwheel concept that so many kids love, made into a pizza package, I knew that I needed to make it busy momma friendly. There is no dough rising, or extra steps. You’ll mix the easy pizza dough, roll it out, spread the toppings, and roll it into a log! Once you cut the pizza log into pinwheels, you’ll simply bake them in a muffin tin. And did I mention they freeze great?! Because that means you can make these on the weekend with the kids and stash them away for Wednesday!
Here’s the step by step for my visual friends!
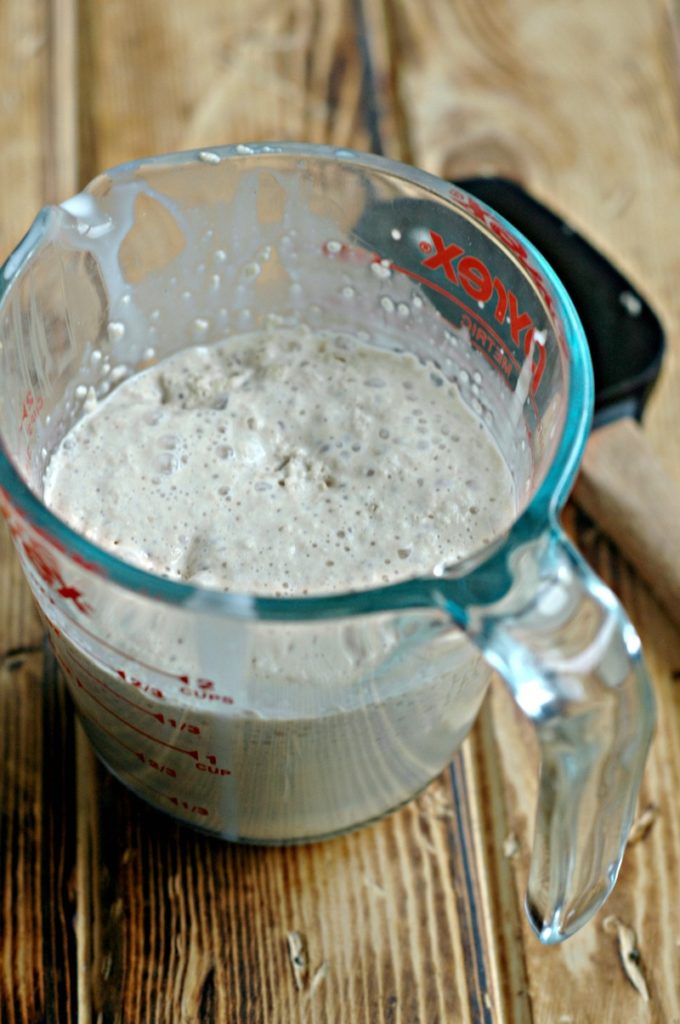
1. While the yeast is blooming, you’ll get the rest of the ingredients into the bowl…
2. Then the dough gets mixed up – it’s so soft and easy to work with!

3. You’ll cut the dough in half and work with a small, rolled out rectangle of dough. It is easier to work with the dough this way.

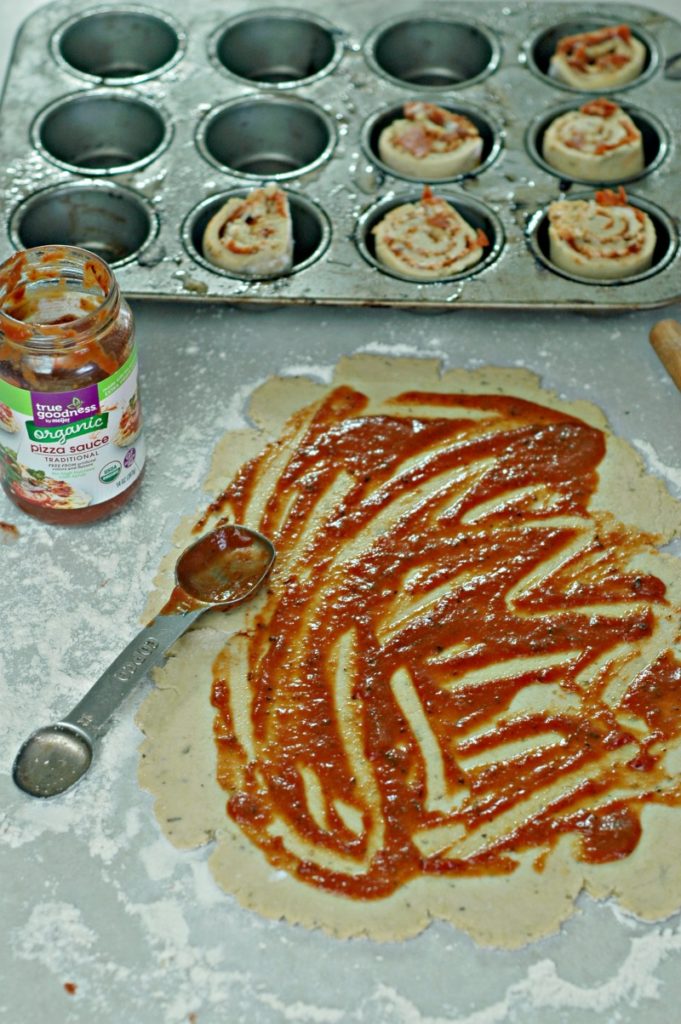
4. Spread the sauce…
5. Add the chopped pepperoni…

6. Sprinkle the cheese…

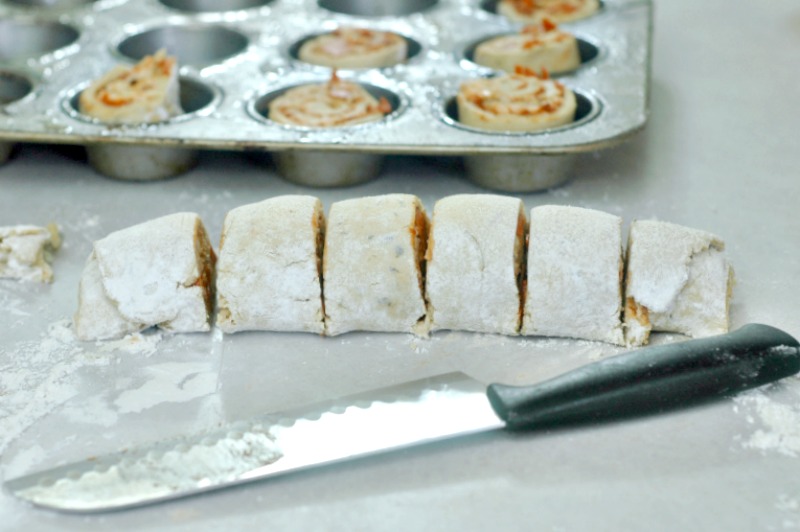
7. Then roll it up!

8. Once you slice the log of dough, you can place them into your muffin pan and spray the tops – they need just 20 minutes in the oven after that!
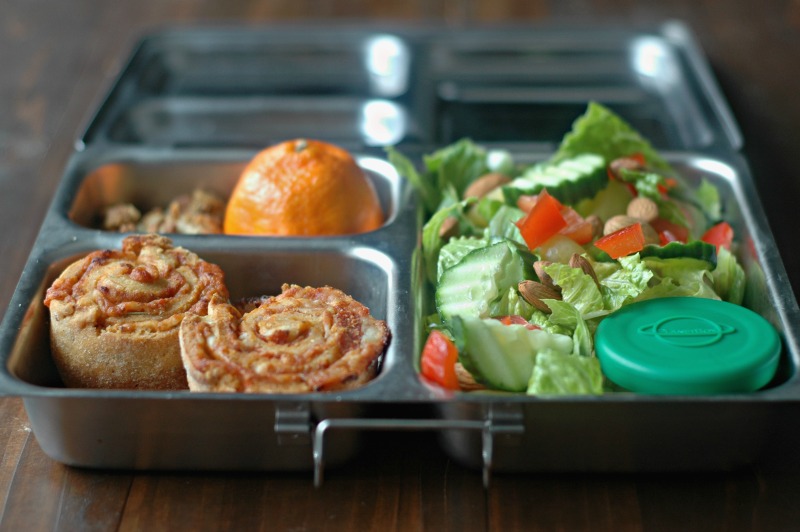
How to Pack Pizza Pinwheels for little kids
Most of your littles will eat one or two pizza pinwheels, depending on how big you make them. The pinwheels are a decent source of protein, fat, and carb, so you can add some fresh fruit and veg on the side to make it a balanced lunchbox. If you have littles with bigger appetites, you might add a half avocado, some olives, coconut chips, or a handful of almonds.

How to Pack Pizza Pinwheels for big kids
Your older children will eat anywhere from 2 to 4 of these, and while I’m sure many grown teens could eat the whole muffin pan (ha!), the key to stretching this meal is all in the big salad. Send 2 or 3 pizza pinwheels along with a loaded salad to fill up your growing big kids. You can add nuts, hard boiled egg, and/or avocado to their salad to make it more filling, and add a fatty nourishing dressing and they should be good to go for the afternoon.
How to store pizza pinwheels in the freezer
Once you let your pizza pinwheels cool completely, you can toss them into gallon freezer bags into your freezer. They can be pulled out frozen right to your child’s lunchbox and they will be thawed by lunchtime. If you want to pull them from the freezer to warm up in the oven for a quick dinner, you can thaw them out and use a baking sheet to warm them back up in the oven.


Gluten Free Pizza Pinwheels
Ingredients
- 1 cup full fat coconut milk or regular milk
- 1 tbsp quality dry active yeast
- 2 tbsp coconut sugar or organic pure cane sugar
- 2 ½ cups Namaste Gluten Free Flour Blend plus some for sprinkling the counter to roll the dough out
- 1 egg
- 2 tbsp olive oil
- 1 tbsp aluminum free baking powder
- 2 tsp garlic powder
- 2 tsp onion powder
- 2 tsp Italian seasoning
- 1 tsp sea salt
- 6-7 tbsp pizza sauce of choice divided
- ½ cup chopped pepperoni divided
- 1 cup shredded cheese divided
Instructions
- Preheat the oven to 400 degrees, and spray a 12-cup muffin pan with avocado oil spray or olive oil spray.
- Measure 1 cup of coconut milk into a liquid measuring cup, and pour it into a small sauce pan to warm up until it is warm to touch – not hot. If it is too hot it will kill the yeast. While the coconut milk warms, put the yeast and coconut sugar into the liquid measuring cup. Pour the warm coconut milk over the yeast and sugar, and stir with a spatula until frothy and combined. Let this sit to bloom the yeast while you prepare the rest of the dough ingredients.
- Put the flour, egg, oil, baking powder, and seasonings into a medium mixing bowl. Once the yeast has made the coconut milk bubble (see above picture), it is bloomed, and you can pour this into the rest of the dough ingredients. Stir the dough with your spatula until the dough comes together. I start with my spatula and end kneading it with my hands.
- Roll the dough into a ball, and cut the dough in half. You’ll be making 2 rolls of pizza pinwheels. It is easier to work with the dough this way.
- Flour your counter and roll out one half of the dough into a rectangle, as thin as you can make it without it tearing or being to hard to roll up (about 1/8 to 1/4 inch). Spread 3-4 tablespoons of pizza sauce on the dough, sprinkle about ¼ cup of chopped pepperoni, and finally about ½ cup of shredded cheese.
- Starting at one end of the rectangle, tightly roll the dough to make a log. Slice off the un-even ends and then make about 5-6 pinwheels (about 2 inches wide each). Place the pinwheels inside your sprayed muffin pan, cut side up.
- Repeat steps 5 and 6 with the other half of the pizza dough, making another log of 5-6 pinwheels. Place these into the pan, and then spray the tops of all of the pinwheels with the avocado oil spray.
- Bake the pizza pinwheels in a 400 degree oven for 20 minutes, until the tops are golden brown. Let the pizza pinwheels cool 10 minutes in the pan before turning out onto a cooling rack. They will keep up to 3 days in the refrigerator. If you are freezing your pizza pinwheels, cool them completely and then store them in freezer bags in the freezer up to 3 months.


These look amazing!
I’ve made these twice now and they are great! The first time, I took a short cut and used a little leftover meat sauce. The second time I followed the recipe as is. They both were great! I’m glad I got the advice from you about manchego cheese because I seem to be tolerating it well! And after seeing lots of yummy recipes posted with the Namaste flour, this one put me over the edge to finally purchase and now I am excited to try lots more because the texture is fantastic!
Hi Vanessa! I’m so glad you have been loving the pinwheels 🙂
These look great, what shall we use for egg replacer?
Hi Emily! I think flax egg should work – the crust might not puff up as much but it will bind just fine 🙂
These are delicious! I love the seasoning in the pizza dough. We are not GF so I just use our regular flour instead of the Namaste blend and they turn out great!
Hi Erin! So glad you enjoyed them!
We try to avoid xanthan gum. Would this work if I use King Arthur gluten free all purpose flour?
thx
Hi Donna! I haven’t tried other GF blends – the lack of xanthan might make the texture less “gluten” feeling, but I do think it should work in this particular recipe 🙂
Will these loose their shape if you just bake them on parchment, instead of in a muffin tin? I don’t have one currently, but really want to try these!
I think that would be fine Kay!
Mine turned out dry and typically your recipes work fab for me. Any ideas? I wonder if I could try again but use another tablespoon of oil in the dough? My one child wouldn’t eat it and the other ate two bites before saying he was done. I did add 1 tsp of nutritional yeast to the dough, maybe that added to the dryness?
I have really never run into that JJ! I’m so sorry to hear that! Actually sometimes I feel like the dough is a bit on the wet side! So maybe the nutritional yeast contributed to that more than one would think?
Hi we are dairy free could you leave out the cheese or does it help bind it?
Thanks!
Hi Kim! I’ve made them without the cheese before! Just wrap them up tight! I have also used the Voila dairy free cheese which is coconut based and it works well!
Where do you buy your pepperoni?
Our grocery store carries the Applegate brand and a couple of other nitrate free ones!
Can I use leftover sourdough post feeding for this instead of using yeast?
Hi Dar! Yes, I think that would work fine.
When you’re packing them from frozen do you defrost or just throw in frozen? My daughter’s summer camp now requires disposable lunches for field trip days (not ideal) so wondering if I could throw these in frozen and they would be thawed by lunch.
PS – I did another batch of these with no nutritional yeast and they worked out fab. Used dairy free cheese in one and uses Bob’s Red Mill egg replacer for the eggs.