These yummy oat free Paleo granola bars are a snap to prep in the blender, quick to bake, and even easier to eat!

Product links in this post are affiliate links. It does not cost you anything, and helps maintain the free information on this site, as well as answer the questions of “what brand do you use?” Please know I never personally recommend any product I wouldn’t use on my own family.
Moving week…and snack short-cuts!
It’s *finally* here! Moving week! It’s been a long year as we awaited our house to finish, and I’m getting ready to get these boxes we have been surrounded by into their final destination! Which means…I won’t have a whole lot of time in the kitchen, or be able to find much of anything until we get unpacked. I decided to get a few things stashed in the pantry that we can grab easily while we are moving, and I even got a new kitchen find to make the granola bar making process even faster!

Meet my new $13 kitchen friend!
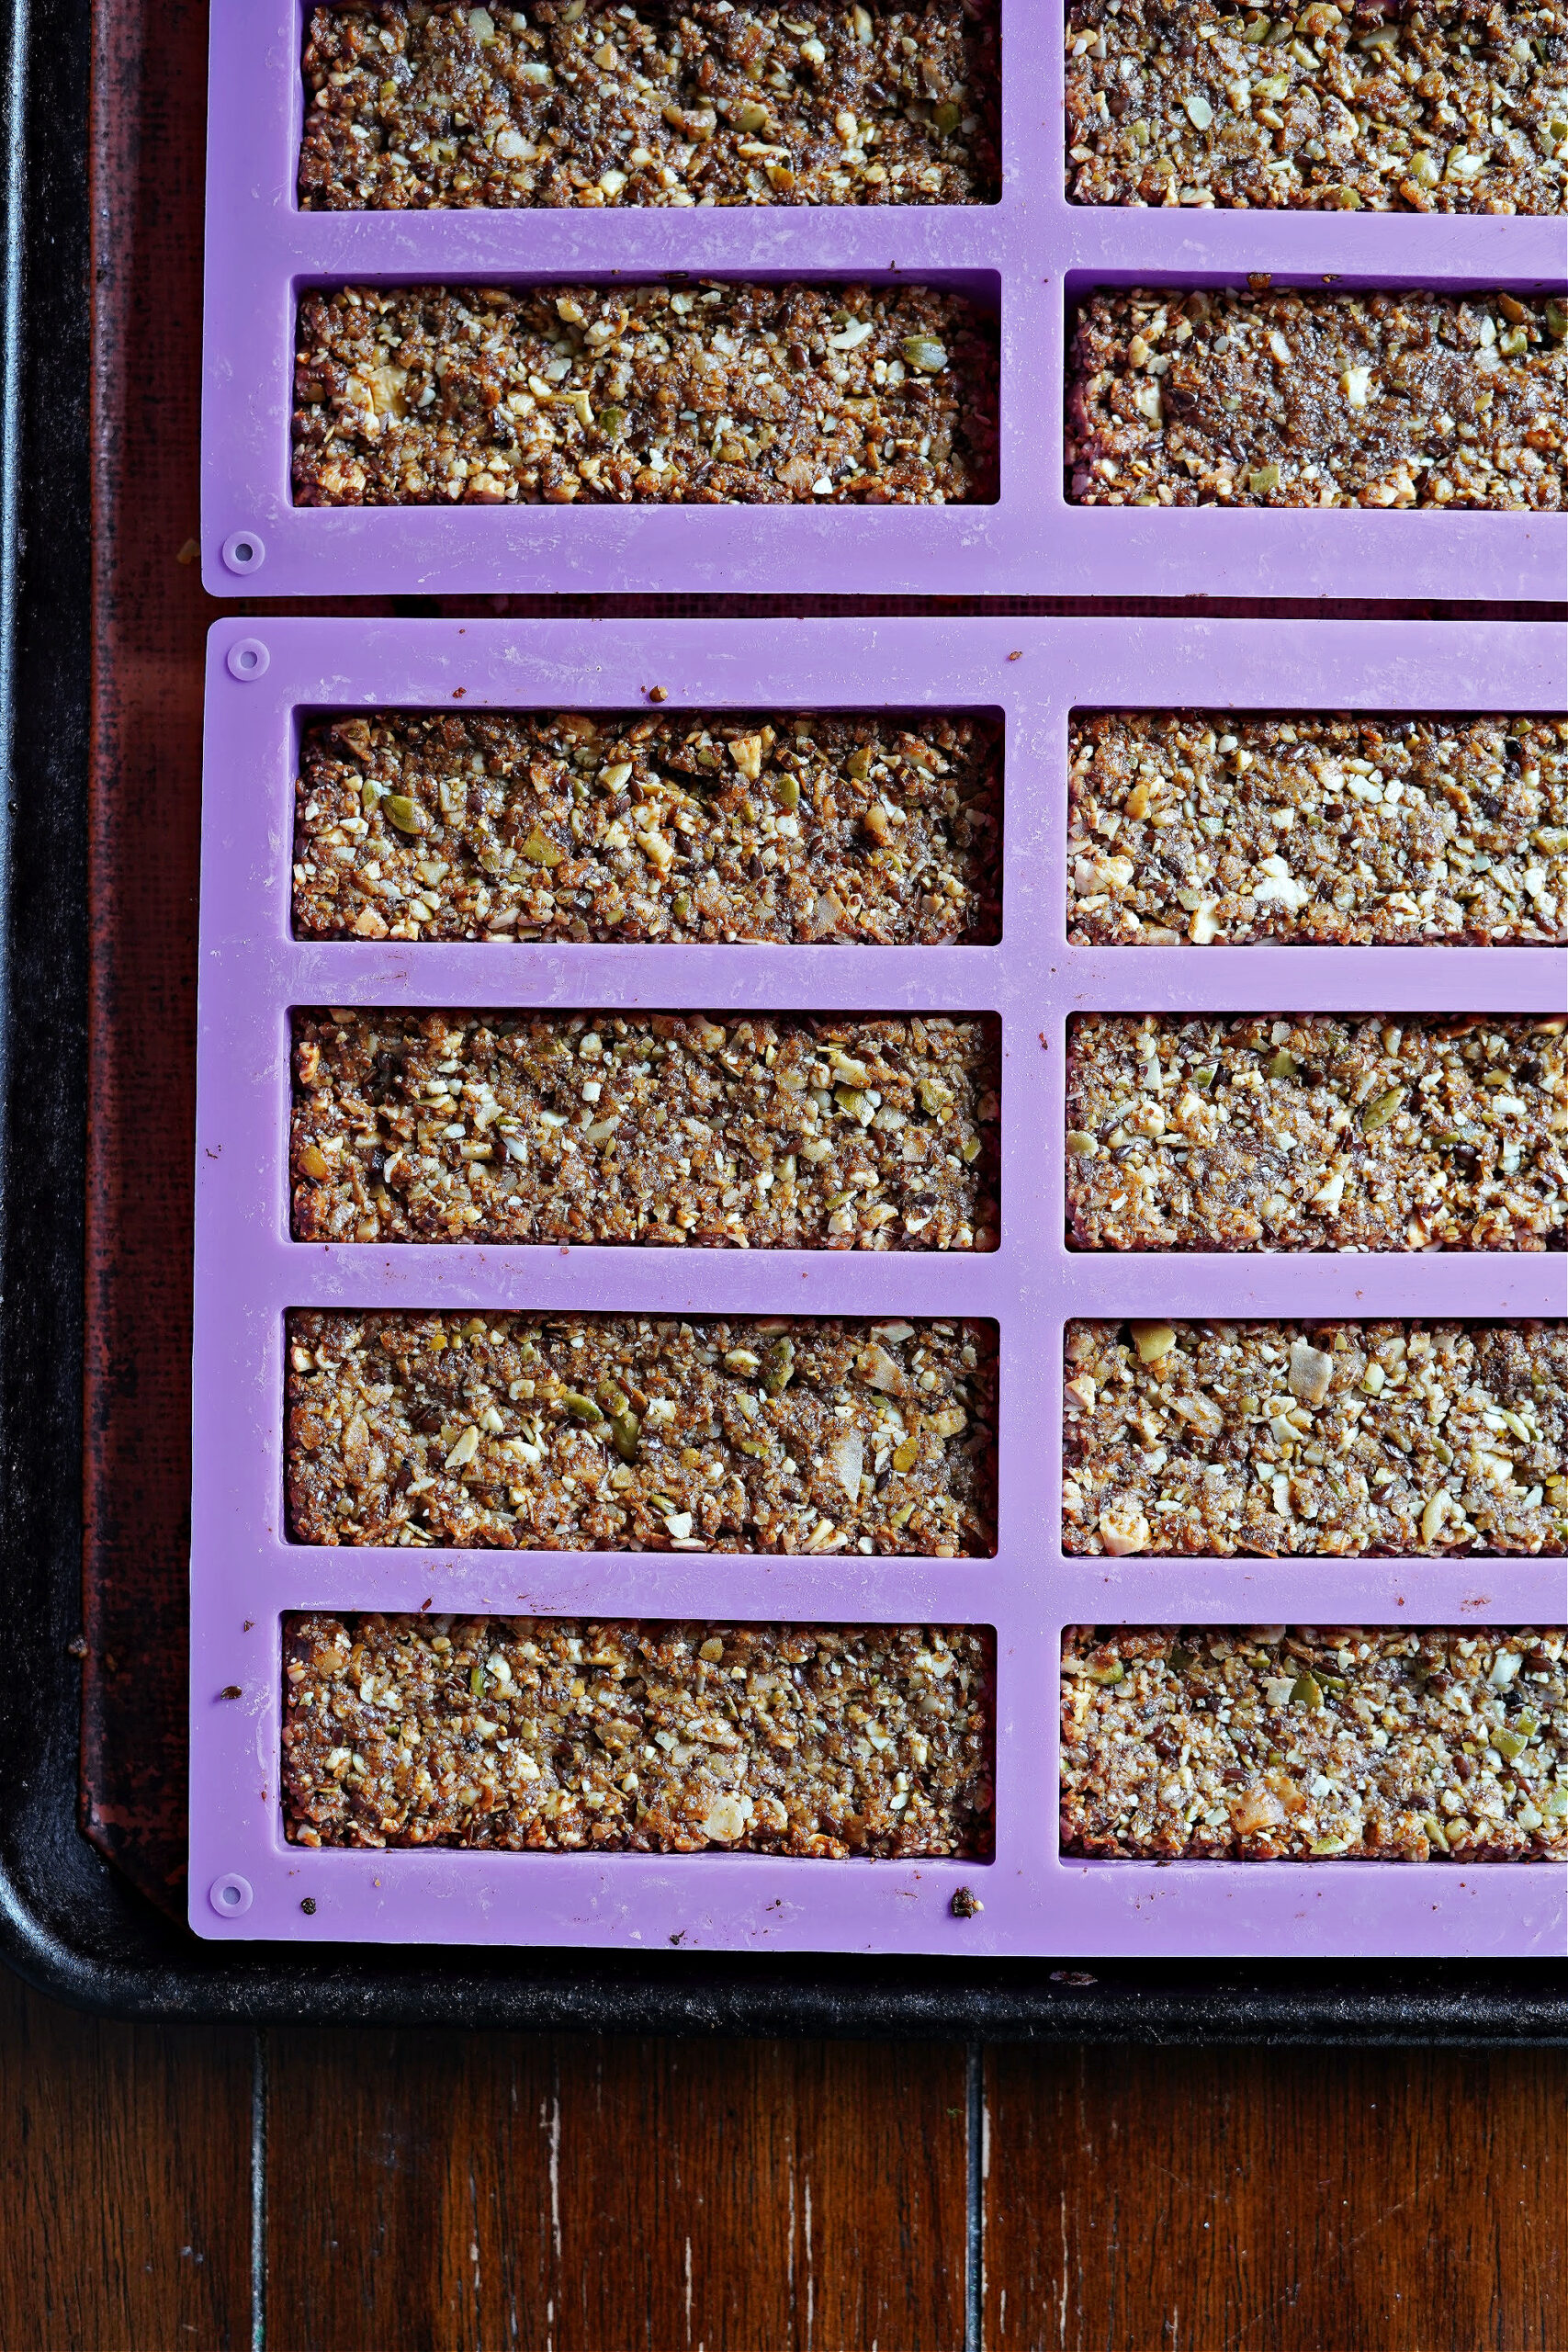
Seriously, this is the best 13 dollars I’ve spent in a long while! I would even say life changing status that compares to the Instant Pot. If you have ever made granola bars before, you know that in a pan, the edges tend to get slightly more cooked than the middle, and sometimes the cutting process can lead to some crumbs. These little silicone granola bar pans literally solve all of those problems, and truly the end result is perfectly shaped, perfectly cooked bars every. single. time….and I’m so here for that!
Let’s talk about the ingredients!
While we aren’t a “paleo” exclusive house, I do like to keep ingredients on a rotation so we aren’t just eating the same ingredients all the time. Most granola bars have an oat base, and since we do oats in other places throughout the week from baked oatmeal to breakfast cookies, I wanted to make this staple, easy to make bar without oats to change the nutrient profile up a little bit. You can swap the nuts for whatever nuts that you have on hand – and I do think that if you are nut free you can use all seeds. The combination power packed nuts, seeds, and coconut, makes for a balanced fuel for everyone in the house!

The Method :: Mix the Dry Ingredients
No hand chopping here! This whole granola bar mixture can be done right in your food processor! Put all of the dry ingredients into the food processor, and pulse about 4 long pulses, just to mix everything up and give a coarse “chop.” The pieces should look about like this ::

The Method :: Mix the Wet Ingredients
Next, you’ll want to melt the honey, coconut oil, and almond butter in a sauce pan, and pour into the food processor. The wet ingredients are what gives the “stick” to the granola bar to bind the pieces together, so you really shouldn’t try to adjust the amounts of these, or you’ll end up with a crumbly mess if you use less, or a gooey mess if you use more. Pulse the food processor to combine the dry pieces with the wet ingredients. You can pulse until the pieces are still on the visible side, or until they are very small and unrecognizable. I like to go somewhere in between – I do have “coconut chip” detective that will refuse the bar if she can “see” the coconut chips – but she has no idea they are there in this form (and she is the biggest fan out of everyone of these bars btw!)! The mixture should look like this ::

The Method :: Assemble and Bake
Again, I think the $13 investment in the silicone granola bar pans is so worth it – I am kicking myself for not getting one sooner! I think I would even pay double that for this convenience. Simply spoon the mixture into each well, and press it down firmly with the pack of your spoon. If you are making the bars in an 8×8 pan or a 9×9 pan, line the pan with parchment paper first, and then pour the mixture in. You’ll want to press the mixture down as firmly as you can before baking.

Snack ideas and storage
Once the bars cool completely, they pop out of the silicone liner so easy, and you can store them in an airtight container in the pantry up to 3 months. Use your paleo granola bars for easy lunchbox add-ins or a quick snack with a side of fruit or veggies and dip! And for those of you with little ones at home, the *best* part about making your own granola bars is that you control the size. You can easily cut these bars into “bites” which is how I often still pack them for my 8 year old’s lunchbox. A full bar makes a good snack for her, but she doesn’t need all of that with other things in a full lunchbox too. My older girls do, though, so we keep the full size in the pantry, and I cut them to the size I need!

Easy Paleo Granola Bars :: Oat Free, Gluten Free, Dairy Free
Ingredients
- 1 cup walnuts
- 1 cup cashews
- 2 cups coconut chips coconut chips are the bigger flakes – not tiny shredded coconut for this recipe
- ½ cup pumpkin seeds
- ½ cup flax seed meal
- 2 tsp cinnamon
- 1 tsp sea salt
- 2 tbsp coconut sugar
- 1/3 cup raw honey
- ¼ cup coconut oil
- 2 tbsp almond butter
Instructions
- Pre-heat the oven to 325 degrees and place your silicone granola bar liners on a baking sheet. If you don’t have granola bar pans, you can use an 8×8 or 9×9 pan and cut them, just line the pan with parchment paper.
- Put the walnuts, cashews, coconut flakes, pumpkin seeds, flax seed meal, cinnamon, sea salt, and coconut sugar into your food processor, and do a long pulse about 4 times to mix the pieces and break them up a bit. You can see what this should look like in the image above labeled “Mix the Dry Ingredients.”
- Put the honey, coconut oil, and almond butter in a small sauce pan and melt over medium heat, stirring along the way.
- Once the liquid ingredients are melted, pour them into the food processor with the dry ingredients, and pulse the ingredients to your desired consistency, making sure the wet ingredients have fully incorporated. If you want bigger pieces, pulse less times. If you want to make the pieces smaller so you can’t “see” them as much, pulse a bit longer. You can see what this looks like in the image above labeled “Mix the Wet Ingredients.”
- Spoon the granola bar mixture into your silicone granola bar pan rectangles. Press the mixture down to pack it in tight using the back of your spoon. If you are using a square baking pan, pour the mixture into the parchment paper lined pan, and press firmly into the pan.
- Bake the granola bars for 20 minutes, until lightly golden, for a slightly crunchy/slightly chewy granola bar, or 23-25 minutes, until darker golden brown, for a crunchy granola bar (similar to the texture of a Nature Valley Crunchy Honey Oat bar). I happen to love them crunchy, but both ways are fantastic! Let the bars cool completely before taking them out of the pan so they have time to harden. If you take them out while warm, they will fall apart.


Hi this looks great any idea on the carb or sugar amounts for this recepie?
Thank you
Hi Leeanne! I do not – but there are calculators you can Google that should be able to help you with that!
Hi there!! I made these this morning and they didn’t hold together. I waited until they were completely cool, but they fell apart. We will use it as granola, as it’s delicious…any thoughts or suggestions on why it didn’t hold and what I can do next time???
Hi Amy! That is a bummer – I’m not sure – I follow this recipe often and haven’t had that happen! No ingredient changes or accidents in measurments?
Hi Renee!
We have a flax seed allergy, but eggs work great. Would I use egg in place of he flax meal? Or another suggestion? Thank you! We’ve been making your grain free pumpkin cookies on repeat all season! So nourishing and so tasty (not to mention the lovely smell of the house when baking them 🙂
Hi Kim! I’m so glad you love the pumpkin cookies! In this recipe, the flax is not an egg replacer, rather it is a seed for just the nutritional value – you could add more chia, more coconut shred, or a little more ground nuts in it’s place. I hope that helps!
ive never tried this recipe before but ive noticed many recipes online, in your blog and even in your cookbooks for granola bars use coconutt oil is there a particular reason for this. Have you tested out any other oil and it just didn’t hold up well. My son has a coconut allergy so I’m curious if I would have to replace it with palm shortening or avocado oil. I would love any feedback thank you for alll your recipes
Hi Jasseline! I just like the nutrition content of the coconut oil and the mildly sweet flavor! For this recipe, you could use melted ghee or avocado oil!
These look delicious. Do you think I can sub sugar free maple sugar for the honey. Honey has two much sugar for me.
Hi Denise! The honey does help with the mixture sticking together – I’m not sure how the sugar free maple sugar would work for that!