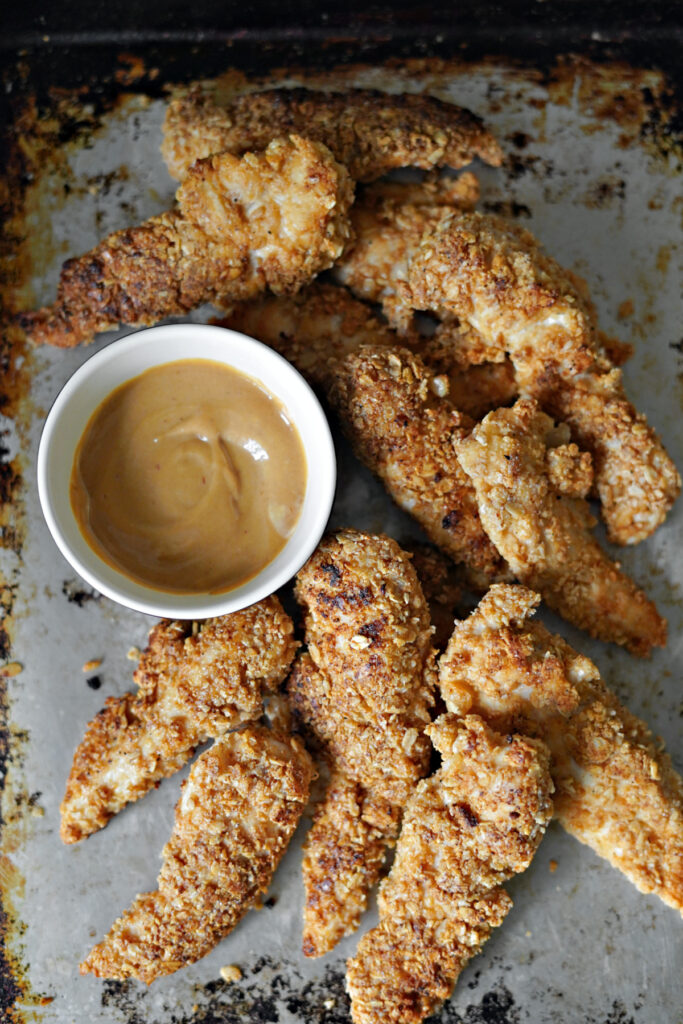
Browsing Category

Dinner Ideas

Dinner Ideas Healthy Kids and Teens Real Food 101 Real Food Tips

20 Minute Hawaiian Sheet Pan Dinner with Easy, No Cook, Fruit Sweetened Hawaiian Barbeque Sauce!

July 9, 2021

An easy weeknight Hawaiian sheet pan dinner with a sweet and zingy fruit sweetened Hawaiian Barbeque Sauce that the whole family will fall in love with!

20 Minute Hawaiian Sheet Pan Dinner with Easy, No Cook, Fruit Sweetened Hawaiian Barbeque Sauce!

Product links in this post are affiliate links. It does not cost you anything, and helps maintain the free information on this site, as well as answer the questions of “what brand do you use?” Please know I never personally recommend any product I wouldn’t use on my own family.

Quick dinners to fuel busy, active kids!

We are in full on summer mode in these parts, and that means HUNGRY kids. Not only are they growing at warp speed, they expend so. much. energy. every waking moment, and that makes for really big appetites. Whether you are enjoying the active days of summer, or are in full swing school fall schedule mode (which…is a whole different level of busy!), I hope you get a chance to get this super fun sheet pan dinner change up onto your meal rotation soon!

20 Minute Hawaiian Sheet Pan Dinner with Easy, No Cook, Fruit Sweetened Hawaiian Barbeque Sauce!

Weeknight perfect prep and *oh so* full of kid friendly flavor!

Sheet pan dinners are so very time-crunch friendly, and you can really pack in the flavor and nutrients all in one shot. The veggies roast down on the sheet tray, which pulls out their natural sweetness, caramelizing on the sheet pan, and we’ve packed out this sheet pan with lots of protein fuel too. Add in mixing it all up with an easy, sweet and zingy Hawaiian inspired barbeque sauce will ensure this whole sheet tray gets devoured by your crew! Fuel that actually counts for rapidly growing kids all on one sheet tray in less time? Sign. Me. Up.

20 Minute Hawaiian Sheet Pan Dinner with Easy, No Cook, Fruit Sweetened Hawaiian Barbeque Sauce!

Less sugar and more flavor!

I have a love hate relationship with “sauces.” On the one hand, I love how sauces and dips help make veggies and meat more “fun” for kids, which in turn helps get a lot more of it down. And on the other hand I just cringe at the amount of sugar in so many dips and sauces. Thankfully there are really cool companies that have come out with less sugar, or more fruit sweetened sauces and dips, and while they are delicious, and such a great swap, instead of cringing at the sugar, I end up cringing at my budget! A small bottle of sauce or dip that has great ingredients divided among 3 kids and a kid-like husband…well let’s just say it is gone in no time. One particular sauce we fell in love with was a really great ingredient Hawaiian inspired BBQ sauce, so instead of buying it again, I looked at the ingredients and sort of made up my own version for much cheaper!

20 Minute Hawaiian Sheet Pan Dinner with Easy, No Cook, Fruit Sweetened Hawaiian Barbeque Sauce!

The Method :: The Fruit Sweetened Hawaiian Barbeque Sauce

This sauce! OH! This sauce! You are going to fall in love with not only the flavor, but the prep time! This is literally a dump in the blender and buzz away sort of a recipe! The sweetening stars of the show are dates and Hawaiian inspired pineapple! There is zero added processed sugar, and you’ll absolutely never miss it. The pineapple adds just the right amount of liquid, and light refreshing flavor too! You’ll first soak the dates for a few minutes while you pile in the rest of the ingredients into your blender. Add your dates a little of the water from soaking the dates, and blend it all up. It’s as simple as that!

20 Minute Hawaiian Sheet Pan Dinner with Easy, No Cook, Fruit Sweetened Hawaiian Barbeque Sauce!

The Method :: The Veggie Line Up!

This part can truly be tailored to whatever produce is in season near you. It just happens to be summer right now, so in the recipe card, you’ll find summer squash and zucchini. A couple weeks ago I made this with eggplant and green beans. I think this sheet pan dinner will work so great in the winter too for a busy school night, and during that time of year, you’ll just have to swap things out for what you have in the veggie bin – carrots and other root veggies, squashes, and maybe frozen green beans from your summer stash! Give the veggies a quick, coarse chop, and pile them up on the sheet tray.

20 Minute Hawaiian Sheet Pan Dinner with Easy, No Cook, Fruit Sweetened Hawaiian Barbeque Sauce!

The Method :: Putting it all together on the sheet pan!

Once you season your cubed up chicken, you’ll toss everything with the fruit sweetened Hawaiian BBQ sauce – right on the sheet tray! Don’t get out more dishes to clean, dear momma. Just toss it all on the sheet tray and pop it in the oven. While your dinner cooks, you are hands free for 20 minutes to clean up, help kids with homework, change a diaper, or maybe read a chapter of that book you said you’d get through!

20 Minute Hawaiian Sheet Pan Dinner with Easy, No Cook, Fruit Sweetened Hawaiian Barbeque Sauce!

How’s the heat level on that sauce?

This sauce is pretty mild as written. In fact one of my girls thought it was “too sweet” on when she dipped her finger in it to taste. Keep in mind my crew hasn’t been exposed to lot of store bought sauces, so take that comment with a grain of salt 😉 My husband wanted more heat, so he added some hot sauce and some red pepper flakes to his bowl. I prefer a bit more heat as well, and wanted more ginger flavor, so I added more ginger to my bowl, but this sauce worked really well for my 2 girls that don’t do heat very well. I’d say it is quite kid friendly.

20 Minute Hawaiian Sheet Pan Dinner with Easy, No Cook, Fruit Sweetened Hawaiian Barbeque Sauce!

Let’s talk about your little ones!

As I was preparing this dinner the other night, I had a thought about how I probably would have made this sheet pan dinner when the girls were younger. So for those of you with itty bitties at home, I have a couple thoughts for you! You have a couple choices on the veggie/meat sizes. The size that I cut the veggies and chicken in these images works well for my older kids, but if you have toddlers and little ones at home, you’ll have to cut their pieces smaller before serving them. Alternatively, you could cut the veg and meat smaller before you cook the sheet pan, and if you do that, just keep in might that your cook time will be faster, so adjust that. Also keep in mind that some little ones get overwhelmed looking at a big bowl of “mixed up” food – I didn’t have one of these kids, but I do know it is a thing, and if that is the case, just get a plate out and separate the chicken in one spot, the rice in another, and the veggies on another side. Pick your battles, dear momma!

20 Minute Hawaiian Sheet Pan Dinner with Easy, No Cook, Fruit Sweetened Hawaiian Barbeque Sauce!

Leftovers and meal prep thoughts

This dinner tastes amazing the next day! Save some for your lunch tomorrow! I also think that if you are the meal prep type, you might like to make this as a lunch prep on a weekend for your weekday meal for work or school. Make up a whole sheet tray and divide it up for your week, and you have a delicious, healthy lunch for your work week. My oldest even asked if she could take this to school for lunch this year! Woot!

20 Minute Hawaiian Sheet Pan Dinner with Easy, No Cook, Fruit Sweetened Hawaiian Barbeque Sauce!

20 Minute Hawaiian Sheet Pan Dinner with Easy, No Cook, Fruit Sweetened Hawaiian Barbeque Sauce!

Ingredients

For the Fruit Sweetened Hawaiian BBQ Sauce ::

For the Hawaiian Sheet Pan Dinner ::

  • ½ purple onion cut into 1-inch pieces
  • 1 medium zucchini halved and cut into ½-inch pieces
  • 1 medium yellow summer squash halved, seeds scraped out, and cut into ½-inch pieces
  • 1 cup broccoli florets
  • 2-3 cups total red & orange bell pepper cut into 2-inch pieces
  • 1 ½ lbs boneless chicken breast rinsed, pat dry, and cut into 1-2 inch cubes
  • 1 tbsp olive oil
  • 1 tsp sea salt
  • ¼ tsp pepper
  • ½ cup of the Fruit Sweetened Hawaiian BBQ Sauce from above plus extra for side dipping or drizzling
  • 1 heaping cup of pineapple cut into 1-inch pieces

Instructions

How to Make the Fruit Sweetened Hawaiian BBQ Sauce ::

  • Fill a small bowl with warm tap water and put the dates in the warm water to soak while you get the rest of the ingredients into the blender.
  • Put the rest of the sauce ingredients into the blender, add the soaked dates, and ½ cup of the liquid that the dates were soaking in, and blend until smooth. This takes about 30 seconds in my high powered blender. You may have to blend longer and/or scrape down the container if you are using a food processor or regular blender.
  • Set the sauce aside until you are ready to make the sheet pan dinner. You can make the sauce up to 2 or 3 days in advance to store in the fridge too! Great prep day task!

How to Make the Hawaiian Sheet Pan Dinner ::

  • Pre-heat the oven to 400 degrees. You can line a large sheet pan with parchment paper or Silpat, though I tend to like a little caramelization on the bottom so I usually leave it off.
  • Put the cut veggies and pineapple onto your sheet pan. Toss the chicken pieces with the olive oil, salt, and pepper, and then add them to the sheet pan with the veggies.
  • Pour ½ cup of the Fruit Sweetened Hawaiian BBQ Sauce onto the sheet tray of veggies and chicken, and toss to combine. I just use my hands but you can use a spatula or tongs. You can add more sauce if you wish, or save the sauce to add to your bowl later. Stay on the light side first – you can always add more but you can’t take it away!
  • Bake the sheet pan of chicken, veggies, and pineapple at 400 degrees for 20-25 minutes, or until the chicken juices run clear. (The internal temp of cooked chicken should be 165°F – leaving your chicken out at room temp for 15 minutes before cooking is a good way to ensure even cooking and tender chicken!)
  • Serve your sheet pan dinner over rice, cauliflower rice, or baked potato/sweet potato. You can serve extra sauce on the side or drizzle over the top too!

Notes

  • Change up the veggies to what is in season! When I photographed this recipe, it was summer, so zucchini, summer squash, and even eggplant work really well! Green beans, root veggies like carrot and turnip, squashes, etc all would swap fine – use what you have!
  • You can prep/chop the veggies a day or so in advance if you need the extra prep time on a busy day. Keep the chopped veg in the fridge and you can just dump it onto the sheet tray on the night you want to make it!
  • This dinner makes a great meal prep for your lunches for a week too. Bake it off on a Sunday night and you can divide the meal up into your busy days for the week to warm up for lunch or dinner.
20 Minute Hawaiian Sheet Pan Dinner with Easy, No Cook, Fruit Sweetened Hawaiian Barbeque Sauce!

More real food SHEET PAN recipes you might like! ::

Breakfast Ideas Dinner Ideas Healthy Kids and Teens Lunch Ideas Nourishing Staples Real Food 101 Real Food Tips RGN Meal Plans

Nourishing 2 Week Meal Plan {Summer Inspired Part 1}

June 12, 2021

The weather is hot, and the produce is abundant! Create a nourishing 2 week meal plan with this fresh summer inspiration!

Nourishing 2 Week Meal Plan {Summer Inspired Part 1}

Product links in this post are affiliate links. It does not cost you anything, and helps maintain the free information on this site, as well as answer the questions of “what brand do you use?” Please know I never personally recommend any product I wouldn’t use on my own family.

Sun, sand, and flip flops!

Those of you that have been around here for a while know that we spend most of our time at the beach in the summer! We don’t go through months of piled up snow for nothing! We truly live it up on some of the most gorgeous powdery sand beaches of our hometown during the summer months while the girls are home from school. Busy, fun summer days don’t mean we pull back on nutrition goals, though! In fact, these kids play so hard in the summer, I find I’m thinking about how to boost them even more during the summer.

Nourishing 2 Week Meal Plan {Summer Inspired Part 1}

Our summer schedule…and how yours might look different!

Everyone’s summers look different. Some families don’t have a lot of change with parents working, so instead of going to school for the day, the children are at day camps for the day. That is great! Some families are at home more and have more time to put into meals. That’s great too! And many of us fall somewhere in the middle. Since I work from home, there is a bit more flexibility, though the work still needs to get done (with children at home and a house to still run!). It can get a bit sticky, but we have a flow that has worked well for us, and I hope to inspire you to work with what you have to keep real food on the table, no matter the schedule. Whether your schedule looks very different from the rest of the school year, or things are business as usual, I hope to show you how our family functions with meals during the warm summer months – and while the abundant produce is around!

Nourishing 2 Week Meal Plan {Summer Inspired Part 1}

How does summer change our family meal plan?

I look forward to summer mornings the most. All school year long, we have a time table to keep in order to get to school on time, so in the summer we truly enjoy slower mornings. Some families don’t have that flexibility, and that’s ok! Sometimes, as a work from home mom, I get up early to knock out some work before the kids get up. But, for the most part, coffee on the porch in my PJ’s is totally the summer morning flow, and I’m absolutely here for it. We swap warm winter oatmeal for cooler yogurt with power packed add-in’s, and some hot weather options like smoothies to swap for egg casseroles that don’t heat up the house, but are still nutrient dense. I do still cook though. You’ll see my thoughts below on “cooking” during the summer, and if that isn’t your jam, do what works for you! For my household, there are a few days a week that I like to still lightly cook for the morning meal for variety and to get an abundance of produce in. ***By the way! If your kiddos are taking packed “school lunch” type lunches for summer day camp each day, you might get more lunchbox inspiration with warmer weather ideas in my Spring Meal Plans Part 1 and Part 2. In the summer, our lunches aren’t always the pack-able kind since we are at home more, but you will find a lot of inspo in the spring when my girls are in school still! ALSO! My friend Kristin from Live Simply has GREAT summer lunchbox ideas on her Insta for her Florida kiddos (insert REALLY hot weather!) that do more day camps in the summer – great, hot weather summer lunchbox ideas there!

Nourishing 2 Week Meal Plan {Summer Inspired Part 1}

Tips for cooking in the heat

Just like many of you, our summer weather is warm. Actually, as frigid as our frozen tundra is in the winter, you’d never believe the humidity that Michigan can get – it truly feels like walking through a tropical rainforest sometimes! So, in the summer we do tend to do naturally do a bit less “cooking” than in the winter months, but I think some may be surprised that there is still some cooking going on during the warm months here.

  • Our ancestors would have cooked over open fires outside all year long, and I kind of take that thought process as we are looking at meals in our house during the summer. As “modern day” moved our kitchens from the outside to the inside, there may have been a shift to more convenience foods or pantry staples during the hot summer, but I encourage you think about how your ancestors, before kitchens being located in the homes, would have naturally eaten.
  • If you have a grill that is a great start! Cook outside to keep the house cool, just like your ancestors would have done!
  • Since we have modern day kitchens, we also have the convenience of having appliances that don’t heat the house up like a pressure cooker Instant Pot, or slow cooker. Take advantage of that!
  • If you’re going to cook, make it stretch into other meals. You’ll notice in the meal plan that if I’m putting my oven on in the summer, I’m making that meal stretch into the next day so I don’t have to turn it on again. I’ll split a whole chicken to cook in the oven in 1 hour instead of all day, and then use that meat for an easy meal the next day.
  • I think one of the biggest differences you will notice in my summer meal plan versus the rest of the school year, is that since the girls are home for lunch, I tend to do either quick dinner leftovers, or a quick pan saute of all those beautiful summer veggies to serve tossed with pasta, or grilled chicken. It is a huge budget saver to just use what veggies are in season, and skip all the lunchbox specialties and snacks. Sure, it’s fun to make granola bars, or energy bites, or pack healthier choice packaged snacks for school, but in the summer, simple pan cooking is budget friendly, and actually much faster than you think. Besides, I would rather be at the beach than baking granola bars!
Nourishing 2 Week Meal Plan {Summer Inspired Part 1}

What’s with the pan sautéed veggies on the meal plan, and how do you do it?

I mentioned above that since the girls are home for lunch during the summer, I tend to do pan cooked summer veggies for lunch a lot, unless we are on an outing with packed lunchboxes. It takes less than 10 minutes, and when you get those in season veggies it is SUCH a budget saver. To make pan cooked summer veggies, melt some butter, olive oil, or coconut oil in a pan over medium to medium high heat. Add the chopped veggies with a pinch of salt, and just cook until tender crisp. If your kiddos are younger ages, you can cut the pieces smaller, and cook them through a bit longer so they are softer to eat, but this is how I have served summer lunch since the girls were just 1 years old! You can grill chicken, fish, or burgers to serve with the veggies, or even serve them with a PBJ – we absolutely do that too!

Raising Generation Nourished 2 Week Meal Plan {Winter Inspired Part 1}

More help means more outside play! Get the kids involved!

This really should be an all year thing, but especially when the kids are done with school work for the summer, it’s the perfect time to learn new kitchen skills – AND help with getting meals done so you can play outside more! No matter the age, everyone can help with something. My older girls take care of a couple of breakfasts per week, while my youngest helps me prep just about any meal. And I never wash a breakfast or lunch dish in the summer. <– Read that again! It’s true! When they were younger, did these tasks always “help” me? NOPE! A lot of times it took longer and made a bigger mess. But the skills they learn when they are little are SO helpful as they get older. You can check out this post for some help on navigating teaching your kids how to help you more in the kitchen!

Nourishing 2 Week Meal Plan {Summer Inspired Part 1}

Remember to think about WHERE you live, and how things grow where you live…

Where I live may have a different growing season than where you live. Summer where you live might also look differently than where I live. We have a very abundant summer growing season in Michigan. While it is pretty slow going in the winter, we can pick vegetables and fruit to our heart’s content all summer long. There are U-Pick patches, farm stands, and farmer’s markets on just about every corner, bursting at the seams through the first part of fall. If that isn’t how it is where you live, that’s ok! Just keep that in mind as you look at our meal plan, and just tailor the produce part to your environment!

Nourishing 2 Week Meal Plan {Summer Inspired Part 1}

Tell me about those popsicles on the meal plan!

They are literally whatever fruit we are picking that week, blended up, and frozen. That is truly how I roll in the summer! There is nothing fancy to it. We have had this ice pop container for years and years, and still use it all summer long to this day. Blend up whatever is in season, and the kids can have a frozen, in-season summer fruit after lunch in the summer. Give this easy blend up and pour task to the kids to do, and take one thing off your plate!

Nourishing 2 Week Meal Plan {Summer Inspired Part 1}

SUMMER MEAL PLAN PART 1!

Here is a free PDF of Summer Meal Plan Part 1! Right below the image will be a blank version, in case you want to fill in your own!

Nourishing 2 Week Meal Plan {Summer Inspired Part 1}

Want to build your own plan?

Here is a FREE Blank PDF Meal Plan so you can sit down with your family and fill in what works for you!

Nourishing 2 Week Meal Plan {Summer Inspired Part 1}
Dinner Ideas Healthy Kids and Teens Instant Pot Lunch Ideas Nourishing Staples Real Food 101 Real Food Tips

Fresh Green Bean Salad

May 19, 2021

Warm or cold, this fresh green bean salad is the perfect veggie side dish change up any time of the year!

Fresh Green Bean Salad
Product links in this post are affiliate links. It does not cost you anything, and helps maintain the free information on this site, as well as answer the questions of “what brand do you use?” Please know I never personally recommend any product I wouldn’t use on my own family.

Our summer happy place

We endure a pretty long cold season in order to enjoy quite possibly the most amazing place in the world to spend summer – the beautiful coastline of Lake Michigan! There is really nothing like it! We have finally hit a warm spurt and it doesn’t even matter that the lake hasn’t warmed up yet! My crew is all in, and we are ready for a few months of sandy barefoot days.

Fresh Green Bean Salad

A summer produce favorite

Green beans are one of the only garden items I can grow like weeds. Our dune-sandy soil is so hard for growing some things, but green beans – I can do that! The girls adore green beans too, so it really works out! As your summer green bean harvest starts coming in, or you see piles of them at the local farmer’s market, grab a big bag full, and try out this fun veggie side with your summer BBQ, or a big juicy burger!

Fresh Green Bean Salad

Simple ingredients

Summer is definitely not the time to be spending loads of time in the kitchen. We only get a few months out of the year to really enjoy all that warm sunshine, so I want to be outside as much of our summer days as possible! This summer salad can be put together in 10 minutes and just hang out in the fridge to be your easy lunch or dinner side dish all week. A simple pound of summer green beans, pretty cherry tomatoes, and a handful of walnuts get tossed with a pantry friendly dressing that shakes right up in a little jar. It doesn’t get much simpler than that – perfect for summer!

Fresh Green Bean Salad

Green bean steaming method options

For this green bean salad, I very lightly steam the green beans. You could potentially serve them raw, but I do find that the dressing soaks in a bit better and is better over the course of days if you give the green beans a light steam, or at the very least, a quick blanch. Here are some steaming options:

  • For the INSTANT POT put 1 cup of water in the bottom of the pot, put the green beans in the steamer basket inside the pot, put the IP lid on, and seal the valve. Press the STEAM feature and bring the time down to “0” minutes. The IP will come to pressure in about 5 minutes in and then be done since you set the time to 0. Release the valve immediately.
  • For an ELECTRIC STEAMER, or if using a STEAMER BASKET OVER BOILING WATER, put the green beans in the steamer and set the timer for 5 minutes.
  • You could also blanch the green beans if you really want a very crisp bean salad.
Fresh Green Bean Salad

Fuss free prep

10 minutes! I promise! Maybe even less if your veggies are already washed up! While your green beans have a quick steam, you’ll make the dressing. You probably already have all of the ingredients right in your pantry to shake up the dressing in the jar. Once the dressing is ready, the cherry tomatoes get sliced, and the walnuts can get a quick chop. Then you’ll toss the lightly steamed green beans with the dressing, tomatoes, and walnuts, and you’re done!

Fresh Green Bean Salad

Serve it cold or warm!

If you happen to get a chance, enjoy a few bites of your freshly tossed green bean salad while it’s warm! Absolute heaven! If it feels like 100 degrees outside, I’m sure the chilled salad fit your menu the best, but if you happen to change up your meal plan in the winter, you can enjoy the cozy warmth of the salad right out of the steamer.

Fresh Green Bean Salad

Nut free friends, and other swaps!

If you are nut free, swap out the nuts for sunflower seeds to add some texture to the salad. I also think that if you have the time to give the walnuts or sunflower seeds a quick 2 minute toast in the saute pan, you’ll really enjoy the flavor that brings. If you are a household that can do dairy, parmesan is a fun addition. And if your kiddos are more Ranch style salad kids, I say swap the dressing for your favorite healthy Ranch if that will make them more willing to try a new salad – you’re still a fantastic momma in my book! You can try my classic Ranch, or, if you are dairy free, use this Paleo Ranch or this better choice store bought Ranch.

Fresh Green Bean Salad

Fresh Green Bean Salad

Ingredients

For the dressing:

For the green bean salad:

  • 1 lb fresh green beans trimmed and cut in half
  • 10-15 cherry tomatoes halved
  • ½ cup walnuts coarsely chopped
  • 1 recipe of the dressing from above

Instructions

  • Put all of the dressing ingredients into a small mason jar with a lid and shake vigorously for 1 minute until combined. Set the dressing in the fridge to chill while you make the rest of the salad.
  • Steam the green beans to crisp tender. You could do this a few different ways. For the INSTANT POT put 1 cup of water in the bottom of the pot, put the green beans in the steamer basket inside the pot, put the IP lid on, and seal the valve. Press the STEAM feature and bring the time down to “0” minutes. The IP will come to pressure in about 5 minutes in and then be done since you set the time to 0. Release the valve immediately. For an ELECTRIC STEAMER, or if using a STEAMER BASKET OVER BOILING WATER, put the green beans in the steamer and set the timer for 5 minutes. You could also blanch the green beans if you really want a very crisp bean salad.
  • Once the green beans are lightly steamed, add them to a medium serving bowl, and toss with the cherry tomatoes, walnuts, and dressing. You can use half the dressing if you want it lightly dressed, or all of it – I would recommend starting with half to see how you like it! Sometimes I use about half and keep the other half for a salad later in the week. Keep in mind that the dressing will soak into the veggies a little bit too. You can eat the salad warm, or chill in the fridge.

Notes

  • This salad stays good in the fridge for 5-7 days. Make some up on a busy week to pull from all week long!
  • You can use a tasteless healthy oil, such as avocado oil, if your crew doesn’t love the taste of olive oil. 
  • This salad and the dressing double up for a crowd very nicely. This amount feeds my family of 5 for a side dish plus a little leftover.
  • Balsamic vinegar makes a delicious swap for red wine vinegar to change things up. White wine vinegar is another way to change it up a bit.
  • Lemon or lime juice will work but I do love the lime the best!
Fresh Green Bean Salad

More real food recipes you might like ::

Breakfast Ideas Dinner Ideas Healthy Kids and Teens Lunch Ideas Nourishing Staples Real Food 101 Real Food Tips RGN Meal Plans

Nourishing 2 Week Meal Plan {Spring Inspired Part 2}

May 13, 2021

Use this fresh, spring inspired meal plan for your growing family!

Nourishing 2 Week Meal Plan {Spring Inspired Part 2}

Product links in this post are affiliate links. It does not cost you anything, and helps maintain the free information on this site, as well as answer the questions of “what brand do you use?” Please know I never personally recommend any product I wouldn’t use on my own family.

Finally!

I know you all have been waiting longer than you have wanted for Part 2 of this spring meal plan, and I thank you for your patience! It’s been a whirlwind of a spring – a welcomed whirlwind, with zoo visits, birthday celebrations, and lots of parks!

Nourishing 2 Week Meal Plan {Spring Inspired Part 2}

Read this first!

While we are creeping closer to needing summer meal plans, I still wanted to show you how to spin off that Spring Meal Plan 1 into this Spring Meal Plan 2. I had purposely put some food items on Meal Plan 1 that could be flowed another week to keep the time in your kitchen down, and I wanted to show you how to do that. I also added in more meal double duty in Part 2, and I really think you will like this flow! If you have not checked out Spring Meal Plan 1, you’ll want to take a peek at that first – this meal plan will make a bit more sense after seeing that!

Nourishing 2 Week Meal Plan {Spring Inspired Part 2}

Yes, we are still in school!

I know many of our friends to the south are wrapping the school year up in the next week or so, but up here in Michigan we don’t start school until late August, and so we are packing those lunchboxes until about mid-June in these parts! You’ll see our lunch routine change up a little bit in my summer meal plans, but for this meal plan, keep in mind the girls’ lunches in the plan are still packed up for school.

Nourishing 2 Week Meal Plan {Spring Inspired Part 2}

Let’s talk about special days and swapping treats!

I wanted to use my spring meal plan space to talk a little bit about special days! We have 2 spring birthdays in our house, and we absolutely want to celebrate that! If you have special celebrations, no matter the time of year, please swap some special meals in your these meal plans! As a for instance, perhaps the weekend of a special birthday you swap the breakfast for birthday scones or a coffee cake. And there may even be a night that you get to take the family out for a special birthday dinner, or end of the school year celebration.

Gluten Free Funfetti® Birthday Scones! :: Gluten, Egg, & Nut Free

FAQ’s!

If you haven’t taken a peek at the first 2 meal plans I created this year, there is some helpful information in both of those. Even if you don’t need winter inspired meals, you’ll want to check out the information on how to balance macro-nutrients for your kids, meal planning baby steps, food availability, (all of these points are in the Winter Meal Plan 1 post), and also how my husband fits into the meal plan as a commuter (in Winter Meal Plan 2).

Kid Friendly Veggie Loaded Tacos

SPRING MEAL PLAN PART 2!

Here is a free PDF of my Part 2 Spring Inspired Meal Plan! Right below the image will be a blank version, in case you want to fill in your own!

Want to build your own plan?

I’m all about that! here is a free blank PDF of the meal plan so you can sit down with the family and create your own plan of attack!

SUMMER is almost here!

I’ll be back soon with some summer inspiration very soon!

Raising Generation Nourished 2 Week Meal Plan {Winter Inspired Part 1}
Condiments Dinner Ideas Lunch Ideas Nourishing Staples Real Food 101 Real Food Tips school lunches

Dairy Free Caesar Dressing

April 20, 2021

Free from common allergens, this delicious dairy free Caesar dressing is also gluten free, soy free, nut free, egg free, and fish free!

Dairy Free Caesar Dressing
Product links in this post are affiliate links. It does not cost you anything, and helps maintain the free information on this site, as well as answer the questions of “what brand do you use?” Please know I never personally recommend any product I wouldn’t use on my own family.

Spring teases, and a need for some dairy free staples

I *think* we’ll see the last of our cold weather snow flurries this week, and we can finally say we are on our way to some consistent spring like temps here in Michigan! We spent a cool but pleasant weekend hiking and even playing at the beach, and while I watched my crew race up and down the shoreline, I was thinking about just how far I’ve come in a health related sort of way.

Dairy Free Caesar Dressing

A marathon, not a sprint

As I watched my kids sprint across the sand, I thought about how I had to change my thought process toward getting healthy so long ago. More of a “sprinter” in all things life, I have had to grow and change my method to more of a marathoner’s mindset. And you know what? Sprinters and marathoner’s are both great athletes. But when it comes to healing decades of growing up in a conventional, standard American health sort of environment, sprinting is only going to lead to more injury. It takes time to heal decades. I’ve had a recent set back toward the end of winter, and while I’m on my way, I have had to learn the hard way that while I’d like to sprint myself back into feeling my normal, a marathon mindset is really where it’s at.

Dairy Free Caesar Dressing

Peeling back the layers

I have had more than one natural minded practitioner remind me that most healing journeys are like peeling onions. There are layers and layers of them, and before you can get to the center root of the onion, you have to get through the surface layers first. A chiropractor friend reminded me of this last week, and I’m hoping someone here needs to hear it too. There are layers of natural elements, like diet, mineral balance, and hydration. And there are also layers of lifestyle, such as sleep, stress, and activity levels. I’ve been working on the later, with over-exercising and not paying enough attention to stress…a very tough admission for this “Type A!” One layer I DO know how to help with, however is food. And if you need to have inflammatory foods out of your diet for a period of time for healing, I’ve got you covered, dear momma. I have been there, done that, and I have some recipe tricks up my sleeve that I hope will help you!

Dairy Free Caesar Dressing

Our favorite Caesar, done without dairy

One of the first recipes I posted to this blog was a recipe for Caesar dressing. It was *the* dressing helped me successfully get my husband off store bought dressings years ago, and has been a staple around here for a while. But the dressing has dairy and egg, which can be inflammatory for those that are healing. Over the years when I have had seasons like I am in right now where I need to strictly be dairy free, I have played around with other ways to make it without the cheese, sour cream, and eggs, and I’m finally getting it here on the blog! This Caesar dressing is a handful of years in the the trial and error making, and I can proudly say it is free from dairy, gluten, soy, nuts, and egg…and it still passes my Caesar dressing critic husband’s taste test!

Dairy Free Caesar Dressing

Dairy Free Caesar Dressing Method

It really doesn’t get any easier than a 5 minute prep, and I’m pretty sure that whether you are on a healing journey or not, less work is music to your ears! I don’t even use measuring cups. Simply use the marks on the side of a pint mason jar and measure to the 1/2 cup mark for the olive oil. Then spoon in your coconut yogurt until the line hits the 3/4 cup mark. The rest is all measuring spoon, and goes so fast. Finally, you’ll use a simple immersion blender to emulsify the dressing into the dreamiest creamy texture!

Dairy Free Caesar Dressing

Important Notes!

Please take the time to read through the Notes section in the recipe card! I have been making this dairy free version of Caesar for a while, and I took the time to write down some of my thoughts on swaps and switches, as well as how to tailor this dressing to fit your unique taste palate!

Dairy Free Caesar Dressing

Dairy Free Caesar Dressing

Ingredients

Instructions

  • In a pint mason jar, measure the olive oil to the ½ cup mark, then add the 1/4 cup of coconut yogurt to fill until the ¾ cup mark on the mason jar (you could use measuring cups too, but this is my favorite way, and is less to clean up!).
  • Add the rest of the ingredients and use an immersion blender to emulsify until creamy and combined. Blend with the immersion blender for about 30 seconds to a minute.
  • Store the Caesar dressing in the refrigerator for 1 week.

Notes

  • If you are egg free, leave the yolk out and add an extra couple tablespoons of coconut yogurt for the creaminess.
  • If you don’t have an immersion blender, you could add all of the ingredients EXCEPT the olive oil to a food processor or blender. Then, while the blender is running, you can drizzle the olive oil into the blender so that it can slowly emulsify the dressing until creamy.
  • Add an extra tablespoon of lemon juice if you like your dressing tangier. The recipe as written is very kid friendly, but I love extra tang, so when I make it for myself I use 2 tbsp – about a full lemon.
  • Add an extra tablespoon of nutritional yeast flakes if you want the dressing to taste cheesier.
  • If you don’t have coconut aminos, you can leave this out, but it does add a depth of flavor that I just love – traditional sardines would add this too if you have those.
  • If you want to use a neutral/flavorless oil, avocado oil works well and is safe, healthy oil. The olive oil flavor gets pretty covered up by all of the other ingredients, but I know some kids might be sensitive to that taste, and avocado oil is flavorless. Really good olive oil is known for it’s anti-inflammatory properties, so I always ready for the olive oil when I can, and my kids really like the taste of it.
  • I get the big, 32oz tubs of plain, unsweetened coconut yogurt from our local grocer for a very budget friendly price. Many regular grocers are carrying this now, just take a look!
Dairy Free Caesar Dressing

More real food salad dressing recipes you might like!

Dinner Ideas Healthy Kids and Teens Nourishing Staples Real Food 101 Real Food Tips

Kid Friendly Veggie Loaded Tacos

April 14, 2021

Learn how to get veggies into taco night with this kid friendly method of veggie loading taco meat!

Kid Friendly Veggie Loaded Tacos

Taco night and our first spring dip in the lake!

Lake Michigan is 37 degrees, and that, my friends, means I’m barefoot in the beach sand trying to soak in some early spring sun rays while these little Michigan born and bread kiddos of mine are in the water and happy as little larks! I’ve been thinking a lot lately about how I can help you with those main staples that are on everyone’s meal plan list, by amping up the nutrient level while still keeping them kid favorites.

Kid Friendly Veggie Loaded Tacos

Taco Tuesday…Amplified!

I would venture to say that most households have a staple taco night. It is an easy kid favorite, familiar, and obviously so delicious too! Sometimes I over look the obvious staples to blog because I figure everyone knows how to make a taco right? But do you know how to make a taco that isn’t just meat a cheese? Something that will get some mineral rich veggies and fiber into the kids without the kids complaining? Without having to add the taco meat to a salad? Not that there is anything wrong with a salad, but I’ve been in those little kid years, dear momma! I know salads are not always first pick. And toddlers don’t always digest or chew salads very easily. They also will be full after one or 2 taco shells with taco filling…so let’s get more in every bite!

Kid Friendly Veggie Loaded Tacos

Making every bite count…taco style!

Little kids have little bellies. And while I have been the witness to bottomless pit kid appetites, when my girls were very little I found out very quickly that 1 or 2 tacos was about all their bellies could hold, so I had to make those bites count. The secret to veggie loading tacos is all about mixing the meat with veggies that have been cooked with the right technique….a slow, flavorful sauté. Sure, this does add about 10 minutes to your cook-time, but it will be so worth it. And one of the best parts about taco meat is that it can be done in advance on a prep-day, and even frozen for easier weeknights!

Kid Friendly Veggie Loaded Tacos

Older kid & teen benefits

Veggie loading tacos isn’t just beneficial for filling up little bellies. Those growing teenagers can seriously put the food away! Filling them up on protein is important, but fiber rich veggies will help fill up those appetites and help them feel fuller longer. Another benefit to veggie loading the meat is that the added extra veggie mineral nutrients is so vital to the function of all of their organs – hello teenage hormones! Hormones need these mineral nutrients from veggies to function properly, and this is a great way to get those in. And even better if your teen likes a big taco salad – double the veg!

Kid Friendly Veggie Loaded Tacos

Two Birds, One Stone…Veggie Loading & Budgets!

While my main focus in veggie loading these tacos is to get more veggies into your kids, I want to also help you see that this method of making taco meat really stretches that pound or 2 of ground beef for your hungry crew. My family of 5 can pound out a pound of taco meat and then some. But when I veggie load taco meat, not only does the volume of taco meat almost double, giving us more to fill into those taco shells, it is also getting fiber rich veggies into hungry bellies to fill them up.

Kid Friendly Veggie Loaded Tacos

A note about taco seasoning

You can swap the DIY taco seasoning for 1-2 packets of taco seasoning – just be real careful on those ingredient lists – staying organic usually helps with avoiding MSG, GMO’s, and other fillers. Also keep in mind that packets (even many organic ones) add starches, so you will need more bone broth or water because those starches thicken things up. I keep a jar of my DIY taco seasoning doubled or tripled up in my cupboard so it is easy to pull out on taco night.

Kid Friendly Veggie Loaded Tacos

Tips for families with babies, toddlers, and preschoolers

Dear momma, if you have an older baby or toddler, I would invite you to take my “jump in with both feet” method of feeding littles, and just add the veggies in without taking too much care to dice them up super fine. Obviously make it small enough for them to handle in their mouths, but I truly believe that my girls never batted an eye at any meal, from spaghetti to tacos, being “veggie loaded” in their lives because we started them out that way. Babies and toddlers have ZERO frame of reference for what a “taco” should look like. <—Read that again! If this is all they have ever known, it is exactly what they will grow up being used to! In fact when I veggie load these tacos, I typically double the spinach in this recipe – feel free to add more if you wish.

Kid Friendly Veggie Loaded Tacos

Tips for families with older kids and teens

If you have older kids used to “normal” tacos I have a few tips for you to ease them into this idea!

  • First of all, don’t make it a big deal – you make it a big deal and they will feed off that. I would actually just try the taco meat with the chopped veggies, and if they ask what it is, simply tell them! Don’t try to hide it – that really creates some trust issues. Just treat them like normal human beings, and be honest with them.
  • If you know for sure this is going to be a battle, try starting out with half of the veggies recommended here and work up to the full amount. As I said in the section above, this is actually toned down from my usual amount of veggies, but you can bring it down a couple of notches to work up to the full amount.
  • Try using a food processor to really finely chop the veggies so they are truly barely noticeable. Once the taco season is in the mixture, there is zero veggie taste – promise. But I know that some kids have texture issues, so perhaps making the veg super small will help ease those kids into this. In all actuality, the sauté and simmer cooking times really make the veggies very soft and manageable, but I do know that some children can be veggie detectives 🙂
Kid Friendly Veggie Loaded Tacos
Print Recipe
5 from 1 vote

Kid Friendly Veggie Loaded Tacos

Ingredients

  • 2 tbsp friendly fat for cooking in butter, olive oil, avocado oil, tallow, etc
  • 1 small onion diced
  • ½ small red bell pepper diced
  • ½ small head of cabbage sliced thin or shredded
  • 1 large carrot shredded
  • 2-3 cups baby spinach finely chopped
  • 2 cloves of garlic minced
  • 1 lb grassfed ground beef
  • 4 tbsp taco seasoning
  • 1 cup bone broth or water
  • Sea salt/pepper if needed to taste

Instructions

  • In a large skillet, melt the fat over medium heat. Add the onion, pepper, cabbage, and carrot with a big pinch of sea salt, and cook over medium high heat until the veggies are soft and sweet. This will take about 5-10 minutes depending on how small you chopped the veggies (smaller chopped veggies will cook faster).
  • Add the spinach, garlic, ground beef, taco season, and broth to the pan. Break up the beef, and cook the veggies, beef, and broth together for over medium high heat, until the broth comes to a simmer. Reduce the heat to a low simmer, stirring occasionally until the beef is cooked through, and the broth is reduced all the way down so that the taco mixture isn't runny. This takes about 10 minutes.
  • Serve your veggie loaded taco meat with traditional taco shells (we love these blue corn shells or yellow corn shells) or soft shell tortillas with toppings, or over a big salad to make a taco salad (use this French dressing or Fiesta Dressing for the salad!)

Notes

  • Instead of chopping, you could put all of the veggies in a food processor to chop up super small. This is a good technique for kids that don’t like “pieces” in their food, or have aversions to veggies. They will cook down and get so small you’ll never see them this way.
  • You can swap the DIY taco seasoning for 1-2 packets of taco seasoning – just be real careful on those ingredient lists – staying organic usually helps. Also keep in mind that packets add starches, so you will need more bone broth or water because those starches thicken things up.
  • When my kids were little, they always struggled with managing a taco and it’s fillings! I got these little taco holders and they are game changers! 
Kid Friendly Veggie Loaded Tacos

More real food recipes you might like ::

Dinner Ideas Healthy Kids and Teens Lunch Ideas Nourishing Staples Real Food 101 Real Food Tips school lunches

Rainbow Broccoli Salad

March 24, 2021

All of the colors of the rainbow in this healthier choice broccoli salad with less sugar, no dairy, and lots of fun, flavorful veggies kids will love!

Rainbow Broccoli Salad
Product links in this post are affiliate links. It does not cost you anything, and helps maintain the free information on this site, as well as answer the questions of “what brand do you use?” Please know I never personally recommend any product I wouldn’t use on my own family.

Glimpses of warmer weather

Michigan likes to do this thing in the spring, where it plays around with 60 degrees one day, and back down to 30 degrees the next day. But my goodness, has spring ever been nice to us this year so far! Lake Michigan is thawed out, our toes are in the sand, and we are ready for warmer weather sides, like fresh spring and summer salads!

Rainbow Broccoli Salad

A better choice broccoli salad…that still tastes amazing!

I’ve been a sucker for a creamy broccoli salad even as a kid. Most broccoli salads are loaded with cheese, bacon, loads of dairy, and sugar…a lot of sugar. Usually anywhere from a quarter to half cup of white sugar is in the typical broccoli salad recipe. What’s not to love about that, right?! I knew when my oldest got to the age where she could manage salads and raw veggies to eat that I had to figure out a better way to make one of my favorite salads with way less sugar. And not that there is anything wrong with cheese, bacon, and dairy, but there is something wrong with the picture when the star of the show in a salad is anything but the veggies. I wanted to teach my girls that salads and veggies can taste amazing without being covered up by sugar.

Rainbow Broccoli Salad

Tips for making raw salads like broccoli salad kid friendly

Be sure to pay attention to the Notes section in the recipe card of this post. There are tips and tricks mentioned that will make salads like this easier for little kids to eat, and your older kids will be more likely to accept this new food keeping some things in mind:

  • When chopping the broccoli and cabbage, remember that if you have real little ones, taking the time to finely chop the veg will really help with their ease of being able to spoon the salad and manage chewing it in their small mouths! As they get a little older, you can leave the pieces bigger.
  • If your kids are funny about the pungency of onion pieces, sub the finely chopped onion for 1-2 tsp of onion powder. My kids love the flavor of sweet onions raw when they are cut up small, but I know that is not always the case. If you have littles, don’t shy away from at least trying. This is how my girls’ palates were formed young! Mince them up and try it!
  • Change up the veggies! Beets and tomatoes swap well for the red. I love using roasted butternut squash for the orange, and did this often when the girls were very little – the sweetness is amazing for little ones and the soft squash is so easy to chew. You can use green cabbage too! Add a little bite of pretty fruit to the bowl if you think the kids will like that. My girls typically complain the salad is too sweet when I do this, but yours might like it! My favorite is pineapple or apple, but raisins and blueberries work nicely too.
Rainbow Broccoli Salad

The Method :: The Dressing

One bowl side dishes are totally my jam. The dressing consists of 4 simple ingredients that get whisked up right in the bowl that you will serve the salad in. Less dishes, and less prep time! The creamy base is lightly sweetened with a spoonful of raw honey instead of white sugar, and it is plenty sweet. Keeping the vinegar amount lower helps with not needing to add as much sweetener as well. I prefer more of a bite to my broccoli salad, so I tend to add a splash of vinegar to my bowl. You can always add some raw shreds of apple or pineapple to the salad if the kids are already used to a sweet broccoli salad. Using fruit is a much better choice than adding more sugar.

Rainbow Broccoli Salad

The Method :: The Veggies

I think you’ll find that chopping the veggies really small is worth the time that it takes. The kids will be able to spoon it easier, and your little ones will chew smaller raw veggie pieces easier this. Chop the veggies up and toss them with the simple dressing and the salad is ready to eat!

Rainbow Broccoli Salad

Yogurt and Mayonnaise Options

There are so many ways to make the creamy base for the dressing suit your dietary needs. If you don’t have any dietary restrictions, plain yogurt and your favorite healthy oil based mayo will do the trick. If you are dairy free, you can swap the regular yogurt for full fat coconut yogurt, or just use all mayo and thin it out with a little splash non-dairy milk like coconut milk or a nut milk. Our favorite store bought mayo using healthy fats is Sir Kensington’s Avocado Oil Mayo that we get for a great price at Costco. There are so many avocado oil mayonnaise choices for great prices now though, even if you don’t have access to Costco. If you are egg free, store bought mayo can be super tough. But I have a solution! There are 2 egg free mayo options on the blog. This Simple Egg Free Mayonnaise is dairy based if you can have that. And this Paleo Mayo is dairy and egg free.

Rainbow Broccoli Salad

More than just a dinner side!

Meal prep this Rainbow Broccoli Salad on Sunday, and you can use it for your a lunchbox veggie side for the kids, and also for your lunches. This kind of preparing helps keep kitchen food prep time at a reasonable amount for busy families. Broccoli salad packs fantastic in lunchboxes, and is such a great change up from regular veggie sticks. To pack Rainbow Broccoli Salad in a lunchbox, I would suggest a leakproof container, or something that seals the sides a bit. For my youngest’s Rover Planetbox shown below (she is 7), we use the little silicone cups that come with the Planetboxes that seal up to the sides. The salad is not drippy, but just in case a little condensation is there, it will prevent little drips. My older girls (almost 12 and 10) have the larger, Launch Planetbox, and they use the bigger Rounds bowl with a lid that the Planetboxes come with for their salads since they are bigger. When packing for little kids, remember the veggies don’t need to be the star of the show for a long school day and a short lunch period. I save bigger veggie portions for her breakfast and/or dinners. Time is of the essence when at school, so I want her filling up on protein and fat packed bites of food. My older girls can eat a bit quicker so they pack bigger salads.

Rainbow Broccoli Salad

Rainbow Broccoli Salad

Ingredients

  • ½ cup full fat yogurt or coconut yogurt
  • 1/3 cup avocado mayonnaise see Notes for homemade mayo options
  • 1 tbsp white wine vinegar
  • 1 tbsp raw honey
  • ½ small onion finely chopped
  • 1 small red bell pepper diced
  • 1 large carrot peeled and shredded
  • 1 head of broccoli florets chopped to bite sized (see Notes)
  • ½ head of a small purple cabbage sliced into thin, short strips (see Notes)
  • Sea salt and pepper to taste if needed

Instructions

  • Whisk the yogurt, mayo, vinegar, and honey in a medium mixing bowl until smooth.
  • Toss the veggies with the dressing in the mixing bowl, and taste for salt and pepper. Serve the salad right away or hours later – as the flavors marry, the salad gets even better!
  • Store your Rainbow Broccoli Salad in the fridge for up to 5 days.

Notes

  • If you are egg and dairy free, try my Paleo mayo! Or if you are egg free but can have dairy, you can try my egg free, dairy based mayo. Any clean, crisp vinegar will work for the dressing.
  • If your kids are funny about the pungency of onion pieces, sub the finely chopped onion for 1-2 tsp of onion powder. My kids love the flavor of sweet onions raw, but I know that is not always the case. If you have littles, don’t shy away from at least trying. This is how my girls’ palates were formed young! Mince them up and try it!
  • Try multiple colors of bell peppers to boost the color even more! When chopping the broccoli and cabbage, remember that if you have real little ones, taking the time to finely chop the veg will really help with their ease of being able to spoon the salad and manage chewing it in their small mouths! As they get a little older, you can leave the pieces bigger.
  • Change up the veggies! Beets and tomatoes swap well for the red. I love using roasted butternut squash for the orange, and did this often when the girls were very little – the sweetness is amazing for little ones and the soft squash is so easy to chew. You can use green cabbage too!
  • Add a little bite of pretty fruit to the bowl if you think the kids will like that. My girls typically complain the salad is too sweet when I do this, but yours might like it! My favorite is pineapple or apple, but raisins and blueberries work nicely too.
Rainbow Broccoli Salad

More real food recipes you might like ::

Batch Up Meals Breakfast Ideas Dinner Ideas Feeding Babies Healthy Kids and Teens Lunch Ideas Nourishing Staples Real Food 101 Real Food Tips school lunches Soup Taking Care of Momma

Creamy Cabbage Soup

March 15, 2021

Creamy and velvety cabbage soup, packed with nutrients and full of flavor!

Creamy Cabbage Soup

Product links in this post are affiliate links. It does not cost you anything, and helps maintain the free information on this site, as well as answer the questions of “what brand do you use?” Please know I never personally recommend any product I wouldn’t use on my own family.

It’s been over 15 years.

About 20 years ago I got the diagnosis that would change everything for me. Hashimoto’s – an autoimmune thyroid disorder. I’ll spare you the details of the 3-4 years after that diagnosis of trying to actually figure out what that meant, and how to feel even an ounce of better. After a few years of trying everything mainstream medical and not feeling any different, I saw more of a natural, functional medicine practitioner. Answers and more of a “root issue” approach helped me quite literally peel back layers and layers of healing that my body needed. I learned how to listen to my body. I learned what worked for me, what the red flags and warning systems looked like, sounded like, and felt like….and I have felt what “good” really and truly feels like.

Back to the basics

And because certain things like stress (hello 2020), infections, inflammatory foods, and toxins can trigger an autoimmune “flare,” I’ve learned how to nail down those triggers so they don’t spiral out of control. I’m feeling one of those “flares” in the season I’m in right now, and after about 6 months of ignoring the red flag symptoms (because we have all been in survival mode in 2020, amiright?!), it’s time to get back to what I know I need to be doing for my body. And for me, that always means getting back to less inflammatory foods even if they are considered “healthy” for most, and hello to more cooked veggie minerals at every meal. It has, and probably always will be a game changer for me. It is one of the biggest reasons there are so many veggie soup recipes on the blog, and in my cookbooks, and why you’ll always hear me talking about “breakfast soups.”

Creamy Cabbage Soup

Breakfast Soup

And lunch an dinner soup. Cooked veggies just digest easier, and it is so much easier to get a variety and abundance in when you roast or “soup” your veggies. Souping your veg doesn’t have to be boring either. There are so many ways to change things up, and give your body the mineral variety it needs! If you are new to veggies at breakfast, soup might sound so strange, but hear me out. A little mug of steamy soup, a muffin, and some sausage or egg? It is perfectly dreamy to be honest. Sure, a veggie hash or a smoothie with greens works for breakfast too, but there is something about souping breakfast that has been the ticket to feeling amazing for me for years.

Cabbage…nutrient packed and anti-inflammatory

And did I mention a big time budget saver? Because let’s face it – that part matters too! Cabbage is about as cheap as it gets, but it is also loaded with micronutrients and minerals. Cruciferous veggies like cabbage can also be anti-inflammatory. For some, cruciferous veggies can be a problem digestively, especially in the raw state, but cooking can help with digestion. It also helps to eat these veggies with a healthy fat, so cooking the veg in a nutritious fat that works for you such as butter or olive oil is perfect. If you are someone that tolerates cabbage well, you are going to love this soup!

But how does it taste, and will my kids eat it too?!

The last thing I want you to be doing is making a bunch of meals that the rest of the family won’t eat, dear momma. Even though I have seasons of needing to eat a little differently than a growing, metabolism burning kid, it doesn’t mean that they can’t also be eating many of the same foods! The girls love just about every soup blend that has come out of my kitchen for their lunchbox thermoses. When they were babies I served them soups for breakfast often right along with myself. It is perfect for those seasons of sleepy babyhood for everyone to eat the same. These days it looks a little more like the kids having a muffin with eggs and a packed out smoothie, and mom having the same muffin, but with some meat, and a mug of soup. This works for our metabolisms where they are right now in the season we are in at the moment. The cabbage for this soup cooks down and and gets sweet with sautéing and really is a blank slate for whatever flavors you want to add in. I use some nutritional yeast to give it a cheesy flavor without the dairy, as well as some of my sausage seasoning blend to give the soup the warmth of cooking with sausage.

Creamy Cabbage Soup

Simple, easy soup making method

This is a one pot deal, and I think that is something just about everyone can handle these days! Just use the slow sauté approach to bring out the sweetness and flavor from the veggies, toss with some potato starch and then simmer them with your broth. The potato starch gives the soup a grain-free velvety, creamy texture that is to live for! You’ll use your immersion blender to puree the soup to a perfect creaminess once it is finished, but if you don’t have an immersion blender you can use a regular blender too.

Creamy Cabbage Soup

Other creamy soup purees that work well for any meal of the day!

My rhythm has most often been to make a soup for the week on the weekends or on Monday’s. If you don’t like to eat the same soup for days in a row, make a couple different kinds and start building your freezer stash. If you store a quart of soup into the freezer each week, you’ll soon have a lush soup stash to pull from so that, perhaps, on an extra busy week you don’t have to cook a soup. Or so that you can pull some variety throughout the week.

Creamy Cabbage Soup

Creamy Cabbage Soup

Ingredients

  • 2-3 tbsp butter to cook in bacon fat, olive oil, or avocado oil work well here too
  • 2 small onions halved and sliced into strips
  • 1 carrot coarsely chopped
  • 1 stalk of celery coarsely chopped
  • 1 small/medium head of cabbage sliced into strips
  • 3 tbsp potato starch
  • 1 tbsp nutritional yeast optional but lends a cheesy flavor without the dairy!
  • 1 tsp of my sausage season blend optional, but gives the flavor of having meat/sausage in the soup
  • 1 quart bone broth
  • 1/2 – 1 cup full fat coconut milk or regular milk if you tolerate dairy
  • Sea salt/pepper to taste

Instructions

  • Melt the butter in a large soup pot over medium high heat, and saute the onion, carrot, and celery for a few minutes while you chop the cabbage. There is so much cabbage, so give the first few veggies a few minutes to get started first.
  • Add the sliced cabbage and saute over medium high heat until the cabbage reduces down about half, and gets really soft and sweet. This takes a good 10 minutes to achieve and the flavor is amazing. Stir throughout the cooking process.
  • Put the potato starch, nutritional yeast, and sausage seasoning blend into the pot, stirring to coat the veggies in the starch and seasonings.
  • Pour the broth in, stir, and bring the soup to a low simmer for 10 minutes. Turn the stove off, pour in the coconut milk, and blend the soup with your immersion blender or in a regular blender until smooth. Salt and pepper the soup to your taste once it is blended.
Creamy Cabbage Soup

More real food recipes you might like ::

Dinner Ideas Healthy Kids and Teens Lunch Ideas Real Food 101 Real Food Tips Snack Ideas

Sheet Pan French Fries

March 10, 2021

Make easy sheet pan French fries for the perfect compliment to any burger, or the most fun munchy snack for game day or movie night!

Sheet Pan French Fries

Product links in this post are affiliate links. It does not cost you anything, and helps maintain the free information on this site, as well as answer the questions of “what brand do you use?” Please know I never personally recommend any product I wouldn’t use on my own family.

Like peanut butter & jelly…

The beach and flip flops. Peanut butter & jelly. Spring time and muddy children. A burger with the perfect French fries. Like so many things that just go together, I really think that having a great, healthy option for French fries is an absolutely must in any kitchen! Over the years, I’ve fallen in love with this French fry method, and I think it will become a staple in your house for every burger night, or munchy snack need too!

Sheet Pan French Fries

The Method :: Cutting the fries

Whether your kids have had restaurant French fries or not, one of your favorite kitchen tools for making fries is going to become the crinkle cutter. This inexpensive cutting tool not only dresses your fries up to look more like restaurant fries, or fries from the frozen section of the grocery store, you can also use it to crinkle cut veggies to jazz those up too! I also find a crinkle cutter an easy to grasp tool for toddlers that want to try learning how to cut soft veggies. To cut the French fries, I like to use a straight knife to cut medium potatoes into thirds lengthwise. Then lay those pieces flat to cut the crinkle fry shape. Be careful with the thickness of the fries – if you go to thin, they will cook really fast and not have that fluffy potato center.

Sheet Pan French Fries

The Method :: Seasoning the fries

Once the potatoes are cut, toss them in a bowl with olive oil and seasoning. It doesn’t get much easier than that! I like using simple sea salt and pepper with a little paprika and parsley for color. But you can dress them up however you like here!

Sheet Pan French Fries

My favorite French fry method…

The secret to fries that don’t stick to the pan, and the perfect crispy outside all lies in the screaming hot sheet pan. One burger night, a very long time ago, I turned the oven on to pre-heat while I prepped my potato fries, and didn’t realize that I had inadvertently left my sheet pan in the oven from earlier in the day. When I went to put my fries on a sheet pan, I couldn’t find it, and, of course, remembered it was in the oven. The sizzle when the oil coated fries hit the pre-heated sheet pan made me wonder how these fries would turn out, and much to our utter happiness, we couldn’t believe how amazing the texture was.

Sheet Pan French Fries

Bake, toss, bake, toss, bake…

Sounds fussy, but I promise it just takes a few seconds to toss those fries around. Let them sear on the super hot sheet pan for about 15 minutes, and then toss them around. Bake another 15-20 minutes, and then toss again. You’ll do one more round of 15, and then you’re fries are ready. Moving them around every 15 minutes or so will ensure the super hot oven doesn’t crisp just one side of your fries. And I’m not talking perfection here – I definitely do not sit there and meticulously flip each fry. I just use a spatula to flip them around, give the pan a shake and toss it back in the oven.

Sheet Pan French Fries

Dipping ideas!

I know, I know…ketchup. But think outside the box a little bit, and one of my favorite fry dipping modes lately in a restaurant has been any kind of aioli they serve! Or as my husband puts it, “fancy mayo” 🙂 You can use your favorite healthy store bought mayo, or make your own. On the blog, I have a great dairy based egg free mayo, and a Paleo egg free mayo to try. There is also 2 great aioli recipes on the blog! Try my chipotle lime aioli or my garlic aioli – both are dairy free!

Sheet Pan French Fries

Does this method work for sweet potatoes?

Absolutely! I tend to flip sweet potatoes a little more often because they tend to burn easily, but stirring them around the 10-12 minute mark seems to do the trick. It all depends on the size of your cut.

Sheet Pan French Fries

Sheet Pan French Fries

Ingredients

  • 5-6 medium russet potatoes
  • 1/3 – 1/2 cup olive oil or avocado oil
  • 1 – 1 1/2 tsp sea salt to taste start with around 1 tsp – you can always add more later but you cannot take it away
  • 1 tsp smoked or sweet paprika
  • 1 tsp dried parsley
  • ½ tsp pepper

Instructions

  • Put a large, unlined baking sheet into your cold oven, and then pre-heat the oven to 425 degrees. You want the sheet pan to be in there to pre-heat as well. This will prevent sticking and make for crispier potatoes.
  • Cut your potatoes into French fry shape. I like to cut the potato lengthwise in thirds using a straight knife, and then use a crinkle cutter to cut the flat pieces into thirds again making a crinkle cut.
  • Toss the French fries in large mixing bowl with the oil and seasonings until the potatoes are coated evenly. I think using my hands works the best here.
  • Once the oven pre-heats, take the hot sheet pan out of the oven, and pour the seasoned and oil coated French fries onto the hot pan (listen for the sizzle!). Use a rubber scraper to get all the oil out of the bottom of the bowl. Spread the French fries out on the pan.
  • Bake the French fries at 425 degrees for 15 minutes. Stir the fries, and then bake another 20 minutes. Take the French fries out again, stir the fries, and the bake another 15 minutes until golden brown and cooked through. If you cut your French fries smaller/thinner, they will take less time. If you cut them bigger, you will want to add more time.

Notes

  • You can leave the paprika out, but I love the color it gives, and the slightly smoky flavor to a smoked paprika. If you use a sweet paprika you won’t taste it as much so that would be a good option for little ones that might not like the smoked flavor, but would still give the pretty and appealing color.
  • Change up the seasoning to what you are serving it with! Try rosemary with a steak, or dill when serving with crispy fish!
Sheet Pan French Fries

More real food recipes you might like!

Batch Up Meals Breakfast Ideas Dinner Ideas Healthy Kids and Teens Lunch Ideas Nourishing Staples Real Food 101 Real Food Tips RGN Meal Plans school lunches

Nourishing 2 Week Meal Plan {Winter Inspired Part 2}

February 17, 2021

More winter inspired meal planning to create 2 more full weeks of nourishing winter meals!

Nourishing 2 Week Meal Plan {Winter Inspired Part 2}

Product links in this post are affiliate links. It does not cost you anything, and helps maintain the free information on this site, as well as answer the questions of “what brand do you use?” Please know I never personally recommend any product I wouldn’t use on my own family.

Winter Inspired Part 2!

You asked, and I’m all ears, dear momma! I was hesitant to hit publish on my first Meal Plan a couple of weeks ago, but my heart is just so full with the messages and posts about how this has helped your families. So I’m back with more! ***If you have not had the chance to read my first Winter Inspired Meal Plan, you’ll want to hop over there to start. You’ll read a lot of great tips for portion sizing, balancing macros, and ideas for making your first baby steps into meal planning with real food.*** There is a full 2 week printable meal plan with winter inspired foods there, and another full 2 weeks on this post – that is a full month of meals to play around with, and I can’t wait to hear about your meal planning successes!

Nourishing 2 Week Meal Plan {Winter Inspired Part 2}

Winter Inspiration

I know there are readers from all over the world that visit this space, so I want to be sure that I reiterate my recommendations on the first meal plan to buy what is in season where YOU live. February in Florida, or somewhere in Australia looks very, very different from February in Michigan! But I also realize that while I’m drooling over your beautiful farmer’s markets this time of year, our farmer’s markets and available in season produce will be bursting at the seams during the summer months. We just have very different growing seasons. Keep in mind where you live, and shop produce that fits in your budget within the season that you are, and you’ll be good to go!

Nourishing 2 Week Meal Plan {Winter Inspired Part 2}

A note about my husband!

I left this out of the Part 1 Meal Plan, and for that I apologize! My husband eats all meals with us on the weekend. He is a commuter on work days, and so he takes his breakfast and lunch with him Monday through Friday (he has been working from home since April, but still preps his food the same way). In the winter, his breakfast is prepped on Sundays. He makes a skillet of potato hash with spinach and sausage for all 5 days, and takes that with him to work. He warms that up at work and adds an egg most days. A nice travel thermos or electric travel mini hot pot works well for anyone that does not have access to warming things up. In the warmer months of summer, he will do smoothies more often. For his lunches, he preps some sort of meat main (typically chicken or beef), and brings enough salad for the week with him. He keeps all of this at work. He eats dinner with us most nights of the week, though sometimes he fasts dinner. {He did not always prep this himself by the way! That started happening when I was pregnant with baby 3…sometimes momma just can’t do everything! He enjoys taking that off my plate, so he still does this, but I know that is not the case in every house. Do what you can!}

Nourishing 2 Week Meal Plan {Winter Inspired Part 2}

Warm meals for cold days

That is the name of the game in the winter months here. If you live somewhere warmer, feel free to swap some of our hot meals for cooler ones! Just look at this frozen Lake Michigan beach in the winter months! We enjoy really warm dinners in the winter, so you’ll see that reflected in the meal plan for the winter months. That does not, however, mean that I want to be in the kitchen all day! I think you’ll see how I’m able to stretch meals into the next day, and repurpose food for new meals to help with time management.

Nourishing 2 Week Meal Plan {Winter Inspired Part 2}

Let’s talk about lunchbox food products!

I love homemade hummus…but 3 kids into this thing I found the convenience of hummus cups to be a bit of a sanity saver. You just can’t always make everything all the time, least you burn out, dear momma. Same with guacamole. We just can’t afford the avocado prices here where they don’t grow, so guacamole cups are a very nice alternative. I do some of this shopping at Costco, and some online, so here is a great post with some of the packaged convenience lunchbox snacks, including crackers and granola bar options that you’ll see in the meal plan too. I do sometimes make these from scratch, but it sure is nice to have the option to buy them during certain seasons.

Nourishing 2 Week Meal Plan {Winter Inspired Part 2}

SO! Let’s get started!

Here is a PDF for you to download of my full 2 Week Winter Inspired Meal Plan with links to recipes included. {See below this section for a blank version if you want to fill in your own!}

Want to build your own meal plan?

Go for it! My way of doing meals is definitely not the only way! And my recipes are not the only recipes around! Here is a blank PDF for you to print and fill out your own.

Winter Inspired Dinners to Swap in the Dinner Section

I know that not every single dinner idea on my blog or in my cookbooks is everyone’s cup of tea, or perhaps you have other ingredients available or in season right now where you live. So here are some other dinner ideas to swap for the dinner section of the meal plan that fit with the idea of “winter inspired!” OR, fill in your own family favorite meals! Most of this list is from right here on the blog. Any recipe links that have a page number are from my cookbooks. Those with page numbers in green are from The Little Lunchbox Cookbook, and those with page numbers in pink are from Nourished Beginnings.

Kid Friendly Veggie Packed Slow Cooker Lasagna

Spring is right around the corner!

I hope you enjoy the 4 total weeks of cold weather meal planning I’ve created for you! I am going to be working on some spring inspired meal planning in the next month or so, and would love any feedback or questions you might have as I prepare to create those! Drop some comments below!

Gluten Free Strawberry Pie
Dinner Ideas Healthy Kids and Teens Real Food 101 Real Food Tips

Veggie Packed Slow Cooker Lasagna

February 9, 2021

Classic lasagna flavor, with a rich grassfed meat sauce packed with veggies, layered with cream and noodles, all in the convenience of your slow cooker!

Kid Friendly Veggie Packed Slow Cooker Lasagna
Product links in this post are affiliate links. It does not cost you anything, and helps maintain the free information on this site, as well as answer the questions of “what brand do you use?” Please know I never personally recommend any product I wouldn’t use on my own family.

Brrrr!

Michigan born and bred has made us quite used to months of piles of snow and cold, but right around the middle of February, we usually dip well below even our threshold for cold air! These kids are pretty used to playing outside everyday no matter the weather, though, and we embrace the cold with warm campfires, cozy blankets…and comforting lasagna!

Kid Friendly Veggie Packed Slow Cooker Lasagna

Warm lasagna made in the slow cooker!

Not that popping a casserole dish in the oven is that hard, but there is just something about being able to get dinner done before noon that makes me smile. Checking dinner off the list early in the day always makes me feel 10 steps ahead of the game, and this slow cooker lasagna will warm up even the most chilled to the bone kids and adults alike in just a few easy steps.

https://amzn.to/37fd5iD

Veggie packed but so kid friendly

I don’t mind a big salad to get our veggies in on lasagna night, but sometimes a cold salad just doesn’t work in February. And little kids eat cooked veggies easier than raw. This lasagna is super packed out with plenty of veggies, but chopped small, and sautéed until sweet, they are the perfect kid friendly way to get flavorful and nutrient loaded vegetables in on lasagna night. Just look at all that veg!

Kid Friendly Veggie Packed Slow Cooker Lasagna

The Method :: The Veggie Meat Sauce

The veggie meat sauce can be made up to a day in advance. If you have a prep day, this is the perfect activity for that day. Or if you plan to make this for a school night, simply make the sauce the night before, so that you can just get everything into the slow cooker in the morning without any fuss. To make the veggie meat sauce, you’ll pull out all the sweetness and flavor from the veggies first by sautéing them in butter or olive oil. This time is precious, and will create so much flavor. Once the veggies are perfection, the beef will get browned, the sauce will be added, and a few minutes of simmering will pull all the flavor together.

Kid Friendly Veggie Packed Slow Cooker Lasagna

The Method :: The Creamy Bechamel Sauce

If you are dairy free, you are in luck! You really can have a creamy element to your lasagna without dairy, and this creamy sauce is just the ticket to your creamy dreams! Make a quick rue with rice flour and butter (if you can have it) or olive oil, then whisk in some coconut milk. If you tolerate dairy, cream or milk work fine here. The creamy bechamel sauce comes together in mere minutes, and this too, can be made a day in advance so that you can build your lasagna easily.

Kid Friendly Veggie Packed Slow Cooker Lasagna

The Method :: Building and Slow Cooking the Lasagna

Once you have the 2 sauces made, you are ready to go! Get a little of the meat sauce down on the bottom of the greased slow cooker, and then build 3 layers of lasagna noodles, bechamel sauce, and veggie meat sauce. If you tolerate a lot of dairy, you can add some cheese on top of each bechamel layer. This is totally optional. Two of my family members only tolerate sheep’s milk or goat’s milk cheese, which is pricy, so we just add some Manchego to the top of the lasagna and are happy! If you are completely dairy free, just leave the cheese off the top – it still tastes so good!

Kid Friendly Veggie Packed Slow Cooker Lasagna

A note on the eggs

I know this is a weird ingredient, but in years of testing out slow cooker lasagnas, I have found a couple eggs whisked into my creamy sauce makes the lasagna set up better. I’ve even used up to 4 eggs! If you are egg free, I would suggest simmering the meat sauce down a bit more so there is less liquid. It does work without the eggs – you may not get perfect little square slices, but it works.

Kid Friendly Veggie Packed Slow Cooker Lasagna

A note on prepping and timing

If you have a slow cooker that has a timer function, you are going to want to use that. I have a super old school slow cooker that does not have a timer, so I have to remember to turn my slow cooker off a the 4 hour mark. When the lasagna is done cooking on low for 4 hours, you want to let it rest with the heat off for at least 30 minutes, but I prefer more like 2 hours. It allows the juices to be soaked in by the noodles, and helps the lasagna to set. You really can make this an all day slow cooker meal while you are at work if you have a timer to shut off the slow cooker while you are gone. If you don’t, like me, you’ll want to save this meal for the weekend, or if you work from home like I do, just set a timer to remember to turn it off.

Kid Friendly Veggie Packed Slow Cooker Lasagna

Lasagna Noodle Tips and GF Brands

So one of the things that my “type A” personality had to get over to make a slow cooker lasagna was that slow cookers are oval…and lasagna noodles are not. It about killed me the first time I broke some noodles up to cover the area needed in my slow cooker, and truth be told, it really doesn’t matter! It all comes out looking the same! By the way, if you are gluten free, you can use the Jovial GF Brown Rice Lasagna Noodles, or the Tinkyada Brown Rice Lasagna Noodles! Some regular grocery stores even carry these now!

Kid Friendly Veggie Packed Slow Cooker Lasagna

Kid Friendly Veggie Packed Slow Cooker Lasagna

Ingredients

For the Veggie Meat Sauce:

  • 3 tbsp olive oil or butter
  • 1 medium onion diced
  • 1 bell pepper diced
  • ½ head cauliflower chopped small
  • 4 ounces of mushrooms sliced
  • 4-5 cloves of garlic minced
  • 2 handfuls baby spinach finely chopped
  • 2 tbsp tomato paste
  • 1 lb grassfed ground beef
  • 1 – 32 ounce jar marinara sauce
  • Sea salt & pepper to taste

For the Creamy Bechamel Sauce

  • 1/3 cup butter
  • 1/3 cup white rice flour
  • 2 ¼ cups full fat coconut milk or regular milk
  • 2 tsp sea salt
  • ¼ tsp pepper
  • 2 eggs whisked

For the Slow Cooker Lasagna

Instructions

Make the Veggie Meat Sauce:

  • Over medium high heat, warm the olive oil and then sauté the onion, bell pepper, cauliflower, and mushrooms for 5-7 minutes until fragrant and soft.
  • Add the garlic, spinach, and tomato paste, and stir to combine.
  • Add the ground beef with a big pinch of sea salt and pepper, and brown the beef, stirring it into the cooked veggies.
  • Once the beef is fully cooked, add the marinara sauce, stir to combine, simmer for 5 minutes, and then set aside.

Make the Creamy Bechamel Sauce:

  • Use a medium saucepan and melt the butter over medium high heat.
  • Whisk in the white rice flour, making a paste, and then gradually stir in the coconut milk, whisking along the way. Add the sea salt and pepper.
  • Keep the heat on high and whisk the mixture until creamy and smooth. This takes a minute or 2.
  • Turn the heat off. Whisk the eggs in a separate bowl and gradually add little bits of the egg at a time to the bechamel sauce whisking along the way until full incorporated.

Assemble and Cook the Lasagna

  • Spray the slow cooker with avocado oil spray before you assemble the lasagna.
  • Scoop enough of the veggie meat sauce onto the bottom of the slow cooker to generously cover the bottom.
  • Layer your uncooked lasagna noodles over the meat mixture. You’ll have to break up the noodles a bit to cover the area.
  • Pour about 1/3 of the creamy bechamel sauce over the noodles, and then scoop some of the veggie meat mixture over the top of the bechamel sauce, spreading it out to cover all of the surface of the noodles.
  • Add another layer of noodles, bechamel sauce, and veggie meat sauce.
  • Add the last layer of noodles, the last of the bechamel sauce, and the last of the veggie meat sauce, and then sprinkle with shredded cheese of your choice.
  • Put the lid on the slow cooker and cook on low for 4 hours. Turn the slow cooker off and let the lasagna rest for at least 30 minutes to soak in the juices and set up before cutting and serving. Up to 2 hours is even better and will still be hot!
Kid Friendly Veggie Packed Slow Cooker Lasagna

More real food recipe you might like!

Batch Up Meals Breakfast Ideas Dinner Ideas Healthy Kids and Teens Lunch Ideas Nourishing Staples Real Food 101 Real Food Tips RGN Meal Plans school lunches

Nourishing 2 Week Meal Plan {Winter Inspired Part 1}

January 30, 2021

Learn how to build a 2 week meal plan for your family centered around whole, real food found in the winter, busy schedules, and nourishing families!

Product links in this post are affiliate links. It does not cost you anything, and helps maintain the free information on this site, as well as answer the questions of “what brand do you use?” Please know I never personally recommend any product I wouldn’t use on my own family.

Finally!

After 7 years of blogging, 2 cookbooks, and countless in person workshops…I’ve made a meal plan! *Sound the trumpets and throw a parade!* I know so many of you have asked throughout the years, and I just never did it because really I never thought I was much of a meal planner. I have always had a bit of a “framework” in my head, gone shopping and bought seasonal food on sale for the week, and then built my week around that – for the last 11 years that I have had children in the house! But more and more of you are asking, and I decided that there definitely could be some value in showing you how I keep our menu seasonal to fit in our budget, as well as show you how I build a week of meals for a normal, “real world” family of five!

Raising Generation Nourished 2 Week Meal Plan {Winter Inspired Part 1}

Balancing Macros {Fats, Protein, Carbohydrates}

Healthy fats, proteins, and carbohydrates – they all matter when it comes to kids. It’s all about the balance/ratio that works for you and your family. This will look different for each family – and possibly each child! We are talking about normal, healthy children, without inflammatory diseases, etc here. There are special circumstances where a spurt of a more “keto” or other type eating style would benefit a child, or an adult working on healing some things. But for most normal children, a good balance of all 3 macros is the key to stable moods and blood sugars, really good sleep, and laser focus for every life activity. Keep in mind that growth spurts, seasons of stress/sports/extra activities will make the ratio need for each macro vary for your child. Listen to their body – kids are smart. Most of them don’t live to eat, they eat to live. And they crave what their body needs at that very moment. So make your meal planning mantra…“Make every bite count!” When you look at any given meal, are all 3 macros represented in a healthy way? If so, you are on your way!

Raising Generation Nourished 2 Week Meal Plan {Winter Inspired Part 1}

Portion Size Considerations **VERY Important – Don’t skip this section!**

One of the reasons I have always hesitated making meal plans trying to portray portion size and meal prep for every kind of family. Every kid has different appetites (even within the same age group!), and every family has a different number of kids at varying ages! The way that I made meals when I had very small children in the house is actually quite different than how I make meals now. The meals are the same, but my method is different. Back then, I used to have way more leftovers! I think I ate leftovers for breakfast almost daily. Or we had leftovers for dinner at least 2 times per week. I’m lucky to get 1 dinner of leftovers for my whole family of 5 these days with 2 pre-teens in the house! I have to be intentional if I want leftovers. That means purposely doubling or tripling something so that I can use the meal again. SO! With that in mind, if you have older children or MORE children in the house than my 3, you may want to consider doubling some of what I have listed. And if you have just a toddler or 2 in the house, know that you probably won’t have to make as many dinners as I do! You’ll have more leftovers to pull from.

Raising Generation Nourished 2 Week Meal Plan {Winter Inspired Part 1}

Meal Planning Baby Steps

If you pull up this meal plan and feel overwhelmed, slow down, and breathe a minute. Baby steps is key to not quitting. Most of the people that I polled wanted all 3 meals represented, and 2 weeks or more at a time. But if you are new to cooking and real food, you might need to back off on changing everything all at once. This is the real world, and I get that momma. This can be done without overwhelming time in the kitchen. Promise. I don’t have time for it, and kitchen work is part of my job! I don’t want you to quit, so please read through these thoughts!

  • Don’t change everything overnight – even if you are a jump in with both feet kind of person. Start out with one meal of the day. Maybe just start with fixing your breakfast routine. Once you have a rhythm set for that meal that feels good to you, then you can move onto lunch, or dinner.
  • Sit down with the whole family and make a menu TOGETHER. Everyone gets a favorite somewhere in the week. TELL THEM why – they will understand! You could go in so many different life skill directions in this conversation too. Everything from helping them see how good their bodies will feel eating real food, to helping them see how planning meals out helps the family budget.
  • Don’t shy away from a “rotation.” Once you figure out your rhythm…trust me it is like auto-pilot and so nice! You’ll see some similarities within each week, and you’ll see how I plan Sunday breakfast and dinners to help me on Monday every week. There is plenty of variety and change, so that things do get boring, but there is also some predictability. There are some things that look the same but have veggie or fruit switches depending on what I find on sale or in season, and you can do the same according to where you live.
Raising Generation Nourished 2 Week Meal Plan {Winter Inspired Part 1}

A quick note about location, seasonal food, and availability

I found out real quick when I started doing my weekly shopping trip Stories on IG how vastly different food cost, availability of food, and seasonal differences are depending on location! I love getting messages and learning about how food is bought all over the world! Please keep in mind that where I live may not be where you live. Where I live, buying a half grass-fed cow for the year is affordable for many, and very available. That is definitely not the case everywhere. So where you see beef on my menu, you may have to swap for a different protein, or whatever meat is the best you can afford. I have readers from Europe that ask why we don’t eat much lamb, and people from East and West Coasts of the US that ask why we eat fish only occasionally. Both lamb and fish are quite costly where I live, so it is just not something that fits more than just weekly, if that. In the winter you will probably never see summer fruit like berries, or spring veggies like asparagus, because it is out of season in the frozen tundra of Michigan, and very expensive. Stick with the seasonality of where you live, buying the very best you can WITHIN the budget that you have for your family. Don’t go broke eating real food – you can do this smart within a budget.

Raising Generation Nourished 2 Week Meal Plan {Winter Inspired Part 1}

SO! Let’s get started!

Here is a PDF for you to download of my full 2 Week Winter Inspired Meal Plan with links to recipes included. {See below this section for a blank version if you want to fill in your own!}

Want to build your own meal plan?

Go for it! My way of doing meals is definitely not the only way! And my recipes are not the only recipes around! Here is a blank PDF for you to print and fill out your own.

Winter Inspired Dinners to Swap in the Dinner Section

I know that not every single dinner idea on my blog or in my cookbooks is everyone’s cup of tea, or perhaps you have other ingredients available or in season right now where you live. So here are some other dinner ideas to swap for the dinner section of the meal plan that fit with the idea of “winter inspired!” OR, fill in your own family favorite meals! Most of this list is from right here on the blog. Any recipe links that have a page number are from my cookbooks. Those with page numbers in green are from The Little Lunchbox Cookbook, and those with page numbers in pink are from Nourished Beginnings.

Raising Generation Nourished 2 Week Meal Plan {Winter Inspired Part 1}

Stay tuned…

YES, I would like to make more of these! Stay tuned for another winter inspired meal plan in the coming weeks, and then I’ll jump into spring inspired meals when we get there! Since I am newer at making meal plans for sharing with readers, I would love to have your feedback so that this is as relevant for you. Let me know how you like the layout, etc. If I’m going to spend the amount of time I did to put this one together, I want to make sure they are going to be used!

Raising Generation Nourished 2 Week Meal Plan {Winter Inspired Part 1}
Dinner Ideas Healthy Kids and Teens Real Food 101 Real Food Tips

Sheet Pan Nachos with Slow Cooker Pulled Brisket or Beef Roast

January 13, 2021

The most perfect sheet pan nachos with easy slow cooker pulled beef for game day or fun Friday night!

Sheet Pan Nachos with Pulled Brisket or Beef Roast

Product links in this post are affiliate links. It does not cost you anything, and helps maintain the free information on this site, as well as answer the questions of “what brand do you use?” Please know I never personally recommend any product I wouldn’t use on my own family.

A story about the girls’ first nacho experience

A couple of summers ago my girls had their first experience with a big pile of loaded nachos! We live in a little beach town, and each summer we pick one weekend to play “tourist” – we ride the trolley, go to the touristy shops and attractions, play at the busier beach instead of the quieter beach, and also enjoy dinner at a local restaurant. That year, one of the girls asked what “nachos” were on the appetizer menu, so we decided to give them the experience! These nachos were no ordinary nachos, with plain corn chips and fake cheese. They were loaded with real pulled barbeque beef, green onions, peppers, crispy fried jalepenos, super yummy aoili and guacamole – the works!

Sheet Pan Nachos with Pulled Brisket or Beef Roast

A new fun weekend at-home nacho idea!

My kids just adored the family style way of getting to eat the nachos at that restaurant, and they talked about it for days! Every so often my middle one would reminisce about those nachos, and asked if we could try to make them at home. How could I say no to that?! We get a half grass-fed cow each year, and I just happened to have a brisket that I hadn’t decided what to do with yet. We slow cooked the brisket in my taco seasoning mix, let the girls dress up some nachos on a big sheet tray, and a new fun weekend dinner treat was born!

Sheet Pan Nachos with Pulled Brisket or Beef Roast

The Method :: Preparing the Beef and Sauce

The ingredients for the pulled beef is very simple. Your favorite taco seasoning mix and an easily whisked sauce – that’s it! The beef cut is really up to you on this one. Any cut of beef roast or brisket will do. (And really you could do a pan of ground beef taco meat if you don’t happen to have a roast around.). I keep a jar of my own taco season blend in my cupboard, so the prep for the beef goes really fast. Over the years, I have discovered that tripling that taco season mix into a jar works best for me, so feel free to do that and enjoy having taco seasoning already made up a lot longer!

Sheet Pan Nachos with Pulled Brisket or Beef Roast

The Method :: The Slow Cooked Pulled Beef

Once you season your beef roast with a generous amount of your favorite taco seasoning, take the time to sear the sides. The crust on the meat gives amazing flavor, and that extra 5-10 minutes of prep is so worth it. You get to tuck the seared beef into the slow cooker for the rest of the time anyway so take your time and get a nice flavorful sear on your beef! You’ll slow cook the beef roast for 8-10 hours on low, and boy oh boy will it just fall apart after that. Perfect for pulling apart with a couple of forks for your sheet pan nachos! Whisk some of the juices from the slow cooker with a starch of choice and you have a delicious sauce to mix in with your shredded beef for the nachos.

Sheet Pan Nachos with Pulled Brisket or Beef Roast

The Method :: The Sheet Pan Nachos

And now we get to do the fun part! If you want to get the kids involved, prepare a “topping bar” type set up so that they can sprinkle toppings onto the sheet pan nachos to their little heart’s desire! Such a fun way for kids to try new veggies like finely chopped peppers – they make the nachos so pretty and get super sweet once cooked! I like to get the cheese onto the chips first, and then let the girls do the rest. You can let them sprinkle a little extra cheese on top after they get the toppings on too.

Sheet Pan Nachos with Pulled Brisket or Beef Roast

A note on the chips and cheese brands

Because I know that there will be questions on chips and cheese brands! I do get the organic tortilla chips from Costco, but there are so many decent brands out there now! Get the best you can afford – this is an every once and a while fun dinner! I also use the manchego cheese from Costco, but any cheese that you love will work. My oldest and I do better on sheep’s milk cheeses so we use manchego which is also super melty!

Sheet Pan Nachos with Pulled Brisket or Beef Roast

Sheet Pan Nachos with Pulled Brisket or Beef Roast

Ingredients

  • 2 tbsp olive oil plus 1 tbsp butter to sear the beef
  • 2-3 pounds grassfed beef brisket or roast I have found any beef roast cut works!
  • 3-4 tbsp of taco season mix divided (I use my own taco season blend. I keep a jar of a triple batch of the seasoning in my pantry, so it is easy to use!)
  • 2 tbsp tomato paste
  • 2 tsp coconut sugar honey, maple syrup, or sugar works here – it cuts the acid in the tomato paste.
  • ½ – 1 cup beef broth chicken broth or water would be fine if that is all you have – I also happen to think swapping some of the liquid for a good beer or red wine tastes amazing
  • 1 large onion sliced into strips
  • 4 cloves of garlic minced
  • Sea salt/pepper to taste
  • Tortilla chips of choice
  • Cheese of choice if using
  • Nacho toppings of choice
  • 1 tsp starch of choice *you may not need this if you are using a taco seasoning mix that already has starch or flour in it – this is to thicken the sauce. You can use potato starch, GMO free corn starch, tapioca starch, or arrowroot.

Instructions

  • Warm a skillet over high heat with the olive oil and butter while you season the beef. Pat dry your beef roast and sprinkle 1 tablespoon of taco season ON EACH SIDE of the beef, rubbing it into the beef on each side. (Total of 2 tablespoons of taco seasoning on the beef roast – if your roast is on the bigger side, you might use a bit more than 2 tablespoons)
  • Put the seasoned beef roast in the hot oil to sear. LEAVE the beef in the skillet for a few minutes until a nice crust forms – if the beef is sticking when you pull it up that means it might need a bit longer. If it pulls away from the pan easily, you’ve made a nice crust on the beef! Turn the beef roast to the other side to sear for a few minutes.
  • While the beef roast is searing you can whisk the sauce. Put 1-2 tablespoons of taco seasoning into a medium mixing bowl. Add the tomato paste, coconut sugar, and broth and whisk to combine until smooth.
  • Put the whisked sauce, sliced onion, and minced garlic into the bottom of your slow cooker. Add the seared beef. I like to put the beef into the sauce, then turn it over so that it is coated on both sides. Put the lid on your slow cooker, and cook on low for 8-10 hours.
  • Remove the cooked beef to a cutting board and shred with 2 forks. Strain out about a cup of the sauce from the slow cooker, and whisk a teaspoon of potato starch into the liquid – this will make a thicker sauce for the beef. Mix the shredded beef with the thickened sauce – you can use as much of the sauce as you want to your desired consistency, and you can make more if you want it saucier!
  • To make the sheet pan nachos, pre-heat the oven to 400 degrees.
  • Line your sheet pan with tortilla chips. Sprinkle the cheese, then the shredded beef, and then the toppings of your choice. You can sprinkle extra cheese on the top if you want!
  • Bake the sheet pan tacos in a 400-degree oven for 15 minutes. Garnish with green onion, fresh herbs, sour cream – whatever you like!
Sheet Pan Nachos with Pulled Brisket or Beef Roast

More real food recipes you might like ::

Dinner Ideas Healthy Kids and Teens Nourishing Staples Real Food 101 Real Food Tips

Skillet Chicken and Kale with Garlic Mushroom Sauce

January 9, 2021

Add this easy, 20 minute skillet chicken and kale with garlic mushroom sauce dinner to your busy weekday menu!

Skillet Chicken and Kale with Garlic Mushroom Sauce

Product links in this post are affiliate links. It does not cost you anything, and helps maintain the free information on this site, as well as answer the questions of “what brand do you use?” Please know I never personally recommend any product I wouldn’t use on my own family.

Happy new year!

I took a look back at some of my new year recipe posts over the years this week, and I noticed a trend. They are all about getting back to the grind, eating well, but with kids in mind. Because those little guys don’t feed themselves, and they sure as the sun aren’t going to eat a boring kale salad everyday just because you have a few health goals 😉 {Go on ahead and call the real food police on that one – they already know I am not a fan of kale salads 🙂 }

Skillet Chicken and Kale with Garlic Mushroom Sauce

Get the kale in, but in a kid friendly way!

The kids need to eat dinner too – and you don’t want to be a short order cook, I’m guessing. Veggie variety is the key, dear momma. Those kids don’t need kale everyday – and quite honestly, neither do you. We have a variety of veggies, every color of the rainbow, available to us for a reason. Those colors equal different nutrients, so it is important to change it up. But on those days that you’re going to get those dark green leafy nutrients in, you might as well make them taste amazing…amiright?!

Skillet Chicken and Kale with Garlic Mushroom Sauce

All in one skillet dinner in 20 minutes?!

YES please! We all need yummy weeknight dinners that are easy to make, and don’t fill up the sink with a load of dishes. You’ll need a pot to boil your pasta in if you choose to serve with pasta, but the rest of the dinner is done in one skillet in about the time that it will take the boil the water and cook the pasta – and that is a recipe for the perfect weeknight dinner!

Skillet Chicken and Kale with Garlic Mushroom Sauce

The Method :: The Chicken

I have a secret place in my heart for the delicious flavor of seared chicken thighs, but if you are more of a chicken breast person, you can totally use that. Simply whisk the seasoning in a shallow dish, coat the chicken, and sear it off in a super hot skillet. The key to the flavor is allowing it to form a little golden crust!

Skillet Chicken and Kale with Garlic Mushroom Sauce

The Method :: The Flavorful Veggies

There is just something magic about a hot skillet, sliced mushrooms, and a little time. The golden color after cooking mushrooms is big flavor that will infuse the creamy sauce along with the garlic – don’t skip this part! It doesn’t take long! And one of the reasons I chose fast cooking veggies like kale and frozen green beans is so that you don’t have to spend extra time cooking that part. You’ll simply add the kale into the pan after the mushrooms turn golden and make the rest of the sauce. The green beans will cook while the sauce simmers. And bonus! All of these veggies have fat soluble vitamins – so eating them with the fatty cream sauce not only makes them easier to eat for kids, it makes the vitamins absorb better for their growing bodies!

Skillet Chicken and Kale with Garlic Mushroom Sauce

The Method :: The Dairy Free Cream Sauce

I know what you’re thinking…how can you get a cream sauce without dairy?! I also know what your first thought will be when you see coconut milk. Let me be the first one to tell you – I am not a fan of coconut…of any kind! So let that be the proof that the sauce doesn’t taste like coconut – it really takes on the flavors of the rest of the skillet, and just leaves a super creamy heaven for the chicken and veggies to soak in. {You can call the real food police on the coconut admission too…they already know it isn’t my fav!} And a quick note for those that tolerate dairy – cream or whole milk will work just fine here if you would rather use that.

Skillet Chicken and Kale with Garlic Mushroom Sauce

To pasta, or not to pasta?

If you have kiddos, and they can tolerate pasta of any kind, I’m thinking you’re going to find the dinner goes down even easier mixed with some fun pasta! Whether you like regular pasta, or gluten free, there are so many healthier choice varieties these days, and if you are off pasta for a bit, you can just serve your plate without the pasta. I think it tastes amazing over a baked potato or sweet potato.

Skillet Chicken and Kale with Garlic Mushroom Sauce

Skillet Chicken & Kale with Garlic Mushroom Sauce

Ingredients

  • 1 tsp basil
  • 1 tsp oregano
  • 1 tsp onion powder
  • 1 tsp garlic powder
  • 1 tsp sea salt
  • ½ tsp pepper
  • 5-6 boneless chicken thighs
  • 4-6 tbsp olive oil ghee, or butter
  • 6 oz mushrooms sliced
  • 2-3 cups chopped kale
  • 5 cloves of garlic minced
  • 1/3 cup white wine broth would be fine here
  • 1 ¼ cups full fat coconut milk or cream/milk
  • 2 handfuls of frozen green beans
  • Sea salt and pepper to taste
  • Cooked pasta of choice to serve over About 3 cups dry pasta. I use the Gluten Free Jovial or Tinkyada rice pastas

Instructions

  • Whisk the basil, oregano, onion powder, garlic powder, sea salt, and pepper in a large dish until combined. Pat dry the chicken thighs and toss them with the seasonings in the dish until the chicken is coated well. You can do this up to 24 hours in advance. If you season the chicken in advance, put plastic wrap around the dish and place it in the refrigerator until you are ready to make dinner.
  • Melt 4 tbsp of olive oil in a large skillet over medium high heat. Add the seasoned chicken thighs to cook until both sides are golden brown on each side, about 3-4 minutes per side. Take the browned chicken thighs out of the skillet onto a plate and set aside while you cook the veggies and sauce. *Keep all the leftover oil and browned bits in the skillet to cook the rest of the veggies in – so much flavor!
  • Melt another 1 tbsp of ghee in the skillet over medium heat. Add the mushrooms and cook for 5 minutes until the mushrooms are fragrant and golden. Add the kale and garlic and cook for a minute or two.
  • Bring the heat up to medium high, and add the wine to deglaze the pan, simmering for a minute or 2. Add the coconut milk and green beans, stir, and bring to a simmer. Put the cooked chicken thighs in the skillet sauce, and simmer for 5-7 minutes.
  • Serve the chicken with mushroom garlic sauce over cooked GF pasta of choice. If you are grain free, you can serve this over a baked potato or sweet potato!

Notes

  • If you have fresh green beans versus frozen, you’ll just have to cook them in the pan a bit longer but it does work.
  • You can use spinach instead of kale, but it does cook up faster, so just add it at the end to wilt in.
Skillet Chicken and Kale with Garlic Mushroom Sauce

More real food recipes you might like!

Dinner Ideas Feeding Babies Healthy Kids and Teens Nourishing Staples Real Food 101 Real Food Tips

Creamy Paleo Stuffed Butternut Squash :: Gluten & Dairy Free!

December 30, 2020

Healthy comfort food for your dinner rotation! Stuffed Butternut Squash packed with flavor, and creamy without the dairy or gluten!

Creamy Paleo Stuffed Butternut Squash :: Gluten & Dairy Free!

Product links in this post are affiliate links. It does not cost you anything, and helps maintain the free information on this site, as well as answer the questions of “what brand do you use?” Please know I never personally recommend any product I wouldn’t use on my own family.

Happy new year!

How about a new dinner idea for your menu rotation this winter? We’ve been enjoying these stuffed butternut squashes all fall long, and my girls have devoured enough of them that I thought it about time to share the recipe with you!

Creamy Paleo Stuffed Butternut Squash :: Gluten & Dairy Free!

Fancy presentation, easy peasy prep!

I know the idea of a stuffed squash seems time consuming, but it really is very little hands-on time. The oven does most of the work for you, and you can get so much done while dinner is in the oven! You could even roast the squash on a prep day if you do that, so that it is ready to go during the week. This also makes the perfect weekend comfort dinner when you do have a bit more time at home!

Creamy Paleo Stuffed Butternut Squash :: Gluten & Dairy Free!

The Method :: The Roasted Squash

A simple slice down the length of the butternut squash is all the cutting you need to do for this squash dinner. No peeling or dicing – my kind of dinner prep! After you scoop the seeds out, rub some olive oil over the flesh and sprinkle salt and pepper and you’ll be hands free while the squash caramelizes and sweetens in the oven.

Creamy Paleo Stuffed Butternut Squash :: Gluten & Dairy Free!

The Method :: The Filling

While your squash is roasting, the filling can be made in about 15 minutes. That gives you plenty of time to clean up the kitchen, help with homework, or tend to kiddos while the squash finishes roasting! To make the filling you’ll sweeten your aromatics before adding some grassfed ground beef. The nutritional yeast adds a cheesy flavor to the cream sauce without cheese! Heaven! Once the veggies and beef are cooked, you’ll coat them in potato starch so that the coconut milk will thicken once it hits the pan. You can swap an starchy flour you like here from tapioca to arrowroot. I leave the broccoli to add until the end so it doesn’t get too mushy. If you prefer your broccoli very soft you could add it earlier. The creamy filling is just so decadent and flavorful!

Creamy Paleo Stuffed Butternut Squash :: Gluten & Dairy Free!

The Method :: Assembling and Roasting the Stuffed Squash

Once your squash is finished roasting, you’ll easily be able to scoop little spoonful’s of the soft squash into your skillet filling. This does 2 things – it makes a perfect little well for the skillet filling to stuff into the squash, and secondly it stirs into the skillet filling, making it even creamier and buttery in taste! After stirring the squash into the filling, you can “stuff” the squash! A little sprinkle of the almond flour based topping and the stuffed squash is ready for the oven!

Creamy Paleo Stuffed Butternut Squash :: Gluten & Dairy Free!

An Important Note on Squash Size and Doubling!

Most of the time when I am grocery shopping, I pick out the short, fat little butternut squashes. I would consider them to be “small” butternut squashes. The recipe as written uses a small butternut squash, and feeds my family of 5 for one meal. If you need more servings, this recipe doubles very easily. You could use 2 small butternut squashes, or one large. I feel like the large butternut squashes take longer to roast, so when I do want more leftover, I tend to just make 2 small butternut squashes in a large, 9×13 baking pan, so they cook faster. And let me tell you, the leftovers are *ahhh-mazing* for breakfast the next day, dear momma!

Creamy Paleo Stuffed Butternut Squash :: Gluten & Dairy Free!

Can I Use Dairy or Cheese If I Tolerate It?

Absolutely! I know many, like myself, find too much dairy to be inflammatory, so typically this time of year, my body is ready for a little dairy break after the holidays. If you tolerate cheese, that makes such a yummy topping for the stuffed squash. We did that a couple times this fall with some Manchego, a sheep’s milk cheese that my dairy sensitive daughter and I tolerate very well. You could also sub real milk or cream for the coconut milk if you have access to that.

Creamy Paleo Stuffed Butternut Squash :: Gluten & Dairy Free!
Print Recipe
5 from 2 votes

Creamy Paleo Stuffed Butternut Squash

Ingredients

For the Roasted Squash

  • 2 tsp olive oil butter is ok here if you tolerate that
  • 1 small butternut squash halved and seeded
  • ½ tsp sea salt
  • ¼ tsp pepper

For the Filling

For the topping

Instructions

For the Roasted Squash

  • Pre-heat the oven to 425 degrees.
  • Rub the olive oil over the 2 halves of squash, and sprinkle with salt and pepper. Roast in a baking dish for 40 minutes at 425 degrees until soft. You can make the filling while the squash roasts.

For the filling

  • Warm the olive oil in a skillet over medium high heat, and add the onion and pepper. Sprinkle some sea salt and cook over medium high heat for 5-7 minutes until fragrant and soft.
  • Add the garlic and cook for a minute
  • Add the ground beef, Italian seasoning, salt, pepper, and coconut aminos and cook until the beef is browned. Stir and break up the meat into small pieces as it cooks.
  • Once the beef is browned, stir the nutritional yeast and potato starch into the mixture, and combine until everything is coated well. Pour the coconut milk and broccoli into the pan and stir until the coconut milk thickens, a couple of minutes. The broccoli will still have some bite to it, but it will cook more in the oven – if you add too early it will get too mushy.

Assemble the stuffed squash

  • Once the squash is done roasting, scoop some of the flesh into the filling mixture in the skillet and stir to combine. Make enough room in the squash to be able to “stuff” it, leaving some squash around the sides and bottom.
  • Once the squash has been stirred into the filling mixture, scoop the ground beef mixture into the squash to stuff it.
  • Mix the topping ingredients with a fork in a small dish, and sprinkle over the top of the squash. Bake in a 425 degree oven for 12-14 minutes, until the topping is golden.

Notes

  • If you need more servings, this recipe doubles very easily. You could use 2 small butternut squashes, or one large. I feel like the large butternut squashes take longer to roast, so when I do want more leftover, I tend to just make 2 small butternut squashes in a large, 9×13 baking pan, so they cook faster.
  • If you tolerate cheese, that makes a delicious topping too!
Creamy Paleo Stuffed Butternut Squash :: Gluten & Dairy Free!

More real food recipes you might like ::

Dinner Ideas Feeding Babies Healthy Kids and Teens Holiday Recipes Lunch Ideas Nourishing Staples Real Food 101 Real Food Tips

How To Make Kid Approved Creamed Vegetables With Any Veggie!

October 26, 2020

Veggie vitamins need healthy fat to absorb, so we might as well make them taste amazing with kid approved creamed vegetables using any veggie!

How To Make Kid Approved Creamed Vegetables With Any Veggie!

Product links in this post are affiliate links. It does not cost you anything, and helps maintain the free information on this site, as well as answer the questions of “what brand do you use?” Please know I never personally recommend any product I wouldn’t use on my own family.

Back to the basics

Last week, I happened to Instagram a quick veggie side dish that has been one of my go-to, “clear out the veggie bin at the end of the week” side dishes since my crew was very little. I was pretty blown away by the interest in the recipe specifics, but I can’t say super surprised, because it is one of the things that I adore the most about this RGN community. The following here is one of actual, real, everyday moms trying to do this real food thing with normal mom schedules and budgets…and this is as real life as it gets my friends!

A busy momma’s best friend!

This easy veggie side dish is going to become a regular on your dinner rotation – I happen to know because it most definitely was when my babies were very little, and still as as my girls have grown. An auto-pilot, nutrient-loaded way to get vegetables into my growing girls that they willingly (happily even!) inhaled each and every time when they were tiny, and ask for a lot as older kids! In right around 10 minutes, this kid approved veggie side can go alongside everything from a Sunday roasted chicken or beef roast, to a weekday pan seared fish.

One of my girls as a toddler gobbling creamy veggies!

For nutrient absorption, fat is where it’s at!

Dear momma, I hope you’ve hear the news by now that healthy fats are not the enemy. If you are anywhere near my age (I’ll be 41 next week!), I’m willing to bet that you grew up with a plethora of low fat food items in the pantry, and heaven forbid there ever be a stick of butter in the house. No, we grew up with a tub of rancid margarine in the fridge, and were told to stay as “low fat” as possible to be healthy. Thankfully the we have learned more about real, healthy fats, and their importance in our bodies. For hormones, for brain function…and for nutrient absorption! Fat soluble vitamins in many fresh foods from vegetables to pastured animal products need fat to even get into the tissues of our body. The very word “soluble,” meaning “able to be dissolved” should clue us in on how these fat soluble vitamins should be consumed. I love this article from my friend Jenny at Nourished Kitchen explaining the role that fat takes when eating fresh food.

How To Make Kid Approved Creamed Vegetables With Any Veggie!
Go on and butter up those veggies, dear momma! They help the vitamins in those veggies absorb and make them taste great for kids! Missing my babies at this age!

Ok, I get it! Fat is good to consume with veggies! Now how do we make the creamy veggies?!

I’m so glad you asked! One of the reasons I have never posted this recipe is because I kinda thought it might be too simplistic. The reality is, however, that these simple dishes happen more often in my house than fancy baking, fun treats, or elaborate dinners. This is the everyday grind, and I am committed to helping the moms of this generation learn how to cook real food everyday – not just every once and a while!

How To Make Kid Approved Creamed Vegetables With Any Veggie!

Let’s talk about what veggies to use!

The total amount of veggies including the onion is about 6-8 cups chopped. The whole point of this kind of skillet side is to use what you have, so change up the veg to what is in season in your veggie bin, and what you have leftover that needs to be used up at the end of the week. Add some frozen corn if you can have grains to add an extra pop of color! You can swap the carrot for sweet potato or bell peppers. Brussel sprouts, cauliflower, or asparagus swap well for broccoli. And zucchini swaps great for the green beans. Chopped spinach always wilts in at the end very well. Just remember 6-8 cups totally veggies – the cooking of the veg in the fat will bring out any veggies natural sweetness and make them super kid friendly in taste 😊

How To Make Kid Approved Creamed Vegetables With Any Veggie!

The cooking method

The key to making these veggies palatable to children lies in the cook method and the fat. Let the veggies get super soft and sweet, cooking in that fat for a good 5-10 minutes before making the cream sauce. You will be so glad you did. This method is the same that I use for the base of just about every veggie soup on the blog, and many dinners as well. It helps the veggie’s natural sugars shine and kids really love them!

How To Make Kid Approved Creamed Vegetables With Any Veggie!

Budget friendly

Because if we are going to do this real food thing, there are some things that are going to be spendy, such as buying quality meat and eggs. In order to balance that out in my budget, we pile high the budget friendly veg. Cabbage, green beans, carrots, spinach – we’re talking high nutrients with very little cost. The veggie fiber is priceless, and we already talked about how that little bit of fat swirled in helps all of the nutrients absorb. That is a big time budget win!

How To Make Kid Approved Creamed Vegetables With Any Veggie!

Serving suggestions

I used this creamed veggie skillet as a side to everything from a big Sunday dinner to an easy weeknight meal. Here are some ideas:

How To Make Kid Approved Creamed Vegetables With Any Veggie!
Print Recipe
5 from 1 vote

How To Make Kid Approved Creamed Vegetables With Any Veggie!

Ingredients

  • 2-3 tbsp healthy fat to cook in butter, ghee, olive oil, avocado oil, etc
  • ½ medium onion diced
  • ¼ – ½ medium cabbage sliced thin
  • 1 large carrot peeled and diced
  • 1 head broccoli florets chopped
  • 2 handfuls frozen green beans cut into 1-inch pieces
  • 3 cloves of garlic minced
  • 2 tbsp flour of choice to thicken any GF flour blend or regular flour, rice flour, or if you are grain free, you could use tapioca starch, potato starch, or arrowroot
  • 1 cup full fat coconut milk or regular milk/cream if you can have dairy
  • ½ cup cheese of choice shredded (If you cannot have dairy and tolerate goat or sheep milk cheese, that would work great. Or if you can’t have that, try adding in about 1 tbsp of nutritional yeast to add some cheesy flavor)
  • Sea salt and pepper to taste

Instructions

  • Melt the butter in a large skillet over medium-high heat and add the onion, cabbage, carrot, and broccoli with a big pinch of sea salt. Stir to combine and cook over medium high heat for about 5-7 minutes until the veggies are soft and sweet.
  • Stir in the frozen green beans and garlic and cook for 2-3 minutes.
  • Sprinkle the flour into the cooked veggies and stir to coat them well. Then, pour the coconut milk into the pan, and stir until the sauce thickens about a minute or 2. Turn off the heat, and stir in the cheese. Salt and pepper the veggies to your taste.

Notes

The total amount of veggies including the onion is about 6-8 cups chopped. The whole point of this kind of skillet side is to use what you have, so change up the veg to what is in season in your veggie bin, and what you have leftover that needs to be used up at the end of the week! Add some frozen corn if you can have grains to add an extra pop of color! You can swap the carrot for sweet potato or bell peppers. Brussel sprouts, cauliflower, or asparagus swap well for broccoli. And zucchini swaps great for the green beans. Chopped spinach always wilts in at the end very well. Just remember 6-8 cups totally veggies – the cooking of the veg in the fat will bring out any veggies natural sweetness and make them super kid friendly in taste 😊
How To Make Kid Approved Creamed Vegetables With Any Veggie!

More real food recipes you might like ::

Dinner Ideas Healthy Kids and Teens Holiday Recipes Real Food 101 Real Food Tips

Gluten Free Pumpkin Enchiladas

October 7, 2020

Put a fall spin on your favorite Taco Tuesday enchiladas with an easy and delicious and pumpkin enchilada sauce!

Gluten Free Pumpkin Enchiladas

Product links in this post are affiliate links. It does not cost you anything, and helps maintain the free information on this site, as well as answer the questions of “what brand do you use?” Please know I never personally recommend any product I wouldn’t use on my own family.

Jackets, jeans, and fuzzy hats…

Yup, we pulled out the ‘ol fall bin of outside gear this past week, and it looks like it’s pretty much here to stay! It kinda feels like I just put all of this stuff away, but the reality is, our fall season is pretty amazing, and we’ll take all the chilly autumn hikes and pretty fall colors as we can!

Gluten Free Pumpkin Enchiladas

A new spin on a family favorite!

Enchiladas are always a very enthusiastic dinner night in our house! Maybe a once a month treat during warmer months, they become more like an every other week thing when the weather turns cold. Last fall, I played around with the idea of a pumpkin base for the enchilada sauce instead of my original tomato based enchilada sauce, because I didn’t have tomato sauce in my pantry. The result was a very rich, perfectly decadent pumpkin enchilada sauce with subtle hints of the fall season. My crew was in love!

Gluten Free Pumpkin Enchiladas

The Method :: The Pumpkin Enchilada Sauce

In under 10 minutes, your pumpkin enchilada sauce will be done, and I think you are going to be floored at the rich flavor! You can make your sauce ahead of time on a prep day too. Just cook the aromatics in some butter and then simmer with canned pumpkin, broth, and warm seasonings. You’ll then use an immersion blender to smooth it all out into a velvety sauce for the enchiladas.

Gluten Free Pumpkin Enchiladas

The Method :: The Pumpkin Enchilada Filling

You’ll have to restrain yourself from sneaking spoonful after spoonful of this enchilada filling before you stuff your tortillas! The veggies cook down super sweet, not only giving the filling amazing flavor, but also packing out the meal with mineral rich veggies for the family! You can use whatever protein you wish! We purchase a half of a grass-fed cow each year, so I usually use our ground beef, but chicken or beans work great here too. Once the filling cooks, you will stir in some of the pumpkin enchilada sauce and some cheese, making a seriously addicting enchilada filling!

Gluten Free Pumpkin Enchiladas

The search for the best gluten free tortillas

If your household has to be gluten free, it is SO worth the little bit of time it takes to make your own tortillas with my new tortilla recipe! Most gluten free wraps that you get from the store are fussy to work with, and they are so expensive! You can make a batch of these tortillas up to a day in advance, and they will roll right up for you with the greatest of ease. You could also make them on a prep day and just stash them away in the freezer so that you can use them when you are ready.

Gluten Free Pumpkin Enchiladas

Feed a crowd!

I think this fun spin on a classic would be perfect to serve on Halloween night before trick-or-treating, or at any fall parties! The recipe as written feeds my family of 2 adults and 3 older kids for one meal with some leftover for one or 2 people the next day. If you have a smaller family or younger children, this will definitely feed you for 2 meals. If you are feeding a crowd, perhaps roll the tortillas tighter with less filling, or cut the tortillas in half so that the enchiladas themselves are smaller, party sized portions.

Gluten Free Pumpkin Enchiladas
Print Recipe
5 from 1 vote

Gluten Free Pumpkin Enchiladas

Ingredients

FOR THE PUMPKIN ENCHILADA SAUCE ::

FOR THE ENCHILADAS ::

  • 2 tbsp butter or olive oil for cooking in
  • ½ medium onion diced
  • 1 red bell pepper diced
  • ¼ head of cabbage sliced into strips
  • 1 lb grassfed ground beef
  • 1 cup frozen organic corn
  • 1 heaping handful of baby spinach chopped
  • 2 cups of cheese divided
  • 1 recipe of the above Pumpkin Enchilada Sauce
  • 8-10 tortillas of choice depending on the size of your tortillas (I use my own GF Tortillas, but store bought is fine too)

Instructions

Make the Pumpkin Enchilada Sauce:

  • Melt the butter in a large sauce pot over medium high heat and add the onion and pepper with 1 tsp of sea salt. Cook the veggies until soft and sweet, about 7 minutes.
  • Add the garlic, chili powder, cumin, and cinnamon and stir to combine, cooking for 1 minute.
  • Add the pumpkin, green chilis, and water, stir to combine and bring to a simmer for 3 minutes.
  • Turn the heat off and use an immersion blender or regular blender to blend the sauce until smooth. Sea salt and pepper the sauce to your taste.

Make the Enchilada Filling:

  • Melt the butter in a large skillet over medium high heat, and add the onion, pepper, and cabbage with a big pinch of sea salt. Cook over medium high heat for 10 minutes until the veggies are soft and sweet.
  • Add the ground beef and cook through until browned.
  • Add the corn and baby spinach and cook for 5 minutes over medium heat until the spinach wilts and the corn is soft.
  • Turn the heat off and stir in ½ cup or so of cheese, and 1 ½ cups of the Pumpkin Enchilada sauce.

Assemble and bake the Pumpkin Enchiladas:

  • Pre-heat the oven to 400 degrees.
  • Spread 1 cup of the Pumpkin Enchilada Sauce on the bottom of a 9×13 baking dish or casserole pan.
  • Scoop the pumpkin enchilada filling into your tortilla shells (I use my own GF Tortillas but store bought is fine too), roll them up, and line them up in the casserole pan. The amount of filling in the shells will depend on what the size of your tortillas are.
  • Once you have all of your enchilada tortillas filled and lined up, pour the remaining pumpkin enchilada sauce over the top of the rolled up tortillas and sprinkle with 1 – 1 ½ cups of cheese.
  • Cover the baking dish with foil and bake at 400 degrees for 20 minutes until the sauce and cheese are bubbling. You can put the pan under the broiler for a few minutes if you would like a pretty browned top.
Gluten Free Pumpkin Enchiladas

More real food recipes you might like ::

Batch Up Meals Dinner Ideas Healthy Kids and Teens Lunch Ideas Nourishing Staples Real Food 101 Real Food Tips

How To Make Gluten Free Flour Tortillas :: Gluten Free, Dairy Free, Nut Free, Egg Free, Soy Free

September 9, 2020

Easy to make, super soft, gluten free flour tortillas with only 5 ingredients!

How To Make Gluten Free Flour Tortillas :: Gluten Free, Dairy Free, Nut Free, Egg Free, Soy Free

Product links in this post are affiliate links. It does not cost you anything, and helps maintain the free information on this site, as well as answer the questions of “what brand do you use?” Please know I never personally recommend any product I wouldn’t use on my own family.

Sweet friends, and a special story…

(Preface :: I got permission from mom to share these girls’ important story and the picture below. Please be the amazing supportive community that my readers always are to this dear friend of mine with positive, uplifting comments.)

See the sweet girls with my crew in the picture below? We met this precious family during Caitlyn’s Young 5’s year at school, and you know those friendships that just click in place like they were always meant to be? Their momma is amazing, and our kids just go together like peanut butter and jelly. Earlier this summer, this family finally figured out what was making their 2 sweet little girls’ tummies ache so much, and experience so much digestive distress all the time from early toddlerhood…a new, VERY positive Celiac diagnosis. For both girls. Talk about life coming to a screeching hault in order to learn all things gluten free! I watched as this strong momma bear gutted her kitchen of all utensils, pots, seasonings, appliances, and foods that might have traces of gluten on them or in them, and then joined her for a shopping trip to fill her kitchen with safe food for her babies.

I have to admit, I was thinking this shopping trip would be super easy. I’ve been gluten free for…gosh, has it really been 15 years?! You’d think an old gluten free pro would be able to help a newly diagnosed celiac family grocery shop. What I found was that gluten free shopping when you have a gluten sensitivity is VERY different from gluten free shopping when you have an autoimmune Celiac disease. SO many packaged gluten free items are NOT made in dedicated gluten free facilities. For people that can’t even have a trace of gluten residue, that is a prescription for disaster. And there were a few times this summer that they found out just that – even foods that we thought were gluten free, definitely “glutened” these sweet girls, making them very sick. Anything that wasn’t labeled “made in a dedicated gluten free facility” was absolutely out of the question.

How To Make Gluten Free Flour Tortillas :: Gluten Free, Dairy Free, Nut Free, Egg Free, Soy Free

A Gluten Free Tortilla Challenge!

Over a decade ago during my new gluten sensitivity diagnosis, I tried my hand at some homemade gluten free tortillas, but honestly the abundance of store bought gluten free tortillas has sky rocketed as “gluten free” has become more popular, so I chalked up tortillas as one of those store bought conveniences that I would take advantage of. There is a variety of “gluten free” tortillas out there, but as I shopped with my friend, we found that there were NONE with healthy ingredients that were made in dedicated gluten free facilities. NOT ONE! This really frustrated me! It’d been a long while since I tried my hand at homemade tortillas, but I really wanted to create something that my friend could safely use for her girls. Gluten free flour blends have REALLY improved in the last 15 years, and I had a feeling Namaste would be a really good candidate to trial with tortilla making.

How To Make Gluten Free Flour Tortillas :: Gluten Free, Dairy Free, Nut Free, Egg Free, Soy Free

5 Ingredients?!?!

Just 5 ingredients?! YES, dear momma, because I want you to be able to make this weekly or bi-weekly, or monthly – whatever your prep day looks like. I don’t want you to dread it or put it off because it feels like a fussy project. I had that friend of mine in mind with 2 Celiac daughters who can’t just pop into the store and grab a quick bag of tortillas. She doesn’t have a choice, but she also has a life to live, kids to take care of, a house to run…and needs realistic kitchen projects so her girls can eat safely. The ingredients are affordable and accessible, and the method couldn’t be easier!

How To Make Gluten Free Flour Tortillas :: Gluten Free, Dairy Free, Nut Free, Egg Free, Soy Free

The Method :: The Dough

This super soft, pliable dough will blow you away! It is really forgiving, and rolls out easily. Whether you plan to use a rolling pin or a tortilla press, you’ll find the dough really easy to work with. Simply mix all of the dough ingredients in a mixing bowl. I start with my spatula, and then finish by kneading with my hands. When measuring the water, I wanted to mention that to make it easy, I fill a 2-cup Pyrex liquid measuring cup to exactly 3/4 cup mark, and then use a tablespoon to add the 2 tablespoons of extra water. If you don’t do this your dough will be tougher and drier. If you use a full cup of water, your dough will be too wet – trust me and do the exact measurement!

How To Make Gluten Free Flour Tortillas :: Gluten Free, Dairy Free, Nut Free, Egg Free, Soy Free

The Method :: Rolling Pin or Tortilla Press!

In my recipe card, I included both rolling pin and tortilla press methods. I borrowed a friend’s tortilla press so that I could test it out both ways. I do feel like I was able to get the tortillas a bit thinner using my rolling pin. I did 3 batches with the tortilla press, and found that I could get them thinner by rotating the pressed tortilla, and also making sure I pressed down for a good 5 seconds wait. I would LOVE to hear about tortilla presses that you love, and/or tortilla press techniques for a novice press user, so please comment below in the comments section! I’m still on the fence for purchasing one for myself! The rolling pin method is super easy, though I have to admit finding the right tortilla press could change my mind. You’ll want to work with parchment paper when rolling your dough out with either method because adding a floured surface will fuss with the texture of the tortilla. Roll the ball of dough in your hand, flatten it slightly on your counter or the tortilla press, and then either roll it out, or press it out! Get the tortilla dough as thin as you can, and then you are ready to cook. If you are rolling your dough out with a rolling pin, I love using my 8-inch soup pot lid to cut a perfect circle! You can toss the dough scraps back in with the dough to keep making more tortillas.

How To Make Gluten Free Flour Tortillas :: Gluten Free, Dairy Free, Nut Free, Egg Free, Soy Free
Pinch off a 2 1/2 inch ball of dough and roll it until smooth.
How To Make Gluten Free Flour Tortillas :: Gluten Free, Dairy Free, Nut Free, Egg Free, Soy Free
Lay a Silpat on the counter to keep your parchment from sliding. Slightly flatten the dough ball with your hand before your roll it out.
How To Make Gluten Free Flour Tortillas :: Gluten Free, Dairy Free, Nut Free, Egg Free, Soy Free
Place parchment over the top of the dough and roll out as thin as you can.
How To Make Gluten Free Flour Tortillas :: Gluten Free, Dairy Free, Nut Free, Egg Free, Soy Free
Use an 8-inch soup pot lid to cut a perfect circle!
How To Make Gluten Free Flour Tortillas :: Gluten Free, Dairy Free, Nut Free, Egg Free, Soy Free
Toss the scraps back in the bowl with the rest of the dough to roll out more tortillas!

The Method :: Cooking the Tortillas

The tortillas cook up so fast! Just a minute on each side over medium heat, and you’re done. It is important to use a dry pan! Don’t oil your pan at all! Keeping the tortillas soft and warm while you cook all of the tortillas is as easy using a tortilla keeper (so inexpensive!), or a simple plate covered with a towel. I have been able to make tortillas quick in the morning or afternoon when I have a minute, and they stay warm until dinner using a tortilla keeper.

How To Make Gluten Free Flour Tortillas :: Gluten Free, Dairy Free, Nut Free, Egg Free, Soy Free

Tortilla Storage

Use your fresh tortillas right out of your tortilla keeper or plate, warm and soft! Leftovers are best kept frozen to maintain moisture, softness, and pliability. What I have found is that you can toss the leftover tortillas into a freezer bag, and they don’t even stick together in the freezer bag! When you want to use a tortilla, simply take a frozen tortilla out and it will thaw within 20 minutes. You could warm in the oven or a pan too if you wish.

How To Make Gluten Free Flour Tortillas :: Gluten Free, Dairy Free, Nut Free, Egg Free, Soy Free

Ideas for using your tortillas!

Other than the obvious Taco Tuesday night (which is an absolute must!), the possibilities are endless for these tortillas! Here are some ideas!

  • Considering GF bread is really difficult to make, and super expensive to buy, using these tortillas as sandwich wraps, is probably the must functional use that I can think of. From tuna salad and chicken wraps, to ham and cheese and even PBJ, you can make any sandwich into a tortilla roll-up! You can find my “Kid-Approved Apple & Tuna Salad” and “Sweet & Sour Chicken Wrap” recipes in my cookbook, “The Little Lunchbox Cookbook!”
  • Quesadillas! There is a really great “Garden Party Quesadilla” recipe in my cookbook, “The Little Lunchbox Cookbook,” using a really yummy, simple bean spread and roasted veggies, or you can make your own up!
  • Pinwheels! Little kids love these, but I’m telling you right now, my 11-year old also adores pinwheels! They are so fun and easy to eat! You can try my egg salad pinwheels, or in my new lunchbox cookbook, “The Little Lunchbox Cookbook,” you can try my “Healthy Chicken Salad Pinwheels” or “Colorful Rainbow Pinwheels!”
  • Tortilla Chips! Check out my tortilla soup recipe and see how you can crisp your tortillas up to make chips for scooping and dipping!
  • Tortilla Pizza! Check this one out for a really easy Friday night pizza night!
How To Make Gluten Free Flour Tortillas :: Gluten Free, Dairy Free, Nut Free, Egg Free, Soy Free
Tuna Salad Wrap in a lunchbox!
How To Make Gluten Free Flour Tortillas :: Gluten Free, Dairy Free, Nut Free, Egg Free, Soy Free
Garden Party Quesadillas in a lunchbox! Recipe is in my cookbook, “The Little Lunchbox Cookbook

Ingredient swap thoughts

I am sure that other gluten free flour blends will work with this recipe, though different blends have different ratios of flours, so you may need to play around with the amount just a touch to get the right consistency if the flour absorbs differently than Namaste. For the most part, any GF Flour Blend that has xanthan gum should behave about the same (the gum gives that “gluten-y texture” to the tortilla. The palm shortening is important. Coconut oil or butter just won’t give the same outcome. I really would just stick to the palm shortening. You can find organic, sustainable palm shortening here.

How To Make Gluten Free Flour Tortillas :: Gluten Free, Dairy Free, Nut Free, Egg Free, Soy Free

Gluten Free Flour Tortillas

Ingredients

Instructions

  • Pre-heat a large skillet over medium heat while you mix the ingredients. Put all of the ingredients into a medium mixing bowl and use a spatula to combine. Once the dough comes together, knead the dough with your hands until it is all incorporated well. If you are in a very humid, wet environment, you may need to add a tablespoon or so more of flour if your dough feels too wet and sticky. I had to do this in the warmer, summer months.

ROLLING PIN METHOD ::

  • Lay a Silpat mat on the counter, and tear 2 pieces of parchment paper. Lay one piece of parchment down on the Silpat. (The Silpat will keep the parchment paper from sliding all over your counter while you roll!)
  • Pinch off a palm-sized, 2 ½ – 3 inch ball of dough, and roll the ball of dough in your hands until smooth.
  • Put the ball of dough on the parchment paper and flatten with your hand slightly. Place the second piece of parchment paper over the dough, and roll out as thin as you can get the dough, around 1/16th to 1/8th inches. Use an 7 or 8-inch pot lid to cut out a perfect tortilla circle!
  • Place the rolled-out tortilla circle in the hot skillet (do NOT oil the skillet!), and cook for 30 seconds to 1 minute on each side. You can roll out a second tortilla ball during this time if you want. Or you can roll all of the tortillas out first, and then cook. When the tortilla has finished cooking on both sides, place it in a tortilla keeper or on a plate with a towel covering the plate to keep the tortillas warm and soft.

TORTILLA PRESS METHOD ::

  • Tear 2 small pieces of parchment paper and lay one of them on the bottom of the tortilla press.
  • Pinch off a palm-sized, 2 inch ball of dough for an 8-inch tortilla press (if you have a larger tortilla press make your dough ball about 3 inches), and roll the ball of dough in your hands until smooth.
  • Put the ball of dough on the parchment paper that is on the tortilla press, and flatten with your hand slightly. Place the second piece of parchment paper over the dough, and use the tortilla press to press the tortilla down, holding for 5 seconds. Open the press, rotate the tortilla 90 degrees, and press again.
  • Place the pressed tortilla in the hot skillet (do NOT oil the skillet!), and cook for 30 seconds to 1 minute on each side. You can press a second tortilla ball during this time if you want. Or you can press all of the tortillas out first, and then cook. When the tortilla has finished cooking on both sides, place it in a tortilla keeper or on a plate with a towel covering the plate to keep the tortillas warm and soft.

STORAGE ::

  • Use your fresh tortillas right out of your tortilla keeper or plate, warm and soft! Leftovers are best kept frozen to maintain moisture, softness, and pliability. What I have found is that you can toss the tortillas into a freezer bag, and they don’t even stick together in the freezer bag! When you want to use a tortilla, simply take a frozen tortilla out and it will thaw within 20 minutes. You could warm in the oven or a pan too if you wish.
How To Make Gluten Free Flour Tortillas :: Gluten Free, Dairy Free, Nut Free, Egg Free, Soy Free

More real food recipes you might like ::

Dinner Ideas Healthy Kids and Teens Nourishing Staples Real Food 101 Real Food Tips

Skillet Stuffed Peppers :: An Easy, Healthy One Pan Dinner!

September 2, 2020

Skip the fussy prep and make skillet stuffed peppers with the most rich, delicious flavor, sure to make the whole family happy!

Skillet Stuffed Peppers :: An Easy, Healthy One Pan Dinner!

Product links in this post are affiliate links. It does not cost you anything, and helps maintain the free information on this site, as well as answer the questions of “what brand do you use?” Please know I never personally recommend any product I wouldn’t use on my own family.

Back to school and fall routines!

To say we were pumped for school to start this week is an understatement! This crew (and this momma!) thrive on routine, and while we absolutely enjoyed every ounce of our summer beach time over the last few months, the first day of school brought some of the biggest smiles I’ve seen in months! The promise of seeing favorite teachers and reuniting with friends was almost too much to handle!

Skillet Stuffed Peppers :: An Easy, Healthy One Pan Dinner!

Long school days call for easy, comforting skillet dinners!

Re-thinking stuffed peppers into an easy weeknight prep skillet was born on a particularly long remote schooling day this late spring. The kids were capital D.O.N.E. and this momma had literally forgotten every ounce of 5th grade math from her youth, so a comforting, easy dinner was in store for all! Instead of actually stuffing the peppers, this fast deconstructed version is weeknight friendly, and *oh so* satisfying!

Skillet Stuffed Peppers :: An Easy, Healthy One Pan Dinner!

One pan dinner – veggies included!

Because one pan was about all I had the time and energy for that day, I decided to stuff this stuffed pepper skillet with enough veggies to be able to say the whole thing was a full meal so that I didn’t have to make extra sides! Not only are the super sweet, kid friendly bell peppers scattered throughout, I also added a whole box of chopped baby spinach. The baby spinach wilts into the skillet meal, and the kids will never taste it. This is truly one of my secret weapons in getting greens into so many of my meals.

Skillet Stuffed Peppers :: An Easy, Healthy One Pan Dinner!

The method

The secret to the rich, savory sauce for this skillet dinner lies in getting a good caramelization of the onion and garlic, and then using the seasoning combination with the coconut aminos to flavor the beef. Once this important skillet work is done, all you have to do is dump in veggies, rice, marinara sauce, and broth, and sit back and let it cook until the rice is tender. Of course adding the cheese at the end and sliding the whole skillet under the broiler is what takes this dinner over the top!

Skillet Stuffed Peppers :: An Easy, Healthy One Pan Dinner!

Leftovers ideas

I’ve made these stuffed pepper skillets a hand-full of times during this summer, even though it screams fall and winter food! Every time I make it, the girls ask if I can put it in their thermoses for school lunches this fall. I’m a huge fan of “cook once eat twice,” so I’m all about that! The recipe as written makes a large skillet full, and my family of 5 usually has at least a couple of kid portions leftover for the next day. If you are a smaller family or have smaller kids, you’re sure to get 2 meals out of this!

Skillet Stuffed Peppers :: An Easy, Healthy One Pan Dinner!
Print Recipe
5 from 2 votes

Skillet Stuffed Peppers :: An Easy, Healthy One Pan Dinner!

Ingredients

  • 1 tbsp butter
  • 1 tbsp olive oil
  • 1 medium onion diced
  • 4 cloves of garlic minced
  • 1 lb grassfed ground beef
  • 1 tbsp Italian seasoning
  • 1 ½ – 2 tbsp coconut aminos this is like a soy sauce
  • 1 tsp sea salt
  • 1 tsp cumin
  • ½ tsp smoked paprika
  • 1 – 5oz box baby spinach chopped
  • 1 ½ large or 2 small/medium bell peppers large dice
  • 1 cup long grain white rice
  • 1 – 32 oz jar marinara sauce
  • 1 cup water or bone broth I do like to make about ¼ cup of this liquid a really dry red wine but that is completely optional. I think it makes the sauce even richer – totally up to you though!
  • 1 cup cheese of choice to top shredded

Instructions

  • Melt the butter and olive oil over medium high heat in a large, oven safe skillet (I use my 14-inch cast iron skillet. A dutch oven would work too). Add the onion and cook over medium high heat for 5 minutes until lightly golden and fragrant.
  • Add the garlic, cook for a minute, and then add the beef, Italian seasoning, coconut aminos, sea salt, cumin, and smoked paprika. Stir everything together, and cook until the beef is browned and cooked through.
  • Add the spinach and bell peppers, and stir to combine. Then add the rice, marinara, and water and stir until everything is combined well. Bring the skillet to a boil, and then reduce to a simmer with a lid on the pan until the rice is cooked through, about 20 minutes.
  • Once the rice is cooked through, turn the heat off and give the skillet stuffed peppers a stir, tasting for salt to your taste.
  • Turn the broiler on in your oven to “HI.” Top your skillet stuffed peppers with shredded cheese and place the skillet under the broiler for 2-5 minutes until the cheese is melted and golden to your liking. Every oven broiler runs differently, so check the cheese around 2-3 minutes in case yours runs hot. Mine takes about 5 minutes.

More real food recipes you might like ::

Skillet Stuffed Peppers :: An Easy, Healthy One Pan Dinner!
Batch Up Meals Condiments Dinner Ideas Healthy Kids and Teens Lunch Ideas Nourishing Staples Real Food 101 Real Food Tips school lunches

Summer Broccoli Salad

August 2, 2020

This light and fresh broccoli salad is perfect for hot summer days!

Summer Broccoli Salad

Product links in this post are affiliate links. It does not cost you anything, and helps maintain the free information on this site, as well as answer the questions of “what brand do you use?” Please know I never personally recommend any product I wouldn’t use on my own family.

Summer 2020…

It sure wasn’t what we thought it was going to be, eh? (See there’s that northern accent coming out in me!) While summer 2020 wasn’t what many of us dreamed it would be, we *did* decide to make the best of what we could actually do, and as it turns out, it was a pretty amazing summer! Hiking, waterfalls, cold and rocky Lake Superior shorelines, and hot powdery sand beaches along Lake Michigan…the outdoors wasn’t canceled and we were totally here for it!

Summer Broccoli Salad

A new summer staple!

I know we are inching our way toward the start of another school year, but there is still plenty of warm weather ahead, and I thought I’d share a new salad obsession of mine! I’ve perfected it this summer and I can’t wait to share it with you!

Summer Broccoli Salad

The busy momma kind of food prep…

My gracious has the last few months been a bit…extra…on us mommas! I made this salad up on a particularly busy week. I wanted to be able to pull a veggie side out of the fridge for myself without any prepping, and this salad has become a staple for me this summer! A shake up in the jar dressing and just 4 veggies to chop, this summer broccoli salad is something everyone has time for.

Summer Broccoli Salad

But will the kids eat it?!

Bonus! This broccoli has been a big hit with the kids as well! The super fun colors, and kid friendly dressing makes this broccoli salad easy on young taste buds. I can see packing this broccoli salad in school lunchboxes as veggie side this fall! I would recommend chopping the salad pieces quite small if you plan on your kids eating it. If the pieces of veggie are too big, it will make it harder to manage for kids. So as much as I love a big strip of onion in my salad, diced will work better for littles. And that extra chop of the broccoli and cabbage will make it easier for kids to eat.

Summer Broccoli Salad

The Method :: The Salad

Just chop and toss – it really is that simple! You can add or subtract veg based on your preferences. I have added sunflower seeds before, and even a hard boiled egg to my bowl.

Summer Broccoli Salad

The Method :: The Honey Mustard Dressing

I use a small 8 ounce jelly jar to measure and shake up my dressing. It is so fast and at this point in the summer I have it memorized because the ingredients are so simple! The dressing is sweet and tangy – perfect for everyone on the family. And instead of the heavier creamy broccoli salad dressings we are all used to (nothing wrong with those!), this light and crisp dressing is perfect for hot summer days.

Summer Broccoli Salad

Storage and serving

The broccoli salad is ready to eat as soon as it is tossed, and it keeps so well for about 5 days. This makes a great prep day item so that you can ensure that you have some veggie side to go with your lunch or dinner every day. I love that this salad doesn’t get soggy even with the dressing on it! If you prefer, you could just add the dressing when you are ready to eat it. The dressing will keep in the fridge for weeks.

Summer Broccoli Salad

Summer Broccoli Salad

Ingredients

FOR THE BROCCOLI SALAD

  • 4-5 cups of chopped broccoli florets
  • ¼ head of cabbage sliced into strips
  • 1 large carrot shredded
  • ¼ red onion sliced into strips (or diced if you like smaller pieces)
  • ½ cup manchego cheese Or whatever cheese you have on hand. You can leave this out if you are dairy free!

FOR THE HONEY MUSTARD VINEGARETTE

  • 3-4 tbsp raw honey
  • 3 tbsp olive oil
  • 3 tbsp Dijon mustard
  • 1 – 2 tbsp apple cider vinegar I liked more bite of vinegar, but my younger girls ate this happier with 1 tbsp
  • ½ tsp garlic powder
  • ¼ tsp sea salt to taste
  • Pepper to taste

Instructions

  • Put all of the broccoli salad ingredients in a medium mixing bowl.
  • Put all of the dressing ingredients into a jar with a lid and shake vigorously to combine. You could use an immersion blender if you wish. Pour the dressing over the salad and toss. Start with ½ of the dressing and add more to your liking. It really depends on how much dressing you like on your salad. I use the whole jar most of the time. Any leftovers taste great on any salad you make and will keep in the fridge for weeks.
  • This broccoli salad will keep in the fridge for about 5 days. Make some on the weekend and use it as your weekday lunch veggie each day!

More real food recipes you might like ::

Dinner Ideas Healthy Kids and Teens Nourishing Staples Real Food 101 Real Food Tips

30 Minute Sheet Pan BBQ Chicken Thighs and Roasted Veggies :: 1 Dinner on 2 Sheet Pans!

March 18, 2020

Busy week? This 30 minute BBQ chicken thighs and roasted veggie dinner is a full meal on 2 sheet pans!

30 Minute Sheet Pan BBQ Chicken Thighs and Roasted Veggies :: 1 Dinner on 2 Sheet Pans!

Product links in this post are affiliate links. It does not cost you anything, and helps maintain the free information on this site, as well as answer the questions of “what brand do you use?” Please know I never personally recommend any product I wouldn’t use on my own family.

So close we can smell it!

You know that feeling when you take a hike and you can just smell spring in the air?! When the kids get warm enough to pull jackets off after hiking and climbing trees for hours? There is just nothing like the feeling of making it through another Michigan winter season. It has thawed out a bit early this year, and I am totally here for it!

30 Minute Sheet Pan BBQ Chicken Thighs and Roasted Veggies :: 1 Dinner on 2 Sheet Pans!

Quick dinners & more outside time

Sheet pan meals are my go-to for busy days that I am not at home much. Everything for one meal on a couple of sheet pans? Sign. Me. Up. If you pop to the bottom of the recipe in this post, you’ll see just how many sheet pan meals are on the blog, and why I love them so much. And one of my sheet pan goals is always to make sure that everything can go in at the same time and cook at the same temp – I’ve got you covered on the prep time and simplicity, dear momma!

30 Minute Sheet Pan BBQ Chicken Thighs and Roasted Veggies :: 1 Dinner on 2 Sheet Pans!

The method :: The Sheet Pan BBQ Chicken Thighs

The chicken thighs can be prepped in less than 10 minutes *AND* can be prepped in the dry rub ahead of time – even up to 24 hours ahead of time. This means you can prep the meat the night before if you plan to be gone all day, or if you have nappers at home, you can get the chicken ready while babies are sleeping so that when dinner time arrives (aka “the witching hour” for those of you with babies!), all you have to do is toss the meat and veg onto the sheet pans and bake them off while you tend to the kids. Simply whisk the dry rub ingredients into a large dish, toss in the chicken thighs, and you can bake them off from there, or you can wrap the dish up and put it into the fridge until you are ready to bake them for dinner.

30 Minute Sheet Pan BBQ Chicken Thighs and Roasted Veggies :: 1 Dinner on 2 Sheet Pans!

The Method :: The Sheet Pan Roasted Veggies

This is about as easy as it gets – just chop, toss, and roast. You could chop the carrots and broccoli ahead of time, but you’ll want to do the potatoes right before you put them into the oven, or they will brown with air if you chop them too far in advance. The roasted veggies cook right alongside the sheet pan chicken thighs, and everything is done at the same time. The veggies can also be swapped out for whatever is in season or on sale. Once spring hits, you can swap the broccoli for asparagus! In the summer, take advantage of all that great farmer’s market produce! And in the fall, swap the potatoes for sweet potatoes or squash! You can serve everything as is, or add a pile of buttered rice if the kids need a little extra.

30 Minute Sheet Pan BBQ Chicken Thighs and Roasted Veggies :: 1 Dinner on 2 Sheet Pans!

How spicy is the rub?

This rub is really mild – perfect for kids. If you love extra heat, I would very highly recommend swapping the sweet paprika for another tablespoon of smoked paprika – that is my favorite way to eat this chicken, and I often make a separate batch of extra heat chicken thighs just for me! I love the leftovers sliced over a salad for lunch the next day.

30 Minute Sheet Pan BBQ Chicken Thighs and Roasted Veggies :: 1 Dinner on 2 Sheet Pans!

Chicken thigh sourcing

If you are lucky enough to grab thighs from a local farmer that keeps their chickens on pasture, that is always going to be the best bet! But, I also am not against the organic chicken thighs I’ve been able to find at Costco. It is a great price point, and it is so nice to have in the freezer for those times when I need a really quick meal for my family, and it will always be 1000% better than choosing take-out for dinner.

30 Minute Sheet Pan BBQ Chicken Thighs and Roasted Veggies :: 1 Dinner on 2 Sheet Pans!

30 Minute Sheet Pan BBQ Chicken Thighs and Roasted Veggies :: 1 Dinner on 2 Sheet Pans!

Ingredients

For the Sheet Pan BBQ Chicken

For the Sheet Pan Roasted Veggies

Instructions

  • Pre-heat the oven to 425 degrees and line a sheet pan with Silpat or unbleached parchment paper. You will need a second sheet pan for the veggies but you won’t need to line the second sheet pan.
  • Whisk the seasonings for the BBQ chicken in a large dish and set aside. Use a paper towel to pat dry your chicken thighs, and then place them into the dish with the BBQ rub. Mix the chicken thighs with the seasoning blend, coating each thigh completely. (You can do this hours or up to a day in advance, wrapping the dish up with plastic wrap and letting it marinate in the refrigerator.)
  • Place the BBQ rub coated chicken thighs on the Silpat or unbleached parchment paper lined baking sheet and set aside.
  • Toss the veggies with the olive oil, sea salt, and all purpose season on the second sheet pan, until coated evenly.
  • Bake both sheet pans in a 425 degree oven for 30 minutes. If you cut your potatoes too large, that sheet pan might need an extra 10 minutes – be sure to make your potato cubes around ½ – ¾ of an inch.
30 Minute Sheet Pan BBQ Chicken Thighs and Roasted Veggies :: 1 Dinner on 2 Sheet Pans!

More real food SHEET PAN DINNERS you might like!

Dinner Ideas Healthy Kids and Teens Nourishing Staples Real Food 101 Real Food Tips

Gluten Free Asian Stir Fry with Crispy Fish

February 24, 2020

Just like Asian take-out without the soy and gluten, this light, crispy coated white fish with fresh veggies has a gooey Asian stir fry sauce the kids will love!

Gluten Free Asian Stir Fry with Crispy Fish

Product links in this post are affiliate links. It does not cost you anything, and helps maintain the free information on this site, as well as answer the questions of “what brand do you use?” Please know I never personally recommend any product I wouldn’t use on my own family.

A tween take-out inquiry (and some Michigan winter love!)

Ah, these tween years are interesting, eh?! My oldest asked what “chinese take-out” was the other day, as her friends were gushing over something they had for dinner the other night. Hormonal girls and savory, salty, sweet, indulgent take-out! Sounds about right, yes?! I’m all for that umami goodness too, and during our school’s mid-winter break, I decided to show my sweet tween just what her friends meant by those to-die-for flavors. We mimicked that take-out with flying colors! We headed out for a mid-winter break hike and came home to take-out…real food style!

Gluten Free Asian Stir Fry with Crispy Fish

Having our cake and eating it too…

I’ll take any excuse I can to get brain nourishing wild caught fish into my kids. Truth be told, because we started them eating it so young, they would be happy clams if we fed them plan skillet cooked fish on the daily! It’s fun to change things up though, and instead of using chicken or beef for this take-out copycat, I pulled out some omega 3 rich wild caught Mahi-Mahi. Super delicious take-out style dinner, and super healthy? Talk about having our cake and eating it too!

Gluten Free Asian Stir Fry with Crispy Fish

Method :: The Fish

You’ll start your stir fry by preparing the fish. You truly could use whatever protein you have on hand from chicken to any fish. I’d stick with a firm fish like Mahi or salmon – cod is really delicate and might fall apart with the batter and cooking. This fish batter is a wet batter, and it doesn’t get any simpler. Just mix it up in a medium bowl and toss with the cubed fish. You can set the fish aside while you prepare the sauce and the veggies for the rest of the meal – once those are done the rest of the meal comes together super fast!

Gluten Free Asian Stir Fry with Crispy Fish

Method :: The Sauce

I think one of the reasons I love Chinese cuisine so much is because their approach to sauces is so right up my alley – toss everything into a sauce pan, whisk it up, and done. No fuss or crazy extra steps! For this sauce, you’ll whisk the ingredients and simmer a few minutes to thicken it up. You can make it ahead of time on a prep day too!

Gluten Free Asian Stir Fry with Crispy Fish

Method :: How to Cook The Crispy Fish

Coconut oil is the name of the game here, but you can use any high heat oil you like. I love the sweetness that the coconut oil gives the crispy batter, though my favorite high heat cooking fat is a good grassfed tallow or lard. Ghee works fantastic as well and has such a good flavor. Butter is going to burn too easily, and while I love a stir fry done in a good olive oil, to crisp this fish up, that delicate olive oil is going to burn a bit and get a funky taste. To cook the fish, simply heat the oil super hot and cook the fish in a couple batches until crispy. Use a wire rack or paper towel after cooking so the crispy fish doesn’t get soggy.

Gluten Free Asian Stir Fry with Crispy Fish

Method :: The Stir Fry

Once these simple sauce and fish part of the meal is set (and it truly doesn’t take more that 15 minutes!), then you are ready to assemble the stir fry. This part goes fast! Just stir your chopped veggies into some cooking fat and cook until bite tender and then toss with the crispy fish and stir fry sauce.

Gluten Free Asian Stir Fry with Crispy Fish

Serving options

This part is up to you! You can go the traditional route with white or brown rice, or even some gluten free ramen (try cooking your rice or ramen in bone broth to soak in extra nutrients, and be sure to add a generous pat of real butter to the rice!). Or you can eat it straight from the bowl sans the rice.

Gluten Free Asian Stir Fry with Crispy Fish
Print Recipe
5 from 1 vote

Gluten Free Asian Stir Fry with Crispy Fish

Ingredients

FOR THE FISH BREADING BATTER:

FOR THE STIR FRY SAUCE:

  • ½ cup water or bone broth
  • 2 tbsp coconut aminos
  • 1 tbsp white wine vinegar
  • 1 tbsp raw honey you can bump this up if you need more on the sweet side
  • 1 clove of garlic minced
  • ½ inch knob of ginger minced (or about 1/2 tsp ground ginger)
  • ¼ – ½ tsp red pepper flakes more if you like more heat
  • 1 tbsp tapioca starch

FOR THE STIR FRY:

  • 1-2 tbsp ghee for cooking in or butter, olive oil, coconut oil
  • ½ medium onion sliced into strips
  • 1 medium bell pepper sliced into strips
  • 3-4 oz mushrooms sliced
  • 4 cups frozen green beans thawed

Instructions

MAKE THE BATTER AND MARINATE THE FISH:

  • Mix the starch, flour, baking powder, coconut aminos, and olive oil in a small mixing bowl. Toss the cubed fish in the batter, coating each piece, and set aside while you prepare the sauce.

MAKE THE STIR FRY SAUCE:

  • Whisk all of the sauce ingredients in a small sauce pan thoroughly until the starch dissolves. Put the sauce pan over high heat, and simmer until the sauce thickens, just a few minutes. Set the sauce aside until the stir fry is ready.

COOK THE FISH:

  • Heat your wok or large skillet over high heat, adding the coconut oil to get nice and hot. Cook the battered fish in 2 batches, flipping the fish to crisp each side until golden brown. This will take a couple minutes for each side. When you take the first batch out, set the crispy fish on a wire rack or paper towel so the fish doesn’t get soggy.

MAKE THE STIR FRY:

  • Heat your wok or large skillet over medium high heat and melt a tablespoon of ghee. Add the onion, bell pepper, and mushrooms and cook over medium high heat for 5 minutes until crisp tender. Add the thawed green beans, crispy fish, and the stir fry sauce, combine and simmer for 1-2 minutes.
  • You can serve your crispy fish stir fry over white rice, GF ramen, or just eat it from the bowl!
Gluten Free Asian Stir Fry with Crispy Fish

More real food recipes you might like ::

Batch Up Meals Dinner Ideas Healthy Kids and Teens Instant Pot Real Food 101 Real Food Tips school lunches Soup

Instant Pot White Chicken Chili

February 11, 2020

Fast and easy prep white chicken chili with a smooth, creamy texture, and out of this world flavor!

Easy Instant Pot White Chicken Chili

Product links in this post are affiliate links. It does not cost you anything, and helps maintain the free information on this site, as well as answer the questions of “what brand do you use?” Please know I never personally recommend any product I wouldn’t use on my own family.

Winter hikes & (kid friendly!) warm chili

I’ve learned that if I just don’t get out in it, I become a big grump by February my friends. So we pull on the winter gear and trudge through the snow, no matter how deep it is. Every weekend. Some winters we can barely tolerate 20 minutes the cold is so bitter and the snow is so deep. Other winters, like this year, we are left wondering if this really is still Michigan or not with the mild(er) temps and small dusting of snow! No matter the winter, a warm bowl of chili is always a good idea during the darkest months of the year!

Easy Instant Pot White Chicken Chili

An old recipe made (so!) much easier!

White chicken chili has been one of my favorite slow cooker recipes for years. The creamy broth base is super kid friendly, and my version is not only packed with chicken, but boasts a load of veggie variety that contributes to it’s amazing flavor. With busy schedules that come with the territory of having older kids and not as much time at home, I was finding that I wasn’t making my favorite white chicken chili as much because it did feel a bit time consuming!

Easy Instant Pot White Chicken Chili

Enter the Instant Pot, and an easy peasy secret to the creamy broth!

When I wrote that recipe, oh so many years ago, the Instant Pot was not even a thought! Since my trusty IP has become my go-to for our favorite regular chili, I decided it was time to give my favorite white chicken chili a face lift – Instant Pot style! And since I don’t always have time to make the cream of chicken soup for the creamy base, a little coconut milk and potato starch did the trick so well!

Easy Instant Pot White Chicken Chili

Dump it all in!

Other than a quick little saute to pull some flavor and sweetness out of the veggies in the beginning, this recipe is a dump and go! *Cue the busy mom applause!* The beauty of the Instant Pot is quick cook times and flavorful, juicy meat outcomes, and this recipe does not disappoint. Simply put all of the ingredients into the IP after sauting the veggies, place the raw chicken breasts on top, and when the Instant Pot is done pressure cooking, you’ll have easy to shred chicken to stir into your chili!

Easy Instant Pot White Chicken Chili

A note on the heat (and to bean or not to bean!)

This recipe is mild in heat and very kid friendly. I left the jalapeno as optional in case your kids are sensitive to heat. I use just one jalapeno in mine, and while I’d love a bit more heat to my bowl, I want my kids to inhale the chili too! I tend to add a hit of cayenne or chili flakes to my bowl to heat it up. One of my tricks to “cooling down” a bowl of chili for little ones is to be sure you top the chili with sour cream. The cool, fatty dairy cuts the heat well. You can use coconut yogurt or coconut milk if you are dairy free. This recipe as written does not contain beans, but if you want to add some white beans, you may!

Easy Instant Pot White Chicken Chili

Storage and school thermoses!

This white chicken chili freezes really well! I love that this hearty chili can be packed in school thermoses on a cold winter day! They play so hard outside at recess! You can pack a side of cheese or sour cream to add on top in the thermos too. To freeze the chili, cool the chili to room temperature, and store in freezer safe containers.

Easy Instant Pot White Chicken Chili

Easy Instant Pot White Chicken Chili

Ingredients

  • 3 tbsp ghee to cook in butter, coconut oil, olive oil, or tallow/lard work too
  • 1 medium onion diced
  • 1 red bell pepper diced
  • 1 yellow bell pepper diced
  • 1-2 small jalapenos optional if you like the heat
  • 5 cloves of garlic minced
  • 2 tbsp potato starch Not potato flour. Tapioca or arrowroot would work here too
  • 2 tsp taco season I use my own DIY blend
  • 2 to matillos diced
  • 2 small zucchinis large dice
  • 1 – 4oz can green chilis
  • 1 cup bone broth
  • 1 cup full fat coconut milk
  • 3 medium boneless skinless chicken breasts 1 lb
  • Sea salt/pepper to taste
  • Cilantro, lime wedges, and avocado slices per preference to garnish (optional shredded raw cheese or sour cream if you tolerate that)

Instructions

  • Turn the Instant Pot on to “saute” and melt the ghee. Saute the onion and bell peppers with a pinch of sea salt for about 5-7 minutes until fragrant and soft. Add the garlic and cook for 1 minute.
  • Turn the Instant Pot “off,” and stir in the taco season and potato starch until the veggies are coated. Stir in the tomatillos, zucchini, broth, and coconut milk, and then set the chicken breasts in the liquid.
  • Put the lid on the Instant Pot, and close the valve. Turn the IP on to “Soup,” and bring the time down to 20 minutes. The IP will take about 5 minutes to come to pressure before counting down the 15 minutes. When the 15 minute timer is up, turn the IP off and let it naturally release for 5-10 minutes before releasing the rest of the valve pressure.
  • Take the chicken breasts out of the IP, shred them with a fork, and then return the shredded chicken to the IP, stirring the chicken into the chili. Season the chili to your taste and garnish each bowl with cilantro, lime, and avocado slices per your preference.
Easy Instant Pot White Chicken Chili

More real food INSTANT POT recipes you might like ::

Dinner Ideas Healthy Kids and Teens Real Food 101 Real Food Tips

Mongolian Beef and Veggies :: Soy Free, Gluten Free, and Naturally Sweetened!

January 22, 2020

Enjoy Mongolian beef stir fry, loaded with veggies and without the soy, gluten, and processed sugar!

Mongolian Beef and Veggies :: Soy Free, Gluten Free, and Naturally Sweetened!

A little walk down memory lane…

So I was driving in Grand Rapids not to long ago, near a spot that I haven’t been by in a very long time. I noticed that a restaurant that my now husband and I used to go to as a very rare, broke college kid date night, and was so sad to see it gone! Mongolian Bar-B-Que…locals do you remember it?! I know, I know, it is probably the furthest thing from traditional or authentic Mongolian meals, but the all you can eat, make your own stir fry bowls to two starving college kids in love was seriously heaven. I remember thinking it was *the* best food in the world. Pretty much anything tastes amazing when you don’t know how to cook and are just starting out, eh?!

Mongolian Beef and Veggies :: Soy Free, Gluten Free, and Naturally Sweetened!

A little Mongolian re-make!

My girls were in the van as we drove by, and I told them about our memories there. I decided to try to re-make what I remembered being my favorite flavors there, and this Mongolian beef was born. I was probably so starved of nutrients back then, because I remember craving that beef stir fry like it was air!

Mongolian Beef and Veggies :: Soy Free, Gluten Free, and Naturally Sweetened!

The brown sugar dilemma

Most Mongolian beef recipes that you find use brown sugar as the main sweetener for the sauce. While I’m all about using (organic) sugar in moderation with baking and special times, I want to be able to have Mongolian beef on my menu rotation way more frequently than that! Did you know that brown sugar is just sugar and molasses mixed together?! Yep, whenever I need brown sugar for a cookie recipe, it’s just 1 cup of sugar to 1 tablespoon of molasses and you’ve got that warm sweetness in seconds! In the Mongolian beef sauce recipe here, I chose to use real honey and molasses, and the result is out of this world! You’ll never miss the processed sugar!

Mongolian Beef and Veggies :: Soy Free, Gluten Free, and Naturally Sweetened!

Let’s talk about the starches

I absolutely love using potato starch for anything that I want to get crispy. I use it to dredge the steak in this recipe because it works so well to give the texture you want in a Mongolian beef stir fry. Corn starch, tapioca, or arrowroot will work, but I just really love the result with potato starch. I use tapioca in the sauce recipe, because I prefer how that thickens sauces. The potato starch would work here as well, but again, I just prefer the texture result with the tapioca.

Mongolian Beef and Veggies :: Soy Free, Gluten Free, and Naturally Sweetened!

Heat preferences

If you have little ones at home, be sure to stick to more of the “pinch” of red pepper flakes versus going all out on the ½ tsp. While I love me some heat, some little kids aren’t quite there yet! I do have one that loves some heat, but because of one of my other girls, I tend to keep any heat to minimum. You can add a pinch or two of cayenne or red pepper flakes your individual plate if you would like some extra heat.

Mongolian Beef and Veggies :: Soy Free, Gluten Free, and Naturally Sweetened!

Serving ideas!

We are definitely team white rice here, but there are so many other options for serving your Mongolian beef! If you prefer brown rice go for it! If you are in a season of needing to avoid grains, I adore this sauce, beef, and veggie combo on top of a baked potato or sweet potato. It is fantastic just plain as well. You can beef up the veggies a bit more by adding shredded cabbage (my favorite), or more of the veggies already listed.

Mongolian Beef and Veggies :: Soy Free, Gluten Free, and Naturally Sweetened!

Mongolian Beef and Veggies :: Soy Free, Gluten Free, and Naturally Sweetened!

Author: Renee Kohley – Raising Generation Nourished

Ingredients

FOR THE SAUCE:

  • ½ cup coconut aminos
  • 4 cloves of garlic minced
  • 2 tbsp raw honey
  • 3 tsp molasses
  • 2 tsp tapioca starch
  • 1 tsp ground ginger
  • Pinch to ½ tsp red pepper flakes depending on your heat prefrence

FOR THE STIR FRY:

  • 4 tbsp ghee for cooking in, divided (butter, olive oil, tallow/lard, or avocado oil would work too)
  • 1 lb grassfed skirt/flank steak or round steak cut into thin strips
  • 2 tbsp potato starch
  • 1 small onion cut into strips
  • 1 red bell pepper cut into strips
  • 1 yellow bell pepper cut into strips
  • 1 head of broccoli florets cut into bite sized pieces
  • 1 handful sugar peas
  • 1 recipe of the above sauce

Instructions

  • Whisk the sauce ingredients together in a bowl, and set aside for later.
  • Put 2 tablespoons of ghee in a large skillet over medium-high heat. While your skillet warms up, pat dry your strips of steak and then toss them with 2 tablespoons of potato starch. Place the coated steak into the hot ghee and cook until browned and almost crispy. This takes about 5 minutes. Take the steak out of the pan and set aside for later.
  • In the same skillet, warm another 2 tablespoons of ghee over medium heat, and add the onion, peppers, broccoli, and sugar peas from above. Cook the veggies over medium heat for a few minutes, until bright in color and still bite tender.
  • Add the cooked beef and the sauce into the skillet with the veggies, and simmer until the sauce thickens and the veggies are cooked to your liking, about 5 minutes or so. The sauce is plenty seasoned, but you can season to your taste if you wish.

More real food recipes you might like!