Fermented Vegetables - Kimchi Style! :: With Serving Ideas & Tips For Feeding It To Kids Too!
Ingredients
- 1 small/medium head of cabbge
- 4 green onions
- 2 leeks
- 1 sweet bell pepper
- 1 daikon radish
- 2 medium carrots
- 1-2 inch knob of ginger
- 4-5 cloves of garlic
- 2 tbsp sea salt
- 2-3 tbsp dried red pepper flakes depending on your heat prefrence
Instructions
- Thinly slice the cabbage, green onions (whites & greens), leeks, and sweet bell peppers. Also halve the sweet bell pepper strips so they are more bite-sized. Add them to a large mixing bowl.
- Shred the daikon radish, carrots, ginger, and garlic, and add them to the large mixing bowl with the other veggies. I like to use the shredding attachment on my food processor.
- Sprinkle the 2 tablespoons of sea salt over the veggies and give them a thorough mix so everything is coated in sea salt. Let the veggies soften in the sea salt for 1-2 hours. This will pull the liquid out of the veggies to make the brine.
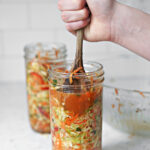
- Once the veggies have sat in the sea salt for an hour or so, stir in the red pepper flakes, and pack the kimchi mixture into mason jars. I usually use 2 - 24 ounce mason jars. There will be juices in the bottom of the bowl from the veggies releasing their liquid - pour this into the jars too! Use a wooden spoon to really pack the veggies down and you will start to see the juices rise above the top. This is the brine that will pickle your veggies. Pack the veggies in until you have about 1-inch headspace at the top of the jar. You'll want to make sure the brine is covering the veggies, or use a glass pickling pebble to weight the veggies down into the brine.
- Once your brine is coving the veggies, you can put your pickle pebble inside the jar, and cover the jar with a lid or a fermenting top. I cover my jars with my Pickle Pipes for fermenting, but a regular lid is fine too. If you use a regular lid, you'll want to "burp" your jars daily by opening the lid to let the gasses escape, and then put the lid back on.
- Let your kimchi ferment on the counter for at least 3 days, or up to a week depending on the taste you like, as well as how fast your kimchi ferments. In the middle of winter here in Michigan, it definitely takes more like a 5-7 days to get the fermentation we like since it is so cold here. In the summer, a good 3-4 days is all that is needed. You can taste your kimchi on that 3rd day to determine if you want ferment longer.
- Once your kimchi has fermented to your liking, transfer it to the refrigerator in an airtight container. Your kimchi will be good in the refrigerator for 3-6 months.
Notes
- If you prefer your kimchi with larger pieces, simply chop the veggies larger and skip the shredder.
- If you want to help your little ones enjoy kimchi, the smaller, shredded pieces will be easier to manage for eating. You can also just spoon the kimchi juices over their food or let them take a bite of the juices off a spoon.
- You can back off on the heat, or completely leave it out if you don't want it spicy, or want to try it with little kids. When my girls were younger I used to make the veggie/salt mixture, and make a separate jar just for the girls with just a teaspoon of the red pepper flakes. That way I could still make a jar for myself with the full heat. My oldest now enjoys the full heat of kimchi - that comes with time!
- Play around with the veggie ratios to your taste! I happen to adore daikon, so a lot of times I'll do half daikon and half cabbage for the base.
- Shredded apple is another fun addition that can bring a flavor to the kimchi that kids enjoy.